296 lines
17 KiB
Markdown
296 lines
17 KiB
Markdown
|
|
# Testing notes and ZIP for release 10.0.0
|
||
|
|
|
||
|
|
Zip file for testing: [woocommerce-gutenberg-products-block.zip](https://github.com/woocommerce/woocommerce-blocks/files/11190253/woocommerce-gutenberg-products-block.zip)
|
||
|
|
|
||
|
|
## WooCommerce Core
|
||
|
|
|
||
|
|
### Prevent error when entering postcode for countries without specific validation rules [(8987)](https://github.com/woocommerce/woocommerce-blocks/pull/8987)
|
||
|
|
|
||
|
|
1. Ensure the shipping calculator is enabled on the Cart block.
|
||
|
|
2. Add an item to your cart and go to the Cart block.
|
||
|
|
3. Use the shipping calculator to enter an address, choose Albania as your country. Ensure you can enter a postcode with no errors.
|
||
|
|
4. Add an item to your cart and go to the Checkout block. Ensure there are no errors on the shipping fields.
|
||
|
|
5. Enter Afghanistan as your shipping country. Ensure the form does not error.
|
||
|
|
6. Enter any value into the postcode field, ensure you can type it in without any issues.
|
||
|
|
7. Place the order and verify it works.
|
||
|
|
|
||
|
|
### Stop displaying decimals in Filter by Price ([8975](https://github.com/woocommerce/woocommerce-blocks/pull/8975))
|
||
|
|
|
||
|
|
1. Edit Product Catalog template in Editor
|
||
|
|
2. Add Filter by Price and Products block
|
||
|
|
3. Save
|
||
|
|
4. **Expected:** Filter by Price displays ONLY whole numbers, skipping decimals in both Editor and Frontend
|
||
|
|
5. **Expected:** Smoke test the inputs and sliders - check that input and slider values are synchronized
|
||
|
|
6. Change Filter by Price "PRICE RANGE SELECTOR" setting from "Editable" to "Text" and repeat the above
|
||
|
|
7. Verify that other prices (e.g. in Products block) display full price with decimals. Remember the number of decimals may depend on the currency, but for the majority of currencies, you should see two minor units, e.g. $19.99.
|
||
|
|
|
||
|
|
### No shipping: Convert error notice to warning notice ([8969](https://github.com/woocommerce/woocommerce-blocks/pull/8969))
|
||
|
|
|
||
|
|
1. WooCommerce > Settings > Shipping
|
||
|
|
2. Create a shipping zone for the UK with flat rate
|
||
|
|
3. Remove all rates from "everywhere else"
|
||
|
|
4. Go to checkout and enter a non-UK address
|
||
|
|
5. See the notice in the shipping options section
|
||
|
|
|
||
|
|
### Checkout Block: Avoid using editor buttons in the post content to prevent inheriting global styles ([8957](https://github.com/woocommerce/woocommerce-blocks/pull/8957))
|
||
|
|
|
||
|
|
#### Express payments
|
||
|
|
|
||
|
|
1. With no express payment methods setup
|
||
|
|
2. Edit the checkout page
|
||
|
|
5. You should not see an express payment method placeholder at the top of the checkout
|
||
|
|
6. Enable an express payment method such as Stripe
|
||
|
|
7. Edit the checkout page. You should see the express payment block now
|
||
|
|
|
||
|
|
#### Payment methods
|
||
|
|
|
||
|
|
1. With some payment methods setup e.g. BACS
|
||
|
|
2. Edit the checkout page
|
||
|
|
3. Confirm payment method block displays normally
|
||
|
|
4. Go to WooCommerce > Settings > Payments
|
||
|
|
5. Disable all payment methods
|
||
|
|
6. Edit the checkout page
|
||
|
|
7. Confirm a notice is shown in place of the block
|
||
|
|
8. Click on the notice.
|
||
|
|
9. Open the block inspector
|
||
|
|
10. See the notice telling you to configure payment methods
|
||
|
|
|
||
|
|
#### Terms and conditions
|
||
|
|
|
||
|
|
1. Ensure your Privacy Policy and Terms and conditions pages are published. If you don't have either of these pages, create them, and ensure they are published. (It is not important what is in the content of the pages, they can be blank.)
|
||
|
|
2. Go to Settings > privacy and unset the privacy page
|
||
|
|
3. Go to WooCommerce > Settings > Advanced and ensure a terms page has been configured
|
||
|
|
4. Edit the checkout page
|
||
|
|
5. Focus on the terms and conditions block
|
||
|
|
6. Open the block inspector. See the notice telling you to configure pages.
|
||
|
|
7. Go to Settings > privacy and set the privacy page to a valid published page
|
||
|
|
8. Edit the checkout page
|
||
|
|
9. Focus on the terms and conditions block
|
||
|
|
10. There should be no notice if both pages are configured
|
||
|
|
11. Edit the block content and remove one of the links to either the privacy page or the terms page
|
||
|
|
12. The inspector should show a notice to restore default content
|
||
|
|
|
||
|
|
### Remove isExperimentalBuild Checks in Classic Template Block ([8902](https://github.com/woocommerce/woocommerce-blocks/pull/8902))
|
||
|
|
|
||
|
|
#### Prerequisites
|
||
|
|
|
||
|
|
WordPress: >=6.1
|
||
|
|
Make sure `Single Product` template customizations are reset to the default state:
|
||
|
|
|
||
|
|
1. Go to (`/wp-admin/site-editor.php?postType=wp_template`)
|
||
|
|
2. Click three dots next to the template and click `Clear customizations`
|
||
|
|
|
||
|
|
#### Steps
|
||
|
|
|
||
|
|
1. Enter the `Single Product` template.
|
||
|
|
2. Check that the placeholder description says "This block serves as a placeholder for your WooCommerce Single Product Block. We recommend upgrading to the Single Products block for more features to edit your products visually. Don't worry, you can always revert back.".
|
||
|
|
3. Click the `Upgrade to Blockified Single Product Template` button.
|
||
|
|
4. See new templates work in the Site Editor and on the front end.
|
||
|
|
5. Ensure there are no side-effects to this change and everything functions as-expected.
|
||
|
|
|
||
|
|
### Product Image Gallery: Prevent image placeholder from going outside its wrapper ([8901](https://github.com/woocommerce/woocommerce-blocks/pull/8901))
|
||
|
|
|
||
|
|
1. Log in to your WordPress dashboard;
|
||
|
|
2. Go to Appearance > Themes, and select a block theme (for example: Twenty-twenty three);
|
||
|
|
3. Go to Appearance > Site Editor (Beta);
|
||
|
|
4. Go to Templates > Single Product;
|
||
|
|
5. Click the Edit button;
|
||
|
|
6. Click on the "+" icon to add a new block and search for "Product Image Gallery" block in the search bar;
|
||
|
|
7. Click on the "Product Image Gallery" block, and add it to the editor;
|
||
|
|
8. Resize the window and make sure that the placeholder image adjusts itself to the block wrapping it
|
||
|
|
|
||
|
|
### Set Cart and Checkout blocks to be wide aligned by default ([8899](https://github.com/woocommerce/woocommerce-blocks/pull/8899))
|
||
|
|
|
||
|
|
1. Activate the Twenty Twenty-Three theme
|
||
|
|
2. Create a new page and insert the Cart block.
|
||
|
|
3. Ensure it renders in a two-column layout, with the cart items on the left and the order totals on the right.
|
||
|
|
4. Select the Cart block (you may need to do this from the block list, because you might select inner blocks) and change the alignment to "none".
|
||
|
|
5. Ensure this changes the layout to a single column.
|
||
|
|
6. Save the page, go to the front-end and add a product to your Cart.
|
||
|
|
7. View the page you just saved on the front-end. Ensure the alignment is set correctly and you see the correct width.
|
||
|
|
8. Go back to the page editor and delete the Cart block. Repeat these steps for the Checkout block.
|
||
|
|
|
||
|
|
### Add "Collection from..." in Checkout sidebar when selecting local pickup ([8305](https://github.com/woocommerce/woocommerce-blocks/pull/8305))
|
||
|
|
|
||
|
|
1. Enable the built-in local pickup method (WooCommerce -> Settings -> Shipping -> Local pickup) and add two locations. Please ensure you set a different address for both of these locations.
|
||
|
|
2. Enable some different regular shipping methods (flat rate, free) for your zone too.
|
||
|
|
3. Add at least two items to your cart and go to the Checkout page.
|
||
|
|
4. For the `Shipping Method` option, select "Shipping"
|
||
|
|
5. Fill in your address and ensure the rates you set up in step 2 are shown. Select one.
|
||
|
|
6. In the Checkout sidebar, ensure you see the correct rate, and your entered address.
|
||
|
|
7. Return to the `Shipping Method` option, select "Local pickup"
|
||
|
|
8. Check the sidebar and ensure the sidebar shows local pickup, and shows the address for the pickup location you have chosen.
|
||
|
|
9. Change the location and ensure the sidebar updates.
|
||
|
|
|
||
|
|
### Product Rating: Normalize the height of icons and the add revew link ([8399](https://github.com/woocommerce/woocommerce-blocks/pull/8399))
|
||
|
|
|
||
|
|
1. Add a new page and the **Products** block.
|
||
|
|
2. Add the **Product Rating** block.
|
||
|
|
3. Make sure you have a product that doesn't have any ratings and one that does have at least one.
|
||
|
|
4. Notice that now the product element below the Rating displays _in line_.
|
||
|
|
|
||
|
|
### Add additionalCartCheckoutInnerBlockTypes filter to enable additional blocks in the Cart/Checkout blocks. ([8650](https://github.com/woocommerce/woocommerce-blocks/pull/8650))
|
||
|
|
|
||
|
|
1. Add the Cart block to a page in the editor. Click into a few inner blocks and ensure the 'core/paragraph', 'core/image', 'core/separator' blocks are available for each.
|
||
|
|
2. Repeat for the Checkout block.
|
||
|
|
3. Ensure the Cart and Checkout blocks work correctly on the front end by placing an order.
|
||
|
|
|
||
|
|
### Feature Branch: Updated Shopper Notices ([8659](https://github.com/woocommerce/woocommerce-blocks/pull/8659))
|
||
|
|
|
||
|
|
These test cases show how to trigger the new notices during certain activities.
|
||
|
|
|
||
|
|
#### Multiple packages notice
|
||
|
|
|
||
|
|
1. Enable “Multiple Packages for WooCommerce” extension.
|
||
|
|
2. Go to WooCommerce > Settings > Multiple packages
|
||
|
|
3. Select "group by" product, then save changes.
|
||
|
|
4. Add several items to your cart.
|
||
|
|
5. Go to the cart page and choose “local pickup”
|
||
|
|
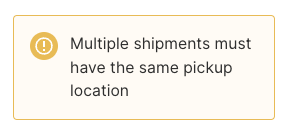
6. See the “Multiple shipments must have the same pickup location” notice
|
||
|
|
|
||
|
|
|
||
|
|
|
||
|
|
#### No Shipping Options
|
||
|
|
|
||
|
|
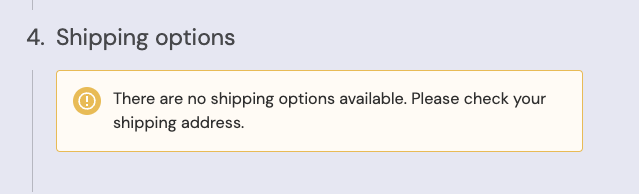
1. Turn off multiple packages and disable all shipping rates
|
||
|
|
2. Go to checkout
|
||
|
|
3. See “There are no shipping options available. Please check your shipping address.” In the shipping options section.
|
||
|
|
|
||
|
|
|
||
|
|
|
||
|
|
#### No Payment Methods and top level errors
|
||
|
|
|
||
|
|
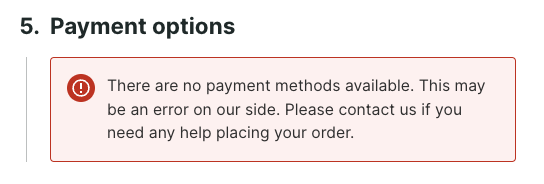
1. Go to payment settings
|
||
|
|
2. Toggle off all payment methods
|
||
|
|
3. Go to checkout
|
||
|
|
4. See payment options section for the notice.
|
||
|
|
5. Try to place an order
|
||
|
|
6. See notice at the head of the checkout
|
||
|
|
|
||
|
|
|
||
|
|

|
||
|
|
|
||
|
|
|
||
|
|
#### Coupon form snackbars
|
||
|
|
|
||
|
|
1. Go to the cart page
|
||
|
|
2. Apply a valid coupon. See snackbar. Snackbar should vanish on its own after 10000ms.
|
||
|
|
3. Remove the coupon. See snackbar. Snackbar should vanish on its own after 10000ms.
|
||
|
|
|
||
|
|

|
||
|
|

|
||
|
|
|
||
|
|
### Add Product Reviews block ([8857](https://github.com/woocommerce/woocommerce-blocks/pull/8857))
|
||
|
|
|
||
|
|
1. Have a product with at least one review.
|
||
|
|
2. Go to Appearance > Editor > Single Product Template.
|
||
|
|
3. Make sure the “Product Reviews” block appears in the inserter and add it.
|
||
|
|
4. Make sure a placeholder appears in the editor and save.
|
||
|
|
5. Go to the front end and make sure that the reviews are correctly shown.
|
||
|
|
|
||
|
|
### Fix duplicated Shipping method Block on the front-end ([8861](https://github.com/woocommerce/woocommerce-blocks/pull/8861))
|
||
|
|
|
||
|
|
1. Go to `WooCommerce -> Settings -> Shipping -> Local pickup`. Enable Local Pickup
|
||
|
|
2. Add a Pickup location under `Pickup locations -> Add pickup location`, and click on `Save changes`
|
||
|
|
3. Add a product to the cart.
|
||
|
|
4. Go to the Checkout Block page. Ensure you have a non-duplicated "Shipping method" section
|
||
|
|
<img width="400" alt="image" src="https://user-images.githubusercontent.com/14235870/227878457-515b1981-093d-411a-81e4-c8b22748b43f.png">
|
||
|
|
5. Edit the default description of the "Shipping method" Block in the editor. Ensure it contains a special character (e.g., `., !`)
|
||
|
|
6. Go to the Checkout Block page. Ensure you still have a non-duplicated "Shipping method" section
|
||
|
|
|
||
|
|
<img width="400" alt="image" src="https://user-images.githubusercontent.com/14235870/227878739-6b56c5e7-0cd0-4003-ad1a-6030c8e61408.png">
|
||
|
|
|
||
|
|
### Show Cart and Checkout blocks in Style Book ([8888](https://github.com/woocommerce/woocommerce-blocks/pull/8888))
|
||
|
|
|
||
|
|
1. Ensure that a block theme is installed, e.g. [TT3](https://wordpress.org/themes/twentytwentythree/) and install [Gutenberg v15.1.0](https://github.com/WordPress/gutenberg/releases/download/v15.1.0/gutenberg.zip)
|
||
|
|
2. Go to `WP Admin » Appearance » Editor`.
|
||
|
|
3. Select a template (e.g. Templates > Single Product) then click the blue `Edit` button and then click the `Styles` icon in the upper-right corner.
|
||
|
|
<img width="273" alt="Screenshot 2023-02-21 at 13 23 00" src="https://user-images.githubusercontent.com/3323310/220263914-44b7013d-c98a-4008-b3ab-a00330d73d22.png">
|
||
|
|
4. Click on the the `Open Style Book` icon (the one that looks like an eye)
|
||
|
|
<img width="282" alt="Screenshot 2023-02-21 at 13 23 24" src="https://user-images.githubusercontent.com/3323310/220263978-e0f6e679-a3b4-43be-93a0-c8521b9dea9a.png">
|
||
|
|
5. Verify that both the Cart and the Checkout blocks are visible.
|
||
|
|
|
||
|
|
Kindly note that the Cart and the Checkout blocks will not appear in the blocks sidebar, as they do not support Global Styles yet:
|
||
|
|
<img width="279" alt="Screenshot 2023-02-21 at 13 24 58" src="https://user-images.githubusercontent.com/3323310/220264263-3ce8a9f2-8302-4b0c-9e3b-6851453ca573.png">
|
||
|
|
|
||
|
|
#### Testing previews
|
||
|
|
|
||
|
|
Ensure gutenberg plugin is active.
|
||
|
|
|
||
|
|
1. Create a new page
|
||
|
|
2. Click the plus (top left) to open the block inserter
|
||
|
|
3. Find the cart/checkout blocks. Hover over them to see the preview.
|
||
|
|
4. Preview should render—no crashing of the editor.
|
||
|
|
|
||
|
|
|
||
|
|
|
||
|
|
## Feature Plugin
|
||
|
|
|
||
|
|
### Product SKU: Adds support for color, typography, and spacing ([8913](https://github.com/woocommerce/woocommerce-blocks/pull/8913))
|
||
|
|
|
||
|
|
#### Test using blocks sidebar
|
||
|
|
|
||
|
|
1. Create a new page or post
|
||
|
|
2. Add the "Products" block to your post.
|
||
|
|
3. Add Product SKU block as an inner block if not included already
|
||
|
|
4. Select the Product SKU block and open the block settings in the right sidebar.
|
||
|
|
5. Customize the block using the new styling options available:
|
||
|
|
- Change the text color, background color, font family, font size, font appearance, line height, letter spacing, text decoration, letter case, margin, and padding under the appropriate settings sections.
|
||
|
|
6. Verify that the styling changes are immediately visible and applied correctly within the editor itself.
|
||
|
|
7. Save the post, then view it on the front-end to ensure the styling changes are visible and applied correctly.
|
||
|
|
|
||
|
|
#### Test using Global Styles
|
||
|
|
|
||
|
|
1. Open the Global Styles sidebar by clicking the "Styles" button at the top right corner of the editor.
|
||
|
|
|
||
|
|
[Video link](https://user-images.githubusercontent.com/16707866/228781997-24a9a29f-4be7-46d4-b1b3-41520692d86d.mov)
|
||
|
|
|
||
|
|
2. In the Global Styles sidebar, locate the "Product SKU" block.
|
||
|
|
3. Customize the block using the new styling options available under the "Product SKU" block in the Global Styles sidebar:
|
||
|
|
- Change the text color, background color, font family, font size, font appearance, line height, letter spacing, text decoration, letter case, margin, and padding under the appropriate settings sections.
|
||
|
|
4. Verify that these applied correctly within editor & on frontend:
|
||
|
|
- Create a new post
|
||
|
|
- Add Products block
|
||
|
|
- Add Product SKU block as an inner block if not included already
|
||
|
|
- Check the Product SKU block in both the editor and on the front-end to ensure that the changes made through the Global styles UI are accurately applied:
|
||
|
|
- In the editor, inspect Product SKU block & ensure it matches the values set in the Global styles UI.
|
||
|
|
- Save the post & publish it. On frontend, inspect Product SKU block & ensure it matches the values set in the Global styles UI.
|
||
|
|
|
||
|
|
**Also, verify the changes in All Products block, which also uses Product SKU block.**
|
||
|
|
|
||
|
|
### Product Price: support for background color, line height, font family, letter spacing, and padding ([8906](https://github.com/woocommerce/woocommerce-blocks/pull/8906))
|
||
|
|
|
||
|
|
#### Test using blocks sidebar
|
||
|
|
|
||
|
|
1. Create a new page or post
|
||
|
|
2. Add the "Products" block to your post.
|
||
|
|
3. Select the Product Price block and open the block settings in the right sidebar.
|
||
|
|
4. Customize the block using the new styling options available:
|
||
|
|
- Change the background color under the "Color" settings.
|
||
|
|
- Adjust the line height, font family, and letter spacing under the "Typography" settings.
|
||
|
|
- Modify the padding under the "Dimensions" settings.
|
||
|
|
5. Verify that the styling changes are immediately visible and applied correctly within the editor itself.
|
||
|
|
6. Save the post, then view it on the front-end to ensure the styling changes are visible and applied correctly.
|
||
|
|
|
||
|
|
#### Test using blocks sidebar
|
||
|
|
|
||
|
|
1. Open the Global Styles sidebar by clicking the "Styles" button at the top right corner of the editor.
|
||
|
|
|
||
|
|
[Video link](https://user-images.githubusercontent.com/16707866/228781997-24a9a29f-4be7-46d4-b1b3-41520692d86d.mov)
|
||
|
|
|
||
|
|
2. In the Global Styles sidebar, locate the "Product Price" block.
|
||
|
|
3. Customize the block using the new styling options available under the "Product Price" block in the Global Styles sidebar:
|
||
|
|
- Change the background color under the "Colors" settings.
|
||
|
|
- Adjust the line height, font family, and letter spacing under the "Typography" settings.
|
||
|
|
- Modify the padding under the "Layout" settings.
|
||
|
|
4. Verify that these applied correctly within editor & on frontend:
|
||
|
|
1. Create a new post
|
||
|
|
2. Add Products block
|
||
|
|
3. Add Product Price block as an inner block if not included already
|
||
|
|
4. Check the Product Price block in both the editor and on the front-end to ensure that the changes made through the Global styles UI are accurately applied:
|
||
|
|
- In the editor, inspect Product Price block & ensure it matches the value set in the Global styles UI.
|
||
|
|
- Save the post & publish it. On frontend, inspect Product Price block & ensure it matches the value set in the Global styles UI.
|
||
|
|
|
||
|
|
**Also, verify these in `all products` block, which also uses Product Price block.**
|
||
|
|
|