69 lines
4.5 KiB
Markdown
69 lines
4.5 KiB
Markdown
|
|
# Webhooks
|
|||
|
|
|
|||
|
|
> ⚠️ **Notice:** This documentation is currently a **work in progress**. Please be aware that some sections might be incomplete or subject to change. We appreciate your patience and welcome any contributions!
|
|||
|
|
|
|||
|
|
> **Note**: We are unable to provide support for customizations under our **[Support Policy](http://www.woocommerce.com/support-policy)**. If you need to further customize a snippet, or extend its functionality, we highly recommend [**Codeable**](https://codeable.io/?ref=z4Hnp), or a [**Certified WooExpert**](https://woocommerce.com/experts/).
|
|||
|
|
|
|||
|
|
## [What are Webhooks?](https://github.com/woocommerce/woocommerce/blob/trunk/docs/webhooks#what-are-webhooks)
|
|||
|
|
|
|||
|
|
A [Webhook](http://en.wikipedia.org/wiki/Webhook) is an event notification sent to a URL of your choice. Users can configure them to trigger events on one site to invoke behavior on another.
|
|||
|
|
|
|||
|
|
Webhooks are useful for integrating with third-party services and other external API that support them.
|
|||
|
|
|
|||
|
|
## [Webhooks in WooCommerce](https://github.com/woocommerce/woocommerce/blob/trunk/docs/webhooks#webhooks-in-woocommerce)
|
|||
|
|
|
|||
|
|
Webhooks were introduced in WooCommerce 2.2 and can trigger events each time you add, edit or delete orders, products, coupons or customers.
|
|||
|
|
|
|||
|
|
It’s also possible to use webhooks with WooCommerce actions, e.g., Create a webhook to be used every time a product is added to the shopping cart, using the action `woocommerce_add_to_cart`.
|
|||
|
|
|
|||
|
|
Webhooks also make it easier for third-party apps to integrate with WooCommerce.
|
|||
|
|
|
|||
|
|
## [Creating webhooks](https://github.com/woocommerce/woocommerce/blob/trunk/docs/webhooks#creating-webhooks)
|
|||
|
|
|
|||
|
|

|
|||
|
|
|
|||
|
|
To create a new webhook:
|
|||
|
|
|
|||
|
|
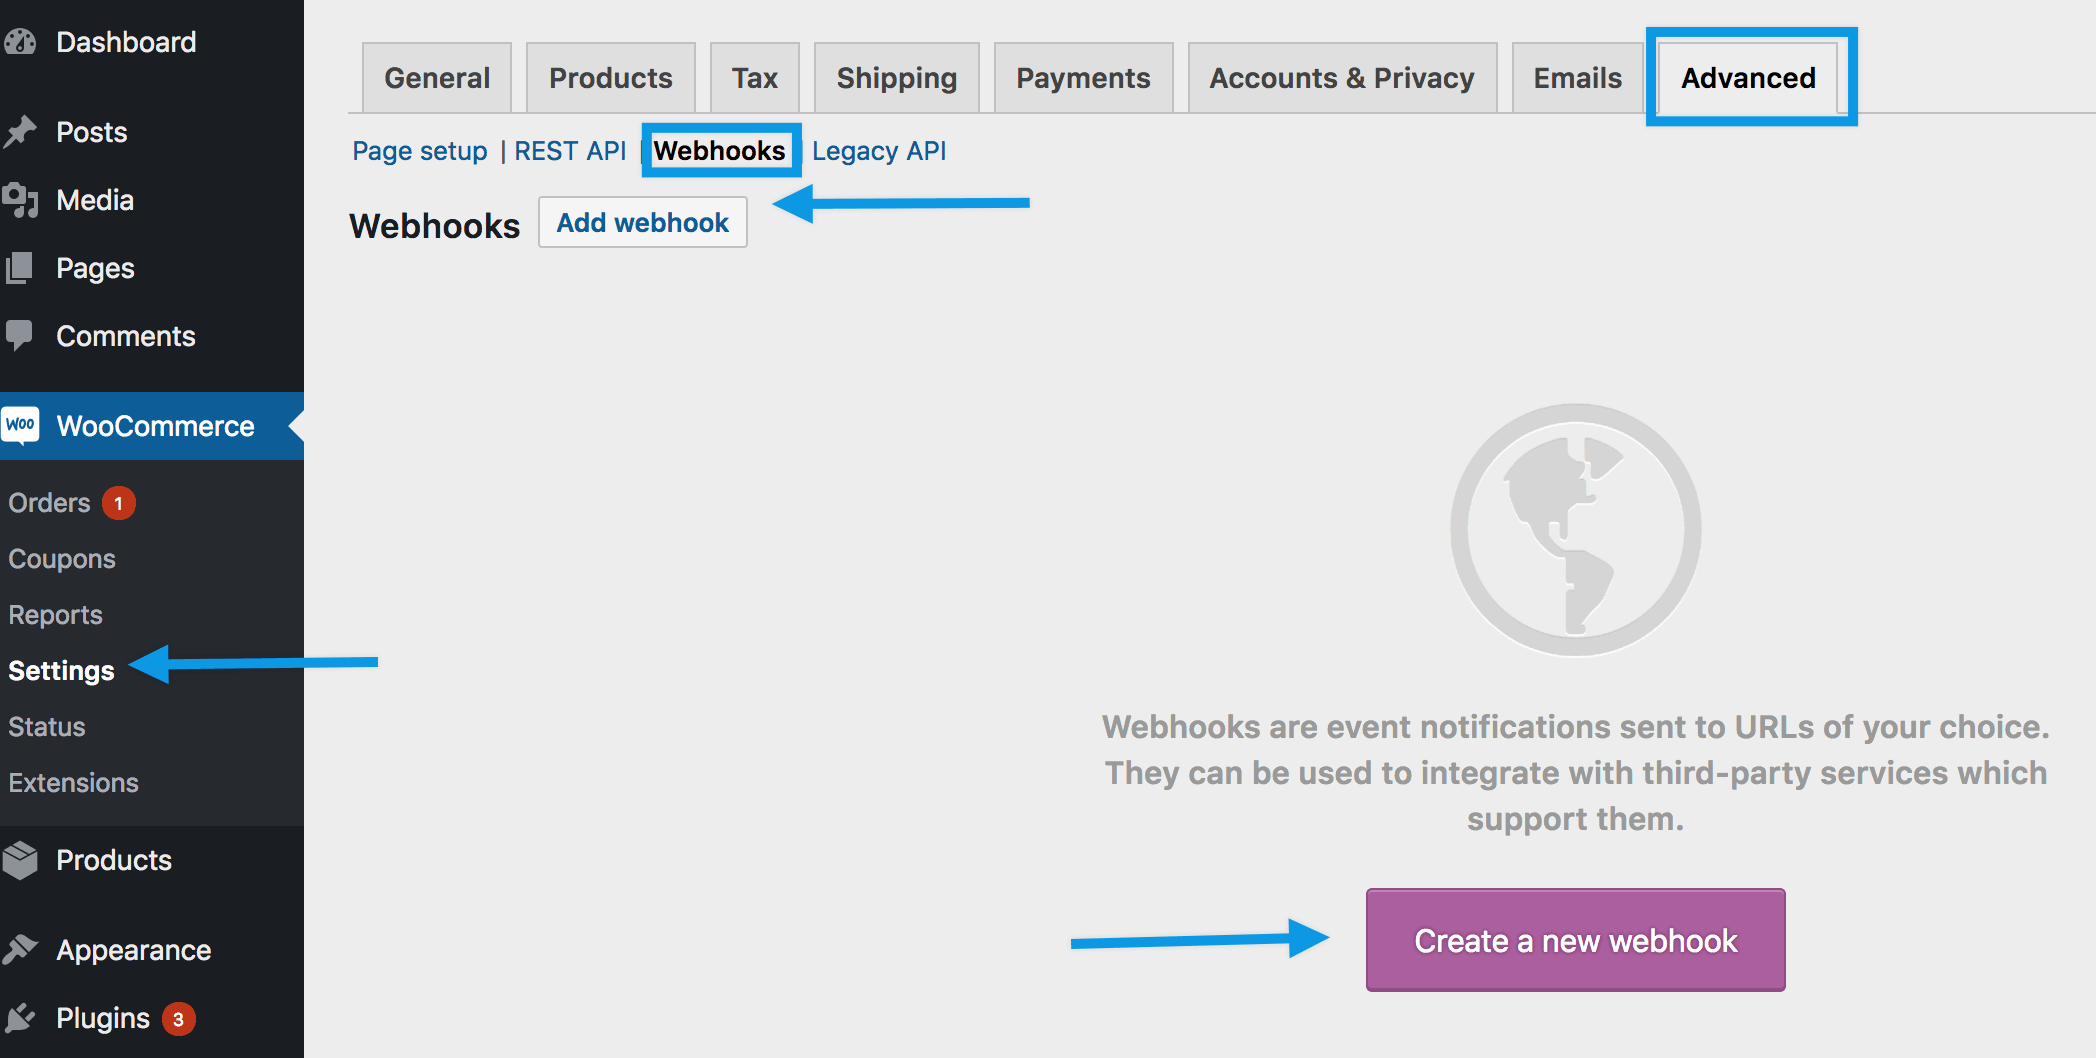
1/ **Go to**: **WooCommerce > Settings > Advanced > Webhooks**.
|
|||
|
|
> **Note:** Webhooks were formerly found under WooCommerce > Settings > API prior to WooCommerce 3.4.
|
|||
|
|
|
|||
|
|
2/ Select **Create a new webhook** (first incident) or **Add webhook**. The **Webhook Data** box appears.
|
|||
|
|
|
|||
|
|

|
|||
|
|
|
|||
|
|
3/ **Enter**.
|
|||
|
|
|
|||
|
|
- **Name**: The **name** is auto-generated as “Webhook created on [date and time of creation]” as a standard to facilitate creation. Change the name to something else.
|
|||
|
|
- **Status**: Set to **Active** (delivers payload), **Paused** (does not deliver), or **Disabled** (does not deliver due delivery failures).
|
|||
|
|
- **Topic**: Indicate when the webhook should be triggered – **Order Created**, **Product Deleted**, or **Customer Updated**. There are also **Action** and **Custom** options.
|
|||
|
|
- **Action Event**: This option is available when the Topic is a WooCommerce **Action**, such as `woocommerce_add_to_cart` for when customers add products to the shopping cart.
|
|||
|
|
- **Custom Topic**: This option is for **advanced users only**. It’s possible to introduce new, customized topics with the help of `woocommerce_webhook_topic_hooks` filter.
|
|||
|
|
- **Delivery URL**: URL where the webhook payload is delivered.
|
|||
|
|
- **Secret**: The Secret Key generates a hash of the delivered webhook and is provided in the request headers. This defaults to the current API user’s consumer secret, if nothing is entered.
|
|||
|
|
|
|||
|
|
4/ **Save Webhook**.
|
|||
|
|
|
|||
|
|
> **Note**: The first time your webhook is saved with the Activated status, it sends a ping to the Delivery URL.
|
|||
|
|
|
|||
|
|
Webhooks are disabled after 5 retries by default if the delivery URL returns an unsuccessful status such as `404` or `5xx`. Successful responses are `2xx`, `301` or `302`.
|
|||
|
|
|
|||
|
|
To increase the number of retries, you can use the `woocommerce_max_webhook_delivery_failures` filter function.
|
|||
|
|
|
|||
|
|
## [Editing and deleting webhooks](https://github.com/woocommerce/woocommerce/blob/trunk/docs/webhooks#editing-and-deleting-webhooks)
|
|||
|
|
|
|||
|
|
Webhooks are listed the same way as posts or products.
|
|||
|
|
|
|||
|
|
1. Find the webhook you wish to alter.
|
|||
|
|
2. Hover over the name, and **Edit** and **Delete permanently** options appear.
|
|||
|
|
3. **Delete**, or make **Edits** and **Save changes**. Bulk deletion is also possible with the dropdown.
|
|||
|
|
|
|||
|
|

|
|||
|
|
|
|||
|
|
## [Webhook logs](https://github.com/woocommerce/woocommerce/blob/trunk/docs/webhooks#webhook-logs)
|
|||
|
|
|
|||
|
|
WooCommerce saves logs of all events triggering a webhook. Webhook logs are found at: **WooCommerce > Status > Logs**.
|
|||
|
|
|
|||
|
|

|
|||
|
|
|
|||
|
|
Logs may be reviewed to see delivery and response from the server, making it simpler to integrate and debug.
|