307 lines
19 KiB
Markdown
307 lines
19 KiB
Markdown
|
|
# Testing notes and ZIP for release 9.8.0
|
|||
|
|
|
|||
|
|
Zip file for testing: [woocommerce-gutenberg-products-block.zip](https://github.com/woocommerce/woocommerce-blocks/files/10966635/woocommerce-gutenberg-products-block.zip)
|
|||
|
|
|
|||
|
|
## WooCommerce Core
|
|||
|
|
|
|||
|
|
### Cart and Checkout blocks
|
|||
|
|
|
|||
|
|
#### Add filter to change proceed to checkout button text and URL [#8613](https://github.com/woocommerce/woocommerce-blocks/pull/8613)
|
|||
|
|
|
|||
|
|
1. Add items to your cart, go to the Cart block and ensure the button to proceed to checkout works and looks normal.
|
|||
|
|
|
|||
|
|
#### Fix / Return associative array for woocommerce_order_get_tax_location filter [#8681](https://github.com/woocommerce/woocommerce-blocks/pull/8681)
|
|||
|
|
|
|||
|
|
1. Enable taxes, and create multiple shipping methods
|
|||
|
|
2. Add an item to cart and proceed to checkout
|
|||
|
|
3. Change between shipping methods and verify no errors are displayed, and the correct taxes are applied to the order.
|
|||
|
|
|
|||
|
|
#### Add LocalPickupSelect component [#8634](https://github.com/woocommerce/woocommerce-blocks/pull/8634)
|
|||
|
|
|
|||
|
|
1. Go to WooCommerce -> Settings -> Shipping -> Local Pickup and activate Local Pickup. Ensure you have added a couple of locations.
|
|||
|
|
2. Add an item to your cart and go to the Checkout block.
|
|||
|
|
3. Select Local Pickup and ensure the options you set up in step 1 are visible.
|
|||
|
|
|
|||
|
|
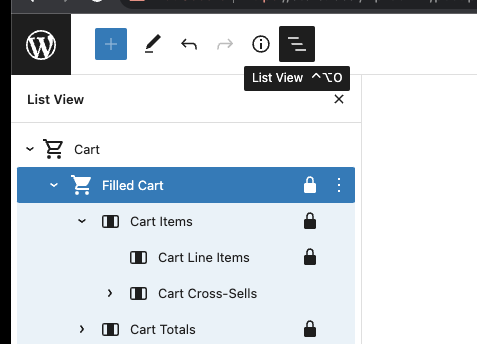
#### Allow view switcher to toggle view when using Gutenberg list view [#8429](https://github.com/woocommerce/woocommerce-blocks/pull/8429)
|
|||
|
|
|
|||
|
|
1. Edit the Cart Block page
|
|||
|
|
2. Toggle the view between empty cart/filled cart using the switcher - focus on the block to see the toggle.
|
|||
|
|
3. Open list view:
|
|||
|
|
|
|||
|
|
|
|||
|
|
|
|||
|
|
4. Click on "empty cart" in the list view. The view should change.
|
|||
|
|
5. Click back to "filled cart" in the list view. The view should change.
|
|||
|
|
6. Select a child of empty cart. Again, the view should change.
|
|||
|
|
|
|||
|
|
#### Revert "Show Cart and Checkout blocks in Style Book" [#8602](https://github.com/woocommerce/woocommerce-blocks/pull/8602)
|
|||
|
|
|
|||
|
|
1. Create a new page or post and open the [block inserter](https://wordpress.org/documentation/article/adding-a-new-block/).
|
|||
|
|
2. Hover over the Cart and Checkout blocks.
|
|||
|
|
3. Verify that the editor no longer freezes.
|
|||
|
|
|
|||
|
|
#### Add Debounce to Shipping Calculation selection [#8498](https://github.com/woocommerce/woocommerce-blocks/pull/8498)
|
|||
|
|
|
|||
|
|
1. Add the Cart block to a page and make sure you have at least two shipping options added and the shipping calculator enabled
|
|||
|
|
2. Add products to the cart and go to the Cart block
|
|||
|
|
3. Quickly click through all the shipping options multiple times
|
|||
|
|
4. Expect the total to change only after the final selection is made.
|
|||
|
|
|
|||
|
|
#### Ignore shipping address from server when updating shipping methods [#8718](https://github.com/woocommerce/woocommerce-blocks/pull/8718)
|
|||
|
|
|
|||
|
|
1. In the Checkout page with the Checkout block, fill out your shipping address. Wait a few moments for it to persist to server.
|
|||
|
|
2. Clear the first name field. There will be a validation error.
|
|||
|
|
3. Select a different shipping method.
|
|||
|
|
4. When the totals are updated, confirm the first name field is still empty.
|
|||
|
|
|
|||
|
|
### Mini Cart block
|
|||
|
|
|
|||
|
|
#### Remove wc-blocks-registry from Mini Cart block dependencies so more scripts can be lazy-loaded [#8657](https://github.com/woocommerce/woocommerce-blocks/pull/8657)
|
|||
|
|
|
|||
|
|
1. Install [Page Optimize](https://wordpress.org/plugins/page-optimize/) and [Product Bundles](https://woocommerce.com/products/product-bundles/).
|
|||
|
|
2. Enable a block theme, like [TT3](https://github.com/WordPress/twentytwentythree/).
|
|||
|
|
3. Go to Appearance > Editor and add the Mini Cart block to the store header.
|
|||
|
|
4. Save the changes.
|
|||
|
|
5. In the frontend, click on the Mini Cart. The drawer should open and show the "empty cart" message.
|
|||
|
|
6. Go to the shop page and add a product to your cart.
|
|||
|
|
7. Click on the Mini Cart. The drawer should open and show the product you just added.
|
|||
|
|
8. Disable the plugins to installed in step 1.
|
|||
|
|
|
|||
|
|
#### Remove wc-settings from Mini Cart block dependencies [#8703](https://github.com/woocommerce/woocommerce-blocks/pull/8703), Preload Mini Cart inner blocks frontend scripts [#8653](https://github.com/woocommerce/woocommerce-blocks/pull/8653)
|
|||
|
|
|
|||
|
|
1. Add the Mini Cart block to the header of your store.
|
|||
|
|
2. In the frontend, open the _Network_ tab of your browser devtools and verify the Mini Cart inner blocks are being preloaded (you can search for `empty-cart-frontend` or `filled-cart-frontend` scripts).
|
|||
|
|
3. Also in the frontend, verify you can open the Mini Cart, interact with its inner blocks (ie: change the quantity of a product, remove a product, etc.).
|
|||
|
|
|
|||
|
|
#### Only print wp.apiFetch.createPreloadingMiddleware() when needed [#8647](https://github.com/woocommerce/woocommerce-blocks/pull/8647)
|
|||
|
|
|
|||
|
|
1. Add the Mini Cart block to the header of your store.
|
|||
|
|
2. Create a post or page with the Cart block and another one with the Checkout block.
|
|||
|
|
3. In the frontend, add some products to your cart and open the Mini Cart. Verify you can change the quantity of products and you can remove them.
|
|||
|
|
4. Go to the Cart page and check that there are no extra `fetch` requests to `wc/store/cart` in the _Network_ tab of your browser devtools (you can open them with <kbd>F12</kbd>).
|
|||
|
|
5. Go to the Checkout page and make sure there is no error and you can place an order (checkout works as normal).
|
|||
|
|
|
|||
|
|
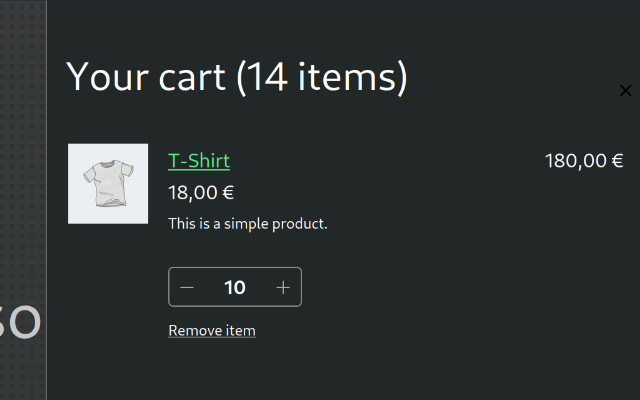
#### Mini Cart drawer close button: inherit text color and improve alignment [#8605](https://github.com/woocommerce/woocommerce-blocks/pull/8605)
|
|||
|
|
|
|||
|
|
0. Switch to a dark theme (ie: [TT3](https://github.com/WordPress/twentytwentythree/)) and set a dark styling (ie: Appearance > Editor > edit a template > Style > Browse styles > Pilgrimage).
|
|||
|
|
1. Add the Mini Cart block to the header of a template.
|
|||
|
|
2. In the frontend, click on it so it opens the drawer.
|
|||
|
|
3. Verify the close button inherits the text color and on the right it's aligned with the product prices below.
|
|||
|
|
|
|||
|
|
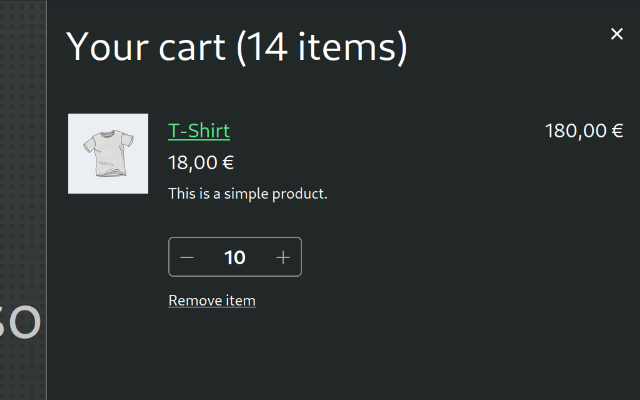
Before | After
|
|||
|
|
----------------------------------------------------------------------------------------------------------------|----------------------------------------------------------------------------------------------------------------
|
|||
|
|
 | 
|
|||
|
|
|
|||
|
|
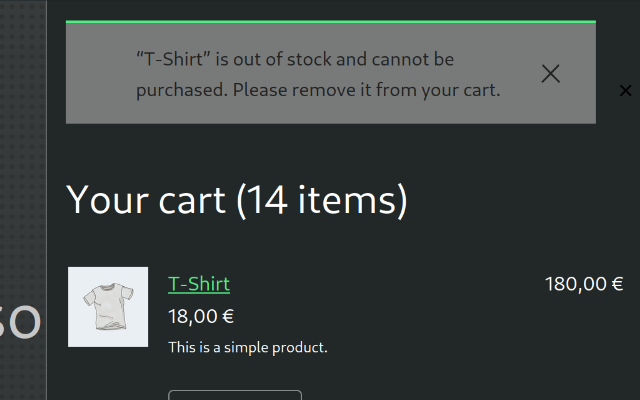
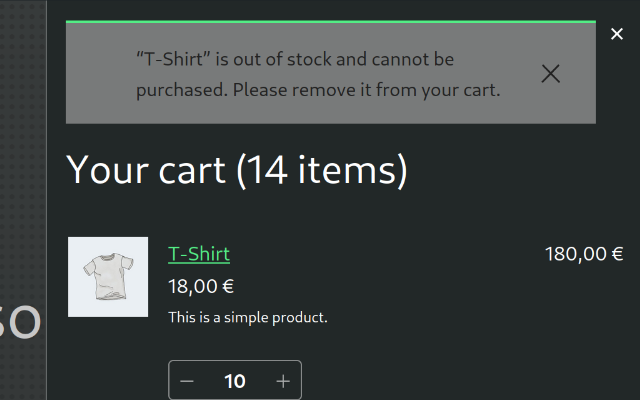
4. Now, to verify the layout still works if there are notices, edit one of the products you have in the cart and set it out of stock.
|
|||
|
|
5. Go back to the frontend, open the drawer and verify the close button is still visible.
|
|||
|
|
|
|||
|
|
Before | After
|
|||
|
|
----------------------------------------------------------------------------------------------------------------|----------------------------------------------------------------------------------------------------------------
|
|||
|
|
 | 
|
|||
|
|
|
|||
|
|
#### Fix Mini Cart missing translations [#8591](https://github.com/woocommerce/woocommerce-blocks/pull/8591)
|
|||
|
|
|
|||
|
|
1. Set your store language to a language with WC Blocks translations, ie: Spanish (_Español_).
|
|||
|
|
2. With a block theme (ie: TT3), go to Appearance > Editor > Template Parts and edit the Mini Cart block template part.
|
|||
|
|
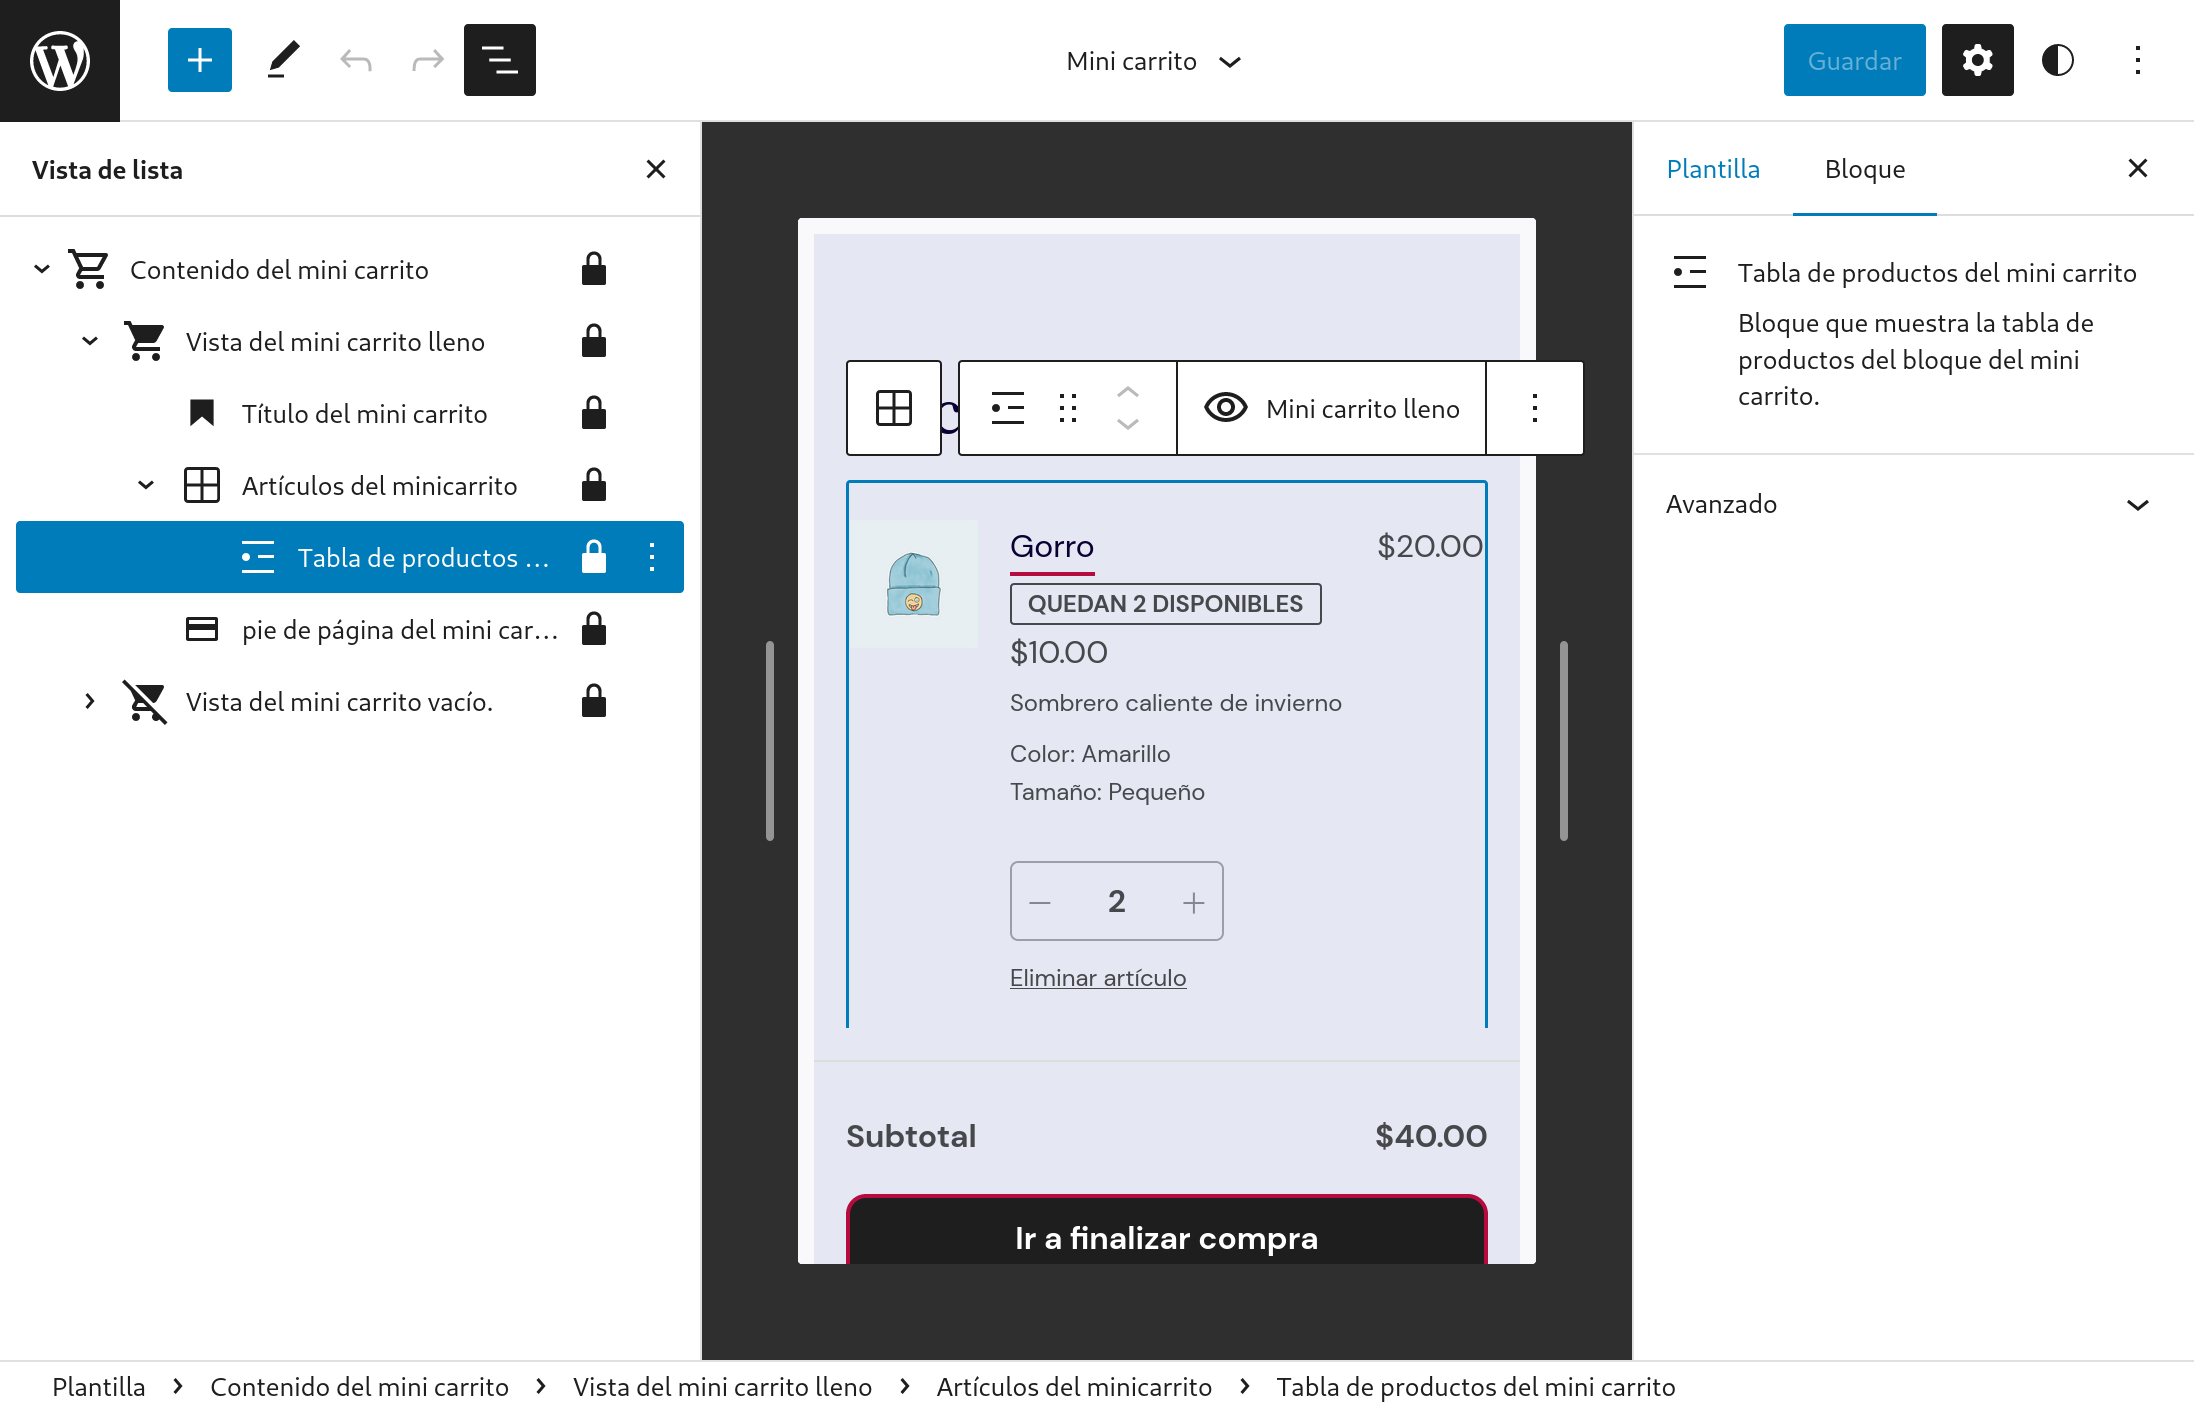
3. Open the sidebar list view and navigate to the `Tabla de productos del mini carrito` block. Verify the block name is correctly translated.
|
|||
|
|
|
|||
|
|
Before | After
|
|||
|
|
--- | ---
|
|||
|
|
 | 
|
|||
|
|
|
|||
|
|
#### Make the customer account icon bigger to match the mini-cart one [#8594](https://github.com/woocommerce/woocommerce-blocks/pull/8594)
|
|||
|
|
|
|||
|
|
##### Check the icon size
|
|||
|
|
|
|||
|
|
1. Go to the Site Editor and edit the Header template.
|
|||
|
|
2. Insert the `Customer account` and `Mini-cart` blocks next to the menu, to look like this 👇
|
|||
|
|
<img width="359" alt="Screenshot 2023-03-01 at 14 16 48" src="https://user-images.githubusercontent.com/186112/222149887-f19ffb9a-3015-4878-aa8e-33ddcf1eb8ac.png">
|
|||
|
|
|
|||
|
|
3. Check the `Customer account` icon is bigger than before and matches the `Mini cart` icon size.
|
|||
|
|
|
|||
|
|
| Before | After |
|
|||
|
|
| ------ | ----- |
|
|||
|
|
| <img width="312" alt="Screenshot 2023-03-01 at 14 20 35" src="https://user-images.githubusercontent.com/186112/222150649-0974f54b-5bb5-43da-a7e1-5870a860094a.png"> |<img width="311" alt="Screenshot 2023-03-01 at 14 21 42" src="https://user-images.githubusercontent.com/186112/222150932-223dacae-5365-43d8-8831-cd39fc27e247.png"> |
|
|||
|
|
|
|||
|
|
4. Modify the font size on both blocks to M, L, and XL and check the icon sizes also match.
|
|||
|
|
|
|||
|
|
##### Check the icon size of existing blocks does not change
|
|||
|
|
|
|||
|
|
1. Disable WC Blocks.
|
|||
|
|
2. Create a new page/post, add a `Customer account` block, and save.
|
|||
|
|
3. Enable WC Blocks.
|
|||
|
|
4. Reload the page from step 2.
|
|||
|
|
5. Insert another `Customer account` block and save.
|
|||
|
|
6. Check in the editor that the block icon inserted in step 1 keeps its size and the one inserted in step 5 is bigger.
|
|||
|
|
7. Check the same in the frontend.
|
|||
|
|
|
|||
|
|
#### Make the start shopping button show the theme style [#8567](https://github.com/woocommerce/woocommerce-blocks/pull/8567)
|
|||
|
|
|
|||
|
|
1. Switch to the TT3 theme (aubergine style on the screenshots above).
|
|||
|
|
2. Go to the Site Editor, add the mini-cart block to the header and save.
|
|||
|
|
3. Go to the frontend, click on the mini-cart icon to open it. Empty the cart if it has items.
|
|||
|
|
4. Check that the `Start shopping` button follows the styles of the theme.
|
|||
|
|
|
|||
|
|
| Before | After |
|
|||
|
|
| ------ | ----- |
|
|||
|
|
| <img width="295" alt="Screenshot 2023-02-28 at 10 33 14" src="https://user-images.githubusercontent.com/186112/221811870-a0801f4e-81ac-498a-9788-12efd47648c6.png"> | <img width="328" alt="Screenshot 2023-02-28 at 10 33 01" src="https://user-images.githubusercontent.com/186112/221811956-42668397-ec7a-490f-977e-d258d01deac7.png"> |
|
|||
|
|
|
|||
|
|
#### Switch Select by Toggle for the 'Add-to-Cart behaviour' [#8558](https://github.com/woocommerce/woocommerce-blocks/pull/8558)
|
|||
|
|
|
|||
|
|
1. Create a new page and add the `Mini cart` block.
|
|||
|
|
2. Open the settings and make sure the `Add-to-Cart behaviour` selector is using a toggle button, not a select dropdown.
|
|||
|
|
3. Make sure both options can be saved, and keep working as expected (there are no regressions).
|
|||
|
|
|
|||
|
|
| Before | After |
|
|||
|
|
| ------ | ----- |
|
|||
|
|
| <img width="274" alt="Screenshot 2023-02-27 at 16 42 20" src="https://user-images.githubusercontent.com/186112/221609853-a601293c-f369-4164-930e-5a04aee2395c.png"> | <img width="269" alt="Screenshot 2023-02-27 at 16 42 00" src="https://user-images.githubusercontent.com/186112/221609927-926d55c1-2034-4197-8b97-209dea74d883.png"> |
|
|||
|
|
|
|||
|
|
#### Remove colorClassName and style from QuantityBadge [#8557](https://github.com/woocommerce/woocommerce-blocks/pull/8557)
|
|||
|
|
|
|||
|
|
1. Create a new page and add the `Mini cart` block.
|
|||
|
|
2. Go to the frontend and with your browser devtools (<kbd>F12</kbd>) check the `undefined` class is no longer showing next to the `wc-block-mini-cart__badge` class.
|
|||
|
|
|
|||
|
|
#### Fix 'Edit Mini Cart template part' link in WP 6.2 [#8574](https://github.com/woocommerce/woocommerce-blocks/pull/8574)
|
|||
|
|
|
|||
|
|
0. Make sure you use a block theme, like TT3, and install the latest version of Gutenberg.
|
|||
|
|
1. Create a post or page and add the Mini Cart block.
|
|||
|
|
2. In the sidebar, click on the "Edit Mini Cart template part" link.
|
|||
|
|
3. Verify the Site Editor open in a new tab and the Mini Cart template part is opened by default.
|
|||
|
|
4. Repeat the testing steps but having Gutenberg disabled and verify the link keeps working. (This step is to verify no regressions were introduced)
|
|||
|
|
|
|||
|
|
#### Add explicit CSS styling to mini-cart block amount in inserter preview [#8516](https://github.com/woocommerce/woocommerce-blocks/pull/8516)
|
|||
|
|
|
|||
|
|
1. Create a new page.
|
|||
|
|
2. Click on the `inserter` plus icon/button.
|
|||
|
|
3. In the search bar, search for `mini cart`.
|
|||
|
|
4. Hover your mouse over the `mini cart` block icon.
|
|||
|
|
5. Ensure you see the cart dollar amount in the preview.
|
|||
|
|
|
|||
|
|
### Products block
|
|||
|
|
|
|||
|
|
#### Products: Update product element margins in patterns [#8401](https://github.com/woocommerce/woocommerce-blocks/pull/8401)
|
|||
|
|
|
|||
|
|
1. Add the **Products** block to a post or page.
|
|||
|
|
2. Add WooCommerce Products patterns:
|
|||
|
|
- WooCommerce 1:1 Image 4-Column Products Row
|
|||
|
|
- WooCommerce 3-Column Product Row
|
|||
|
|
- WooCommerce 4-Column Product Row
|
|||
|
|
- WooCommerce Large Image Product Gallery
|
|||
|
|
- WooCommerce Minimal 5-Column Products Row
|
|||
|
|
- WooCommerce Minimal Product List
|
|||
|
|
- WooCommerce Product Gallery
|
|||
|
|
- WooCommerce Product list with 1:1 images
|
|||
|
|
- WooCommerce Product list with full product description
|
|||
|
|
|
|||
|
|
3. Ensure all margins are displaying correctly both in the editor and the frontend.
|
|||
|
|
|
|||
|
|
#### Improve Products block Attributes Filter Inspector Controls [#8583](https://github.com/woocommerce/woocommerce-blocks/pull/8583)
|
|||
|
|
|
|||
|
|
|
|||
|
|
|
|||
|
|
##### Simple happy path
|
|||
|
|
|
|||
|
|
1. Add a Products (Beta) block to your page.
|
|||
|
|
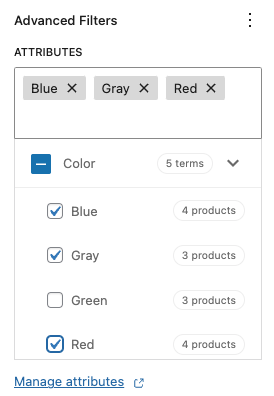
2. Open the Inspector Controls and add the “Product Attributes” advanced filter.
|
|||
|
|
3. The Attributes selector component should show up in an uninteractable loading state.
|
|||
|
|
4. Once loading finishes, the Attributes should appear, collapsed.
|
|||
|
|
5. Uncollapse a section
|
|||
|
|
6. Select a few attributes.
|
|||
|
|
7. Publish your page.
|
|||
|
|
8. Check on the frontend to see that the correct products are displayed.
|
|||
|
|
|
|||
|
|
##### Checkbox behavior
|
|||
|
|
|
|||
|
|
1. Repeat steps 1–5 above.
|
|||
|
|
2. Click on some terms checkboxes.
|
|||
|
|
3. Notice that the parent checkbox will be in the indeterminate state (`[-]`).
|
|||
|
|
4. Select all the children.
|
|||
|
|
5. Notice parent checkbox will be checked.
|
|||
|
|
6. Uncheck the parent checkbox.
|
|||
|
|
7. All the children should be unchecked.
|
|||
|
|
8. Check the parent checkbox.
|
|||
|
|
9. All the children should be checked.
|
|||
|
|
10. Uncheck a few children.
|
|||
|
|
11. Check the parent checkbox.
|
|||
|
|
12. All children should be checked.
|
|||
|
|
|
|||
|
|
##### Token input behavior
|
|||
|
|
|
|||
|
|
1. Repeat steps 1–4 above.
|
|||
|
|
2. Start typing something within the input.
|
|||
|
|
3. The checklist should be correctly filtered showing breadcrumbs.
|
|||
|
|
4. Try the behavior for both collapsed and uncollapsed states.
|
|||
|
|
5. Every time a checkbox is checked, it should have the corresponding token in the input field and viceversa.
|
|||
|
|
6. Tokens can be correctly removed from the input field and this will uncheck the corresponding checkbox.
|
|||
|
|
|
|||
|
|
#### Fix Products block Add to Cart button when AJAX on archives is disabled [#8532](https://github.com/woocommerce/woocommerce-blocks/pull/8532)
|
|||
|
|
|
|||
|
|
1. Go to WooCommerce > Settings > Products and disable the _Enable AJAX add to cart buttons on archives_ checkbox.
|
|||
|
|
2. Add a Products block to a post or page.
|
|||
|
|
3. In the frontend, verify clicking on “Add to cart” adds the product to the cart with a page refresh.
|
|||
|
|
4. Optionally, test also the option _Redirect to the cart page after successful addition_, test variable products, out of stock products, etc. and verify they can (or cannot) be added to the cart as you would expect.
|
|||
|
|
|
|||
|
|
#### [Products]: Fix attributes filters that do not update the editor preview correctly [#8611](https://github.com/woocommerce/woocommerce-blocks/pull/8611)
|
|||
|
|
|
|||
|
|
1. Create new post
|
|||
|
|
2. Add _Products_ block
|
|||
|
|
3. Add “Product Attributes” filter from “Advanced Filters” in the inspector controls.
|
|||
|
|
4. Add some attributes filter
|
|||
|
|
5. **Expected**: Preview changes according to the applied attribute
|
|||
|
|
|
|||
|
|
### Single Product
|
|||
|
|
|
|||
|
|
#### Add Product Meta Block [#8484](https://github.com/woocommerce/woocommerce-blocks/pull/8484)
|
|||
|
|
|
|||
|
|
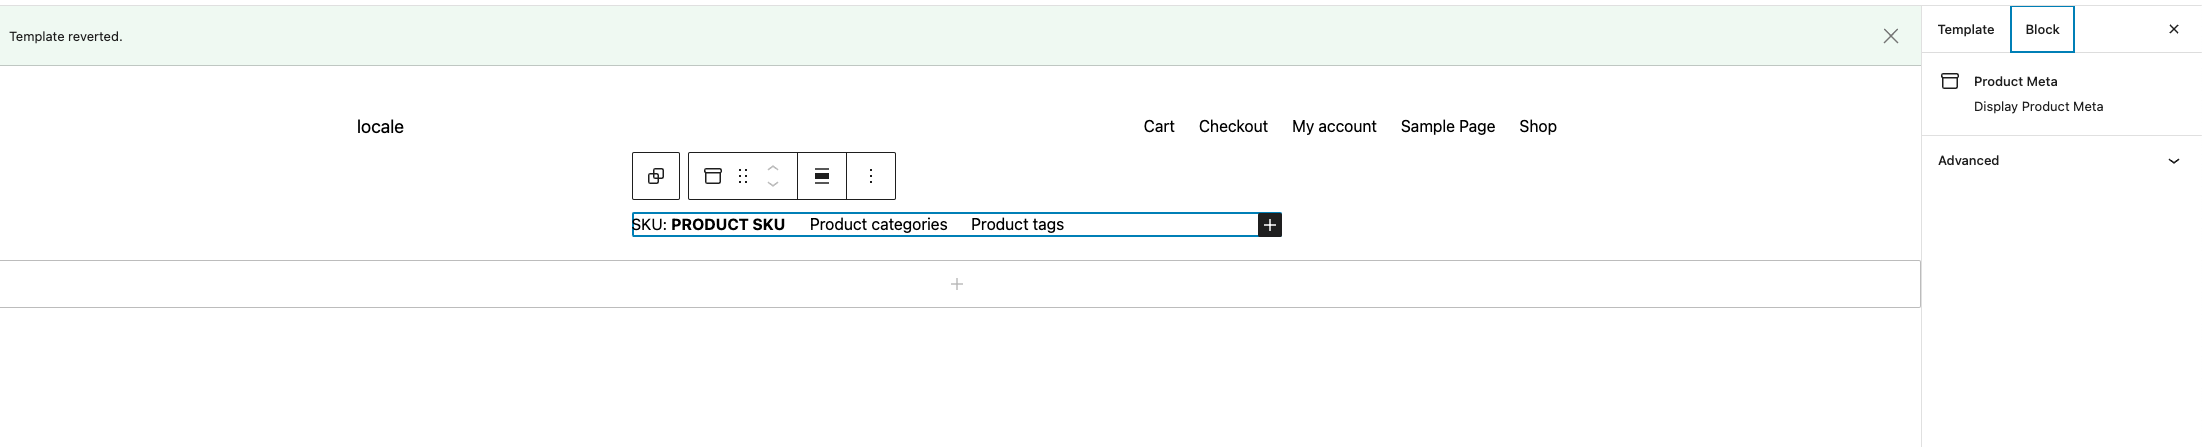
1. Edit the Single Product Template.
|
|||
|
|
2. Add the `Product Meta` block.
|
|||
|
|
3. Be sure that the blocks look like the image above.
|
|||
|
|
4. Save the template.
|
|||
|
|
5. On the front end, visit a Single Product page. Be sure that the blocks render the right data.
|
|||
|
|
|
|||
|
|
|
|||
|
|
|
|||
|
|
#### Product Price block: add support to the Single Product Template [#8609](https://github.com/woocommerce/woocommerce-blocks/pull/8609)
|
|||
|
|
|
|||
|
|
1. Switch to the TT3 theme.
|
|||
|
|
2. Go to the Site Editor, and edit the Single Product Template.
|
|||
|
|
3. Add the Product Price. It should have a price of 50.00 with the currency set in WC options. Save.
|
|||
|
|
4. On the front end, click a product and check that the block shows the right price.
|
|||
|
|
|
|||
|
|
#### Enable the compatibility layer when Product Meta, Product Price and Breadcrumbs blocks are added [#8719](https://github.com/woocommerce/woocommerce-blocks/pull/8719)
|
|||
|
|
|
|||
|
|
1. Switch to the TT3 theme.
|
|||
|
|
2. Go to the Site Editor, and edit the Single Product Template.
|
|||
|
|
3. Add the Product Meta, Product Price and Breadcrumbs blocks **inside** the group block.
|
|||
|
|
4. Add the Product Meta, Product Price and Breadcrumbs blocks **outside** the group block.
|
|||
|
|
5. Save.
|
|||
|
|
6. Go to the frontend and check that all the blocks are visible.
|
|||
|
|
|
|||
|
|
### Product Catalog
|
|||
|
|
|
|||
|
|
#### Product Result Count block: Add support for global styles [#8517](https://github.com/woocommerce/woocommerce-blocks/pull/8517)
|
|||
|
|
|
|||
|
|
1. Go to the `Site Editor » Browse all templates` and edit the `Product Catalog` template.
|
|||
|
|
2. Add the `Product Results Count` block.
|
|||
|
|
3. In the toolbar, select Styles (black and white circle) and click Blocks options.
|
|||
|
|
4. Search `Product Results Count` block and select it.
|
|||
|
|
5. Change the color/font styles to the block and make sure styles are applied to the block in editor.
|
|||
|
|
6. Save, go to frontend, and check that the styles are correctly applied as well.
|
|||
|
|
|
|||
|
|
## Feature plugin
|
|||
|
|
|
|||
|
|
### Add border support to mini cart contents [#8654](https://github.com/woocommerce/woocommerce-blocks/pull/8654)
|
|||
|
|
|
|||
|
|
1. Enable a blocks theme, go to Site Editor, and add the `Mini Cart` block to the header.
|
|||
|
|
2. Go to Template Parts and open the `Mini Cart` template.
|
|||
|
|
3. Open the List View, select the `Mini Cart contents` block and check that in the settings sidebar you can see the `Border` controls.
|
|||
|
|
4. Click the `+` button and add a border and save the template.
|
|||
|
|
5. Go to the frontend, click on the `Mini Cart` button, and check you see the same border in the editor and in the frontend.
|
|||
|
|
6. Check that all the buttons in the mini cart modal are correctly displayed.
|
|||
|
|
7. Double check in different browsers and logged in/out of the admin.
|
|||
|
|
|
|||
|
|
| Before | After |
|
|||
|
|
|---------------------------------------------------------------------------------------------------------------------------------------------------------------------|---------------------------------------------------------------------------------------------------------------------------------------------------------------------|
|
|||
|
|
| <img width="291" alt="Screenshot 2023-03-08 at 15 41 35" src="https://user-images.githubusercontent.com/186112/223743115-6f21efd3-d268-4086-ae52-ca94975af484.png"> | <img width="288" alt="Screenshot 2023-03-08 at 15 41 09" src="https://user-images.githubusercontent.com/186112/223743151-03acaf76-d09d-4e83-b900-5b444f908bcf.png"> |
|
|||
|
|
| <img width="509" alt="Screenshot 2023-03-08 at 15 40 26" src="https://user-images.githubusercontent.com/186112/223742677-dfc6d5d9-4a18-4fc0-abf8-ba134207feaa.png"> | <img width="509" alt="Screenshot 2023-03-08 at 15 40 14" src="https://user-images.githubusercontent.com/186112/223742736-d6453711-a93b-4806-a173-7ef4af28799a.png"> |
|