# Testing notes and ZIP for release 9.2.0
Zip file for testing: [woocommerce-gutenberg-products-block.zip](https://github.com/woocommerce/woocommerce-blocks/files/10260516/woocommerce-gutenberg-products-block.zip)
## Feature plugin and package inclusion in WooCommerce
### Fix overriding archive-product when saving a fallback template ([7975](https://github.com/woocommerce/woocommerce-blocks/pull/7975))
1. On the `Site Editor` (`/wp-admin/site-editor.php?postType=wp_template`), make sure you have no customizations on any template.
2. Edit the `Product Catalog` template, add some customization and save.
3. On the front end, go to `/shop` and make sure you see the customization you just did.
4. On the front end, go also to a category, a tag, and an attribute page (like `product-category/clothing/`, `/product-tag/music`, `color/red`, depending on your store configuration).
5. Check that all 3 pages are using the `Product Catalog` template, meaning you see exactly the same customization you did on the `Product Catalog`.
6. Go back to the `Site Editor`, click on one of the templates using the Catalog fallback (either `Products by Category`, `Products by Tag`, or `Products by Attribute`).
7. Make some customization and save it.
8. Go back to the `Site Editor` and make sure `Product Catalog` still has its original customization.
9. Make sure the other two templates still fall back to `Product Catalog`.
10. On the front end, go to `/shop` and make sure you see the `Product Catalog` customization.
11. On the front end, go also to a category, a tag, and an attribute page and make sure you see the expected customizations.
### Fix: Add non-ASCII terms support to Filter by Attribute block. ([7906](https://github.com/woocommerce/woocommerce-blocks/pull/7906))
#### Screenshots
| Before | After |
| ----------------------------------------------------------------------------------------------------------------------------------------- | ----------------------------------------------------------------------------------------------------------------------------------------- |
|  |
|  |
#### Testing
1. Add a product attribute named `大きさ`.
2. Add a term under the attribute above, named `大`
3. Assign that term to a product.
4. With a block theme, add a Filter by Attribute block to the Product Catalog template, and configure that block to use the `大きさ` attribute.
5. On the front end, try filtering the block by `大きさ`, see it the block works and the products is filtered as expected.
### Fix: Ensure that the Checkout block respects the WooCommerce core settings for guest checkout and account creation. ([7883](https://github.com/woocommerce/woocommerce-blocks/pull/7883))
#### Show login prompt when guest checkout and account creation (in core) are disabled
1. Create a test page and add the Checkout block to it.
2. Head over to `/wp-admin/admin.php?page=wc-settings&tab=account`.
3. Deactivate the option `Guest checkout` → `Allow customers to place orders without an account`.
4. Deactivate the option `Account creation` → `Allow customers to create an account during checkout`.
5. Open the frontend in an incognito window and ensure that you're not accidentally logged in (from a previous test).
6. Add a product to the cart and go to the test page with the Checkout block.
7. Verify that the checkout form is not visible.
8. Verify that the message `You must be logged in to checkout. Click here to log in.`.
#### Show checkout when guest checkout is enabled, but account creation is disabled
1. Create a test page and add the Checkout block to it.
2. Head over to `/wp-admin/admin.php?page=wc-settings&tab=account`.
3. Activate the option `Guest checkout` → `Allow customers to place orders without an account`.
4. Deactivate the option `Account creation` → `Allow customers to create an account during checkout`.
5. Open the frontend in an incognito window and ensure that you're not accidentally logged in (from a previous test).
6. Add a product to the cart and go to the test page with the Checkout block.
7. Verify that the checkout form is visible.
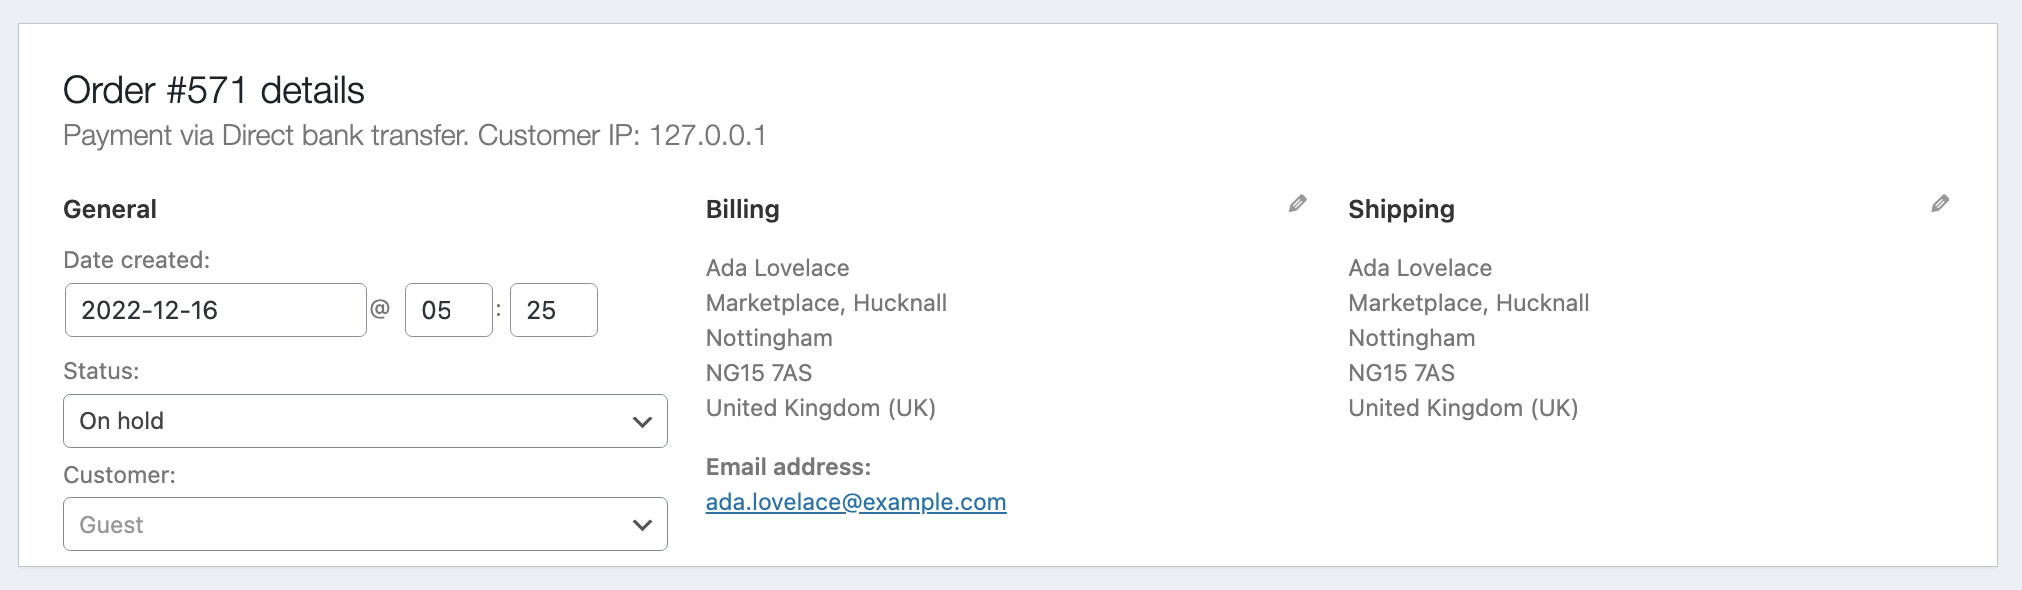
8. Place a test order and verify that no account had been created. The order details show `Guest` as a `Customer`:
|
#### Testing
1. Add a product attribute named `大きさ`.
2. Add a term under the attribute above, named `大`
3. Assign that term to a product.
4. With a block theme, add a Filter by Attribute block to the Product Catalog template, and configure that block to use the `大きさ` attribute.
5. On the front end, try filtering the block by `大きさ`, see it the block works and the products is filtered as expected.
### Fix: Ensure that the Checkout block respects the WooCommerce core settings for guest checkout and account creation. ([7883](https://github.com/woocommerce/woocommerce-blocks/pull/7883))
#### Show login prompt when guest checkout and account creation (in core) are disabled
1. Create a test page and add the Checkout block to it.
2. Head over to `/wp-admin/admin.php?page=wc-settings&tab=account`.
3. Deactivate the option `Guest checkout` → `Allow customers to place orders without an account`.
4. Deactivate the option `Account creation` → `Allow customers to create an account during checkout`.
5. Open the frontend in an incognito window and ensure that you're not accidentally logged in (from a previous test).
6. Add a product to the cart and go to the test page with the Checkout block.
7. Verify that the checkout form is not visible.
8. Verify that the message `You must be logged in to checkout. Click here to log in.`.
#### Show checkout when guest checkout is enabled, but account creation is disabled
1. Create a test page and add the Checkout block to it.
2. Head over to `/wp-admin/admin.php?page=wc-settings&tab=account`.
3. Activate the option `Guest checkout` → `Allow customers to place orders without an account`.
4. Deactivate the option `Account creation` → `Allow customers to create an account during checkout`.
5. Open the frontend in an incognito window and ensure that you're not accidentally logged in (from a previous test).
6. Add a product to the cart and go to the test page with the Checkout block.
7. Verify that the checkout form is visible.
8. Place a test order and verify that no account had been created. The order details show `Guest` as a `Customer`:
 #### Show checkout when guest checkout is disabled, but account creation is enabled
1. Create a test page and add the Checkout block to it.
2. Head over to `/wp-admin/admin.php?page=wc-settings&tab=account`.
3. Deactivate the option `Guest checkout` → `Allow customers to place orders without an account`.
4. Activate the option `Account creation` → `Allow customers to create an account during checkout`.
5. Open the frontend in an incognito window and ensure that you're not accidentally logged in (from a previous test).
6. Add a product to the cart and go to the test page with the Checkout block.
7. Verify that the checkout form is visible.
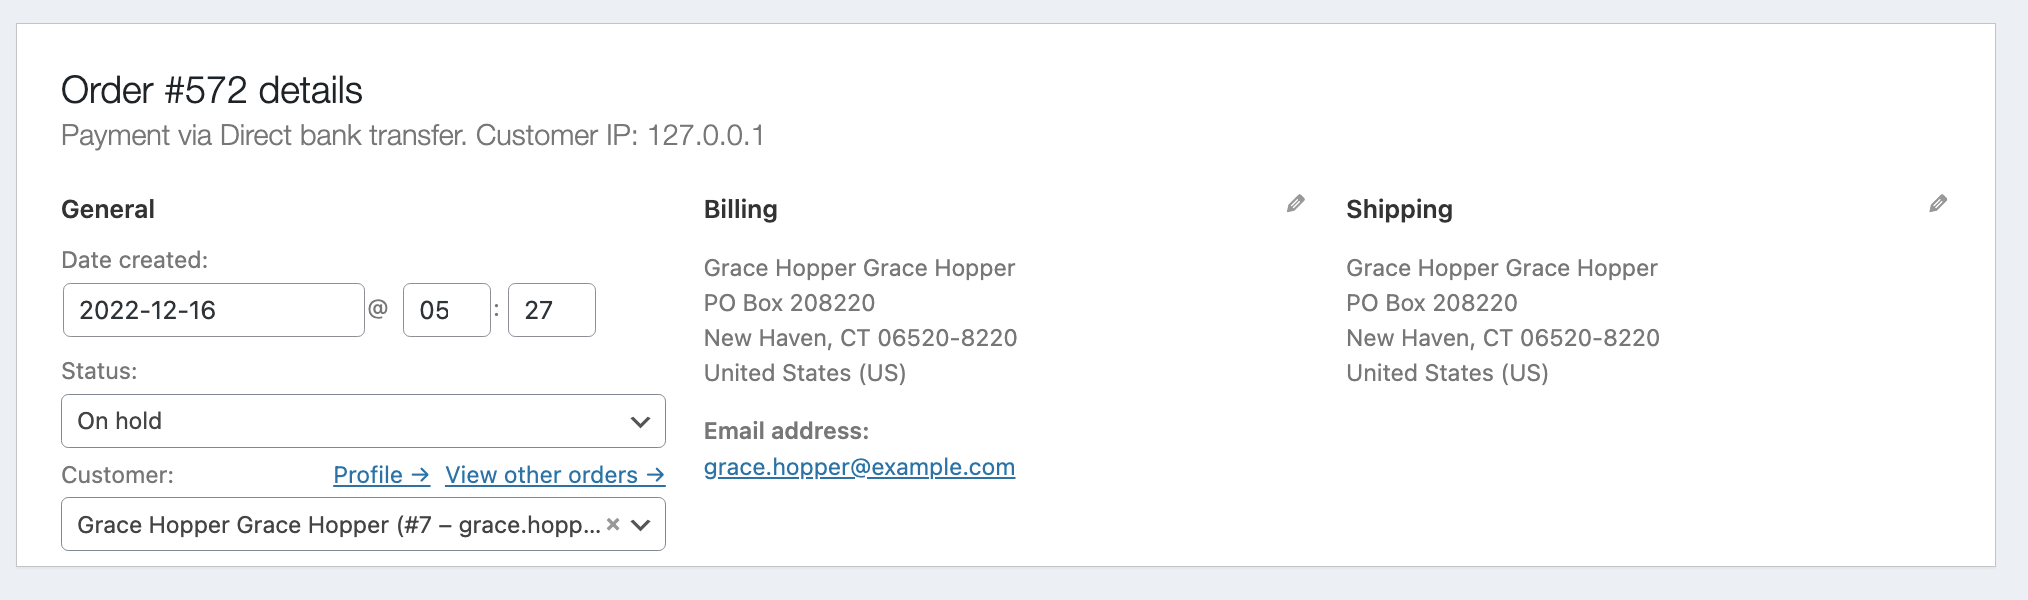
8. Place a test order and verify that a new account had been created. The order details shows the new account as a `Customer`:
#### Show checkout when guest checkout is disabled, but account creation is enabled
1. Create a test page and add the Checkout block to it.
2. Head over to `/wp-admin/admin.php?page=wc-settings&tab=account`.
3. Deactivate the option `Guest checkout` → `Allow customers to place orders without an account`.
4. Activate the option `Account creation` → `Allow customers to create an account during checkout`.
5. Open the frontend in an incognito window and ensure that you're not accidentally logged in (from a previous test).
6. Add a product to the cart and go to the test page with the Checkout block.
7. Verify that the checkout form is visible.
8. Place a test order and verify that a new account had been created. The order details shows the new account as a `Customer`:
 #### Show checkout when guest checkout and account creation are enabled, but don't create account
1. Create a test page and add the Checkout block to it.
2. Head over to `/wp-admin/admin.php?page=wc-settings&tab=account`.
3. Activate the option `Guest checkout` → `Allow customers to place orders without an account`.
4. Activate the option `Account creation` → `Allow customers to create an account during checkout`.
5. Open the frontend in an incognito window and ensure that you're not accidentally logged in (from a previous test).
6. Add a product to the cart and go to the test page with the Checkout block.
7. Verify that the checkout form is visible.
8. Verify that the checkbox `Create an account?` is not checked.
9. Place a test order and verify that no account had been created. The order details show `Guest` as a `Customer`.
#### Show checkout when guest checkout and account creation are enabled, and create account
1. Create a test page and add the Checkout block to it.
2. Head over to `/wp-admin/admin.php?page=wc-settings&tab=account`.
3. Activate the option `Guest checkout` → `Allow customers to place orders without an account`.
4. Activate the option `Account creation` → `Allow customers to create an account during checkout`.
5. Open the frontend in an incognito window and ensure that you're not accidentally logged in (from a previous test).
6. Add a product to the cart and go to the test page with the Checkout block.
7. Verify that the checkout form is visible.
8. Verify that the checkbox `Create an account?` is checked.
9. Place a test order and verify that a new account had been created. The order details shows the new account as a `Customer`:
#### Verify that display logic is in sync
1. Execute the previous test cases again, both with the classic checkout and the Checkout block.
2. Do not place an order, but verify that the display logic of the login link respectively the checkout form is in sync.
### Filter by Rating Block > Display a notice in the editor if the store has no products with ratings([7763](https://github.com/woocommerce/woocommerce-blocks/pull/7763))
#### Screenshots
| Before | After |
| --------------------------------------------------------------------------------------------------------------------------------------------------------------------- | --------------------------------------------------------------------------------------------------------------------------------------------------------------------- |
|
#### Show checkout when guest checkout and account creation are enabled, but don't create account
1. Create a test page and add the Checkout block to it.
2. Head over to `/wp-admin/admin.php?page=wc-settings&tab=account`.
3. Activate the option `Guest checkout` → `Allow customers to place orders without an account`.
4. Activate the option `Account creation` → `Allow customers to create an account during checkout`.
5. Open the frontend in an incognito window and ensure that you're not accidentally logged in (from a previous test).
6. Add a product to the cart and go to the test page with the Checkout block.
7. Verify that the checkout form is visible.
8. Verify that the checkbox `Create an account?` is not checked.
9. Place a test order and verify that no account had been created. The order details show `Guest` as a `Customer`.
#### Show checkout when guest checkout and account creation are enabled, and create account
1. Create a test page and add the Checkout block to it.
2. Head over to `/wp-admin/admin.php?page=wc-settings&tab=account`.
3. Activate the option `Guest checkout` → `Allow customers to place orders without an account`.
4. Activate the option `Account creation` → `Allow customers to create an account during checkout`.
5. Open the frontend in an incognito window and ensure that you're not accidentally logged in (from a previous test).
6. Add a product to the cart and go to the test page with the Checkout block.
7. Verify that the checkout form is visible.
8. Verify that the checkbox `Create an account?` is checked.
9. Place a test order and verify that a new account had been created. The order details shows the new account as a `Customer`:
#### Verify that display logic is in sync
1. Execute the previous test cases again, both with the classic checkout and the Checkout block.
2. Do not place an order, but verify that the display logic of the login link respectively the checkout form is in sync.
### Filter by Rating Block > Display a notice in the editor if the store has no products with ratings([7763](https://github.com/woocommerce/woocommerce-blocks/pull/7763))
#### Screenshots
| Before | After |
| --------------------------------------------------------------------------------------------------------------------------------------------------------------------- | --------------------------------------------------------------------------------------------------------------------------------------------------------------------- |
|  |
|  |
#### Testing
1. Make sure your store doesn't have any products with ratings.
2. Open the editor and add a Filter by Rating block.
3. Make sure a notice is displayed informing there are no products with ratings available, as demonstrated on the screenshot shared here on this PR. Also, ensure the dummy list with default product ratings is displayed below the notice.
4. Now, add a rating to any product in your store.
5. Refresh the editor and make sure the notice is replaced with the expected value:
|
#### Testing
1. Make sure your store doesn't have any products with ratings.
2. Open the editor and add a Filter by Rating block.
3. Make sure a notice is displayed informing there are no products with ratings available, as demonstrated on the screenshot shared here on this PR. Also, ensure the dummy list with default product ratings is displayed below the notice.
4. Now, add a rating to any product in your store.
5. Refresh the editor and make sure the notice is replaced with the expected value:
 6. On the front end, ensure the filter by rating works as expected and without any changes.
### Prevent invalid data being pushed to the server when validating fields on the checkout. ([7755](https://github.com/woocommerce/woocommerce-blocks/pull/7755))
1. Make sure you're logged in so the field is populated with a valid email address e.g. `test@test.com`
2. Remove the .com part so it's invalid: `test@test`
3. Wait a few moments—no errors should appear.
4. Click out of the field. An inline validation error should appear.
### Product Query: Add Product Visibility support. ([7951](https://github.com/woocommerce/woocommerce-blocks/pull/7951))
0. Use the sample product data provided by WooCommerce.
1. On a new page, add the `Producs (Beta)` block and `[recent_products]` shortcode block.
2. Change the layout of the `Producs (Beta)` to 4 products per row x 3 rows.
3. Change the popular preset to `Newest`.
4. Save the page and view it in a new tab.
5. See the products inside the `Producs (Beta)` block (the front end and the editor) and the Recent Products shortcode are the same.
### Remove account creation setting from Checkout block. ([7941](https://github.com/woocommerce/woocommerce-blocks/pull/7941))
1. Create a test page and add the Checkout block.
2. Select the `Contact Information` inner block.
3. Verify that the `Allow shoppers to sign up for a user account during checkout` setting is no longer visible.
4. Verify that a notification with a link to the account settings in WooCommerce core is visible in the sidebar.
5. Go to the frontend and add a product to the cart.
6. Go to the checkout and place the order.
7. Verify that the order can be placed, and this PR does not break the Checkout block.
### Enable merchants to adjust the label of the `Place Order` button according to their needs. ([7843](https://github.com/woocommerce/woocommerce-blocks/pull/7843))
#### Filter and merchant value
> This test should verify that the filter value overwrites the merchant value.
1. Create a test page and add the Checkout block to it.
2. Install and activate the [Simple Custom CSS and JS](https://wordpress.org/plugins/custom-css-js/) plugin.
3. Head over to `/wp-admin/edit.php?post_type=custom-css-js` and add the following JS code snippet:
```js
const label = () => 'Pay now';
const { __experimentalRegisterCheckoutFilters } = window.wc.blocksCheckout;
__experimentalRegisterCheckoutFilters( 'custom-place-order-button-label', {
placeOrderButtonLabel: label,
} );
```
4. Head over to the Checkout block and change the label of the `Place Order` button to `Place Order Now`.
5. Head over to the frontend, add a product to the cart and open the page with the Checkout block.
6. Verify that the button label says `Pay now`.
#### Payment method and merchant value
> This test should verify that the payment method value overwrites the merchant value for the corresponding payment method, but that the merchant value is visible for other payment methods.
1. Head over to `/wp-admin/edit.php?post_type=custom-css-js` and deactivate the JS code snippet of the previous test.
2. Install and activate the [Code Snippets](https://wordpress.org/plugins/code-snippets/) plugin.
3. Head over to `/wp-admin/admin.php?page=snippets` and add the following PHP code snippet:
```php
add_filter( 'woocommerce_should_load_paypal_standard', '__return_true' );
```
4. Head over to `/wp-admin/admin.php?page=wc-settings&tab=checkout§ion=paypal` and select the options `Enable PayPal Standard` and ` Enable PayPal sandbox`.
5. Head over to the Checkout block and verify that the label of the `Place Order` button still says `Place Order Now`.
6. Head over to the frontend, add a product to the cart and open the page with the Checkout block.
7. Select the payment method `PayPal`.
8. Verify that the button label says `Proceed to PayPal`.
9. Select a payment method apart from `PayPal`.
10. Verify that the button label says `Place Order Now`.
#### Only merchant value
> This test should verify that the merchant value is visible.
1. Head over to `/wp-admin/admin.php?page=wc-settings&tab=checkout` and deactivate the payment method `PayPal Standard`.
2. Head over to the Checkout block and verify that the label of the `Place Order` button still says `Place Order Now`.
3. Head over to the frontend, add a product to the cart and open the page with the Checkout block.
4. Verify that for any selected payment method the label of the `Place Order` button says `Place Order Now`.
#### Default value
> Test that the default value remains visible in the frontend when no filter, payment method or merchant value is available, and that the button shows the placeholder text `Place Order` in the editor.
1. Head over to the Checkout block, empty the label of the `Place Order` button and save the page.
2. Verify that the placeholder text `Place Order` is visible.
3. Head over to the frontend, add a product to the cart and open the page with the Checkout block.
4. Verify that the label of the `Place Order` buttons says `Place Order` even though the button is empty in the editor.
### Enable merchants to edit the button labels within the Mini Cart block. ([7817](https://github.com/woocommerce/woocommerce-blocks/pull/7817))
1. Activate a FSE theme, e.g. Twenty Twenty-Three.
2. Go to `/wp-admin/site-editor.php?postType=wp_template_part`
3. Open the Mini Cart template.
4. Open the list view.
5. Navigate to `Mini Cart Contents » Filled Mini Cart view » Mini Cart Footer`.
6. Adjust the `View my cart` and `Go to checkout` labels.
7. Navigate to `Empty Mini Cart view » Mini Cart Shopping Button`.
8. Adjust the `Start shopping` label.
9. Add the Mini Cart block to one of the other templates, e.g. the header template.
10. Go to the frontend and open the Mini Cart block.
11. Verify that the expected `Start shopping` label is visible, when there are no products in the cart.
12. Verify that the expected `View my cart` and `Go to checkout` labels are visible, when there are products in the cart.
### Fix Mini Cart icon color in Global Styles blocks customizer. ([7762](https://github.com/woocommerce/woocommerce-blocks/pull/7762))
#### Screenshots
| Before | After |
| ------------------------------------------------------------------------------------------------------------------------------------------- | ------------------------------------------------------------------------------------------------------------------------------------------- |
|  |  |
#### Testing
1. Make sure you have a blocks theme active (like Twenty Twenty-Two).
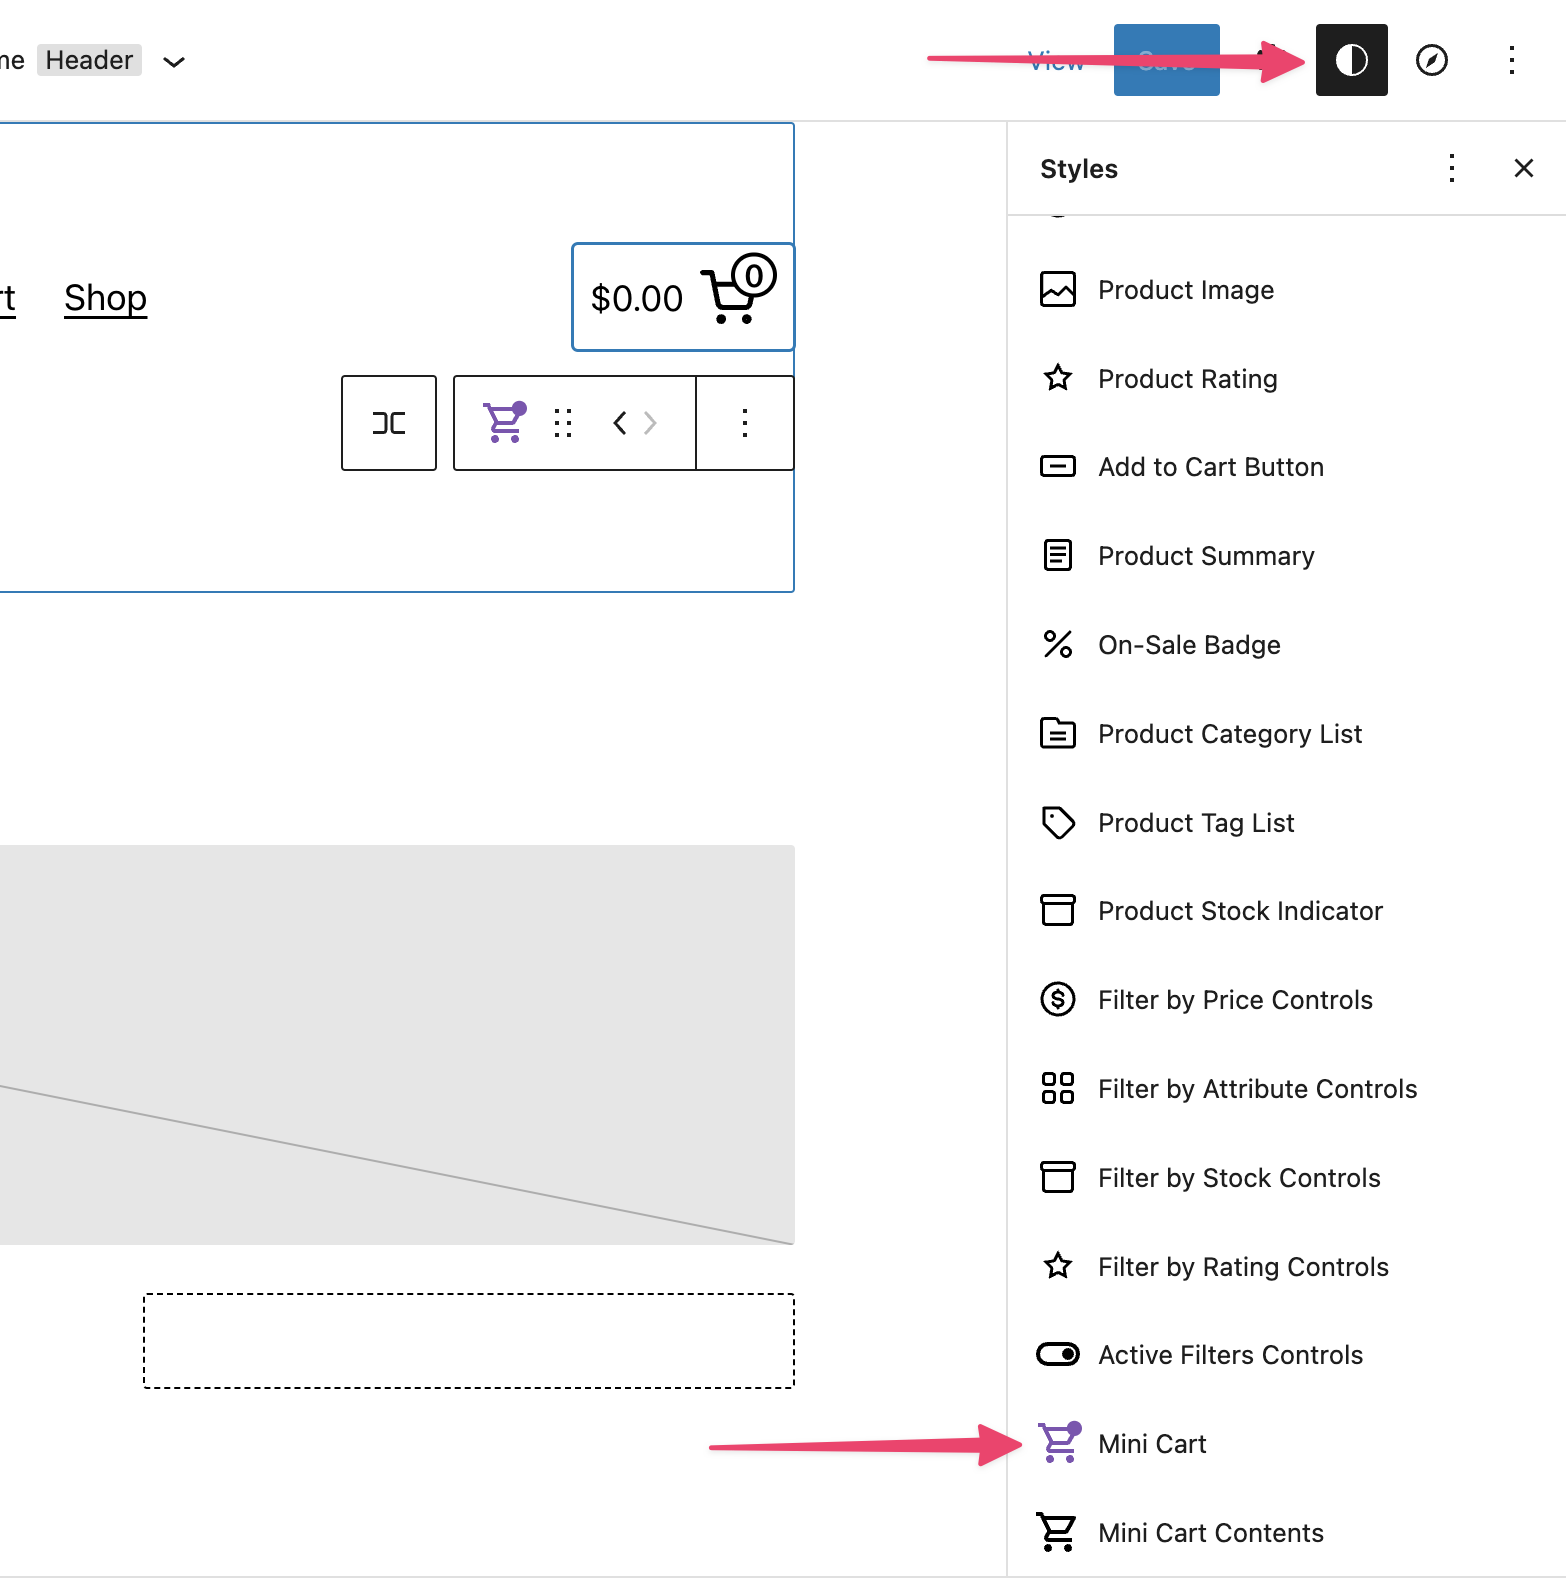
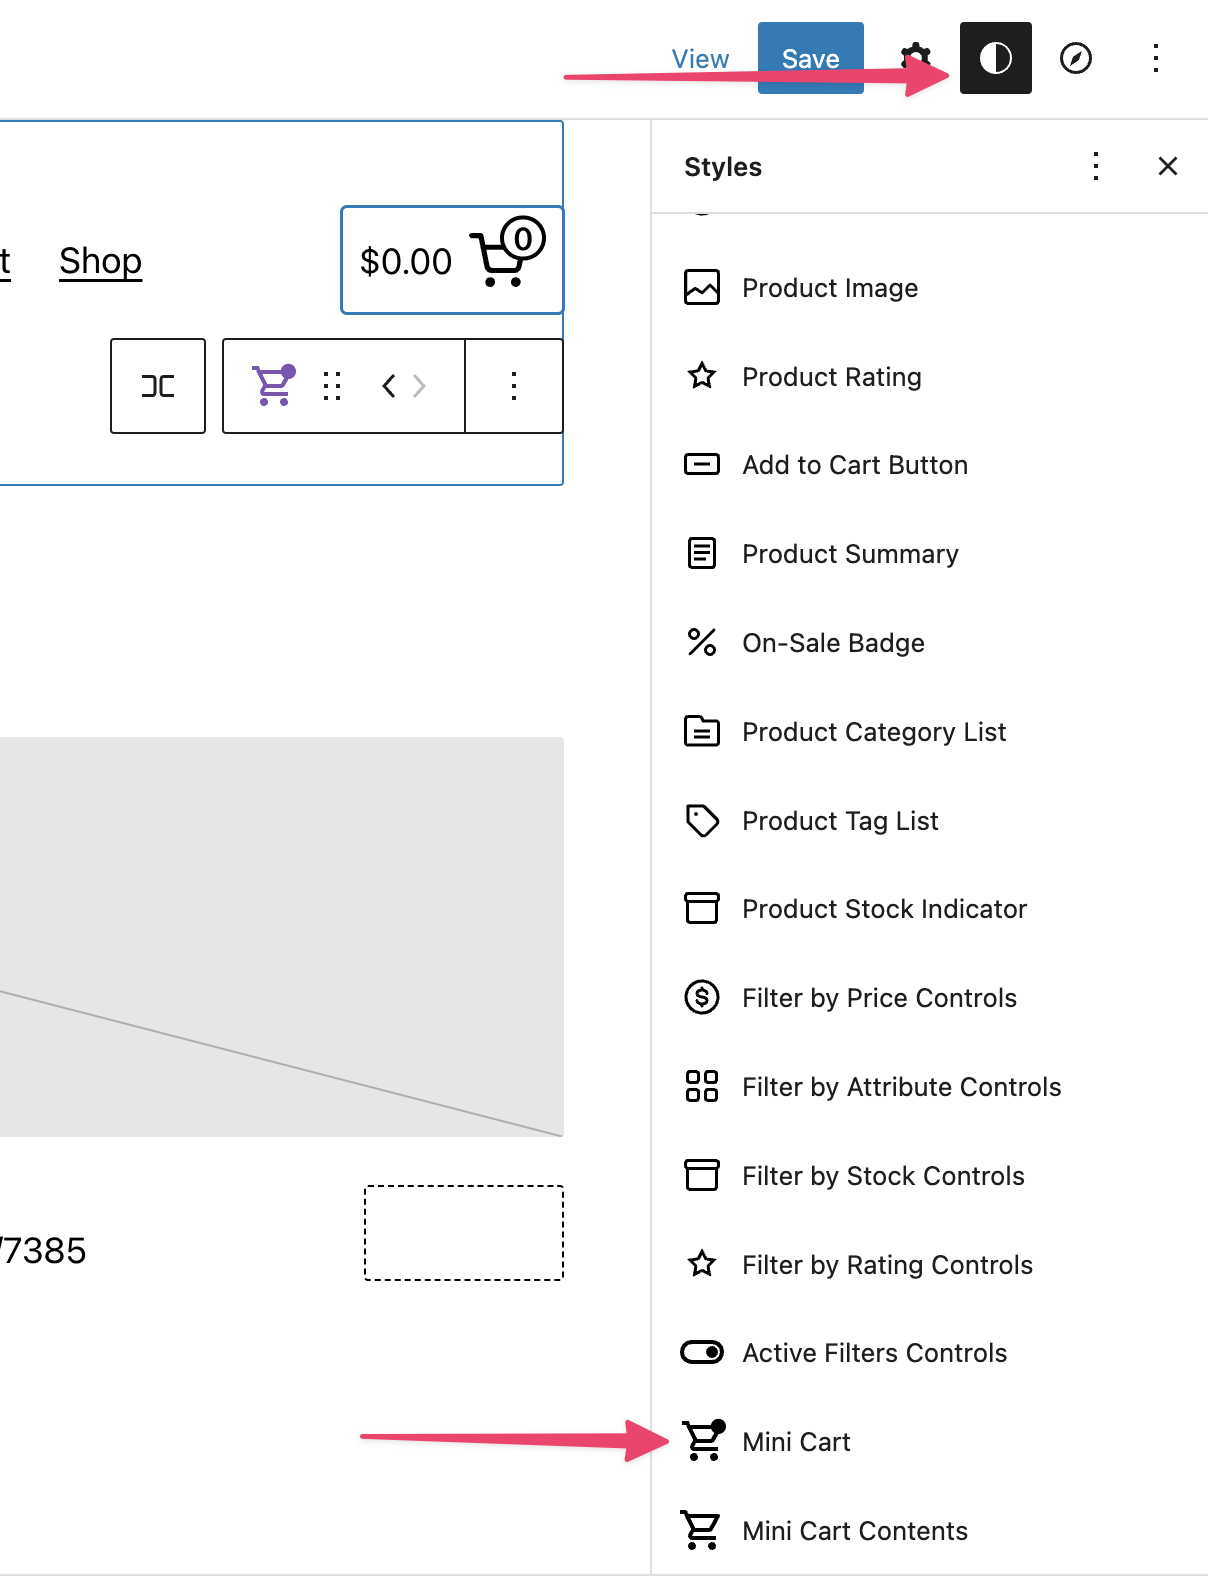
2. Navigate to Appearance > Editor (Beta) and go to the Global Styles customizer (click on the Styles button on the top toolbar and then the Blocks section towards the bottom - see screenshot below).
3. Scroll down to view the Mini Cart block and confirm the icon color is back like all of the others in the list.

### Enable merchants to adjust the label of the Proceed to Checkout button according to their needs. ([7733](https://github.com/woocommerce/woocommerce-blocks/pull/7733))
1. Open up the Cart page in the editor
2. Click on the `Proceed to Checkout` button. You should be able to edit the text of this button
3. Edit the text and press "Update"
4. Visit the Cart page on the front end and make sure the changes are visible
### Remove hidden autocomplete fields in checkout. ([7953](https://github.com/woocommerce/woocommerce-blocks/pull/7953))
Prerequisite: Browser must have saved addresses that can be used to autocomplete forms. Preferably 2 from different counties.
1. On a new checkout, trigger autocomplete in the name field.
2. Select the address.
3. Ensure country and state fields are populated.
4. State should be a select for countries with states (US), or a text input if not.
### Show notices to the shopper if an item in the cart's quantity is updated automatically. ([7938](https://github.com/woocommerce/woocommerce-blocks/pull/7938))
1. Add a coupon to your store.
2. Add some items to your cart and go to the Cart block.
3. Test changing the quantities of some items.
4. Test applying the coupon, it should work and you should see the discount applied.
5. Try applying a nonexistent coupon, you should see an error.
6. Ensure removing an item from your cart works correctly.
7. Continue to checkout and ensure placing the order works OK.
8. Edit a page and add the All Products Block. Ensure it loads correctly in the editor and in the front-end.
9. Try adding products to your cart from the All Products Block.
6. On the front end, ensure the filter by rating works as expected and without any changes.
### Prevent invalid data being pushed to the server when validating fields on the checkout. ([7755](https://github.com/woocommerce/woocommerce-blocks/pull/7755))
1. Make sure you're logged in so the field is populated with a valid email address e.g. `test@test.com`
2. Remove the .com part so it's invalid: `test@test`
3. Wait a few moments—no errors should appear.
4. Click out of the field. An inline validation error should appear.
### Product Query: Add Product Visibility support. ([7951](https://github.com/woocommerce/woocommerce-blocks/pull/7951))
0. Use the sample product data provided by WooCommerce.
1. On a new page, add the `Producs (Beta)` block and `[recent_products]` shortcode block.
2. Change the layout of the `Producs (Beta)` to 4 products per row x 3 rows.
3. Change the popular preset to `Newest`.
4. Save the page and view it in a new tab.
5. See the products inside the `Producs (Beta)` block (the front end and the editor) and the Recent Products shortcode are the same.
### Remove account creation setting from Checkout block. ([7941](https://github.com/woocommerce/woocommerce-blocks/pull/7941))
1. Create a test page and add the Checkout block.
2. Select the `Contact Information` inner block.
3. Verify that the `Allow shoppers to sign up for a user account during checkout` setting is no longer visible.
4. Verify that a notification with a link to the account settings in WooCommerce core is visible in the sidebar.
5. Go to the frontend and add a product to the cart.
6. Go to the checkout and place the order.
7. Verify that the order can be placed, and this PR does not break the Checkout block.
### Enable merchants to adjust the label of the `Place Order` button according to their needs. ([7843](https://github.com/woocommerce/woocommerce-blocks/pull/7843))
#### Filter and merchant value
> This test should verify that the filter value overwrites the merchant value.
1. Create a test page and add the Checkout block to it.
2. Install and activate the [Simple Custom CSS and JS](https://wordpress.org/plugins/custom-css-js/) plugin.
3. Head over to `/wp-admin/edit.php?post_type=custom-css-js` and add the following JS code snippet:
```js
const label = () => 'Pay now';
const { __experimentalRegisterCheckoutFilters } = window.wc.blocksCheckout;
__experimentalRegisterCheckoutFilters( 'custom-place-order-button-label', {
placeOrderButtonLabel: label,
} );
```
4. Head over to the Checkout block and change the label of the `Place Order` button to `Place Order Now`.
5. Head over to the frontend, add a product to the cart and open the page with the Checkout block.
6. Verify that the button label says `Pay now`.
#### Payment method and merchant value
> This test should verify that the payment method value overwrites the merchant value for the corresponding payment method, but that the merchant value is visible for other payment methods.
1. Head over to `/wp-admin/edit.php?post_type=custom-css-js` and deactivate the JS code snippet of the previous test.
2. Install and activate the [Code Snippets](https://wordpress.org/plugins/code-snippets/) plugin.
3. Head over to `/wp-admin/admin.php?page=snippets` and add the following PHP code snippet:
```php
add_filter( 'woocommerce_should_load_paypal_standard', '__return_true' );
```
4. Head over to `/wp-admin/admin.php?page=wc-settings&tab=checkout§ion=paypal` and select the options `Enable PayPal Standard` and ` Enable PayPal sandbox`.
5. Head over to the Checkout block and verify that the label of the `Place Order` button still says `Place Order Now`.
6. Head over to the frontend, add a product to the cart and open the page with the Checkout block.
7. Select the payment method `PayPal`.
8. Verify that the button label says `Proceed to PayPal`.
9. Select a payment method apart from `PayPal`.
10. Verify that the button label says `Place Order Now`.
#### Only merchant value
> This test should verify that the merchant value is visible.
1. Head over to `/wp-admin/admin.php?page=wc-settings&tab=checkout` and deactivate the payment method `PayPal Standard`.
2. Head over to the Checkout block and verify that the label of the `Place Order` button still says `Place Order Now`.
3. Head over to the frontend, add a product to the cart and open the page with the Checkout block.
4. Verify that for any selected payment method the label of the `Place Order` button says `Place Order Now`.
#### Default value
> Test that the default value remains visible in the frontend when no filter, payment method or merchant value is available, and that the button shows the placeholder text `Place Order` in the editor.
1. Head over to the Checkout block, empty the label of the `Place Order` button and save the page.
2. Verify that the placeholder text `Place Order` is visible.
3. Head over to the frontend, add a product to the cart and open the page with the Checkout block.
4. Verify that the label of the `Place Order` buttons says `Place Order` even though the button is empty in the editor.
### Enable merchants to edit the button labels within the Mini Cart block. ([7817](https://github.com/woocommerce/woocommerce-blocks/pull/7817))
1. Activate a FSE theme, e.g. Twenty Twenty-Three.
2. Go to `/wp-admin/site-editor.php?postType=wp_template_part`
3. Open the Mini Cart template.
4. Open the list view.
5. Navigate to `Mini Cart Contents » Filled Mini Cart view » Mini Cart Footer`.
6. Adjust the `View my cart` and `Go to checkout` labels.
7. Navigate to `Empty Mini Cart view » Mini Cart Shopping Button`.
8. Adjust the `Start shopping` label.
9. Add the Mini Cart block to one of the other templates, e.g. the header template.
10. Go to the frontend and open the Mini Cart block.
11. Verify that the expected `Start shopping` label is visible, when there are no products in the cart.
12. Verify that the expected `View my cart` and `Go to checkout` labels are visible, when there are products in the cart.
### Fix Mini Cart icon color in Global Styles blocks customizer. ([7762](https://github.com/woocommerce/woocommerce-blocks/pull/7762))
#### Screenshots
| Before | After |
| ------------------------------------------------------------------------------------------------------------------------------------------- | ------------------------------------------------------------------------------------------------------------------------------------------- |
|  |  |
#### Testing
1. Make sure you have a blocks theme active (like Twenty Twenty-Two).
2. Navigate to Appearance > Editor (Beta) and go to the Global Styles customizer (click on the Styles button on the top toolbar and then the Blocks section towards the bottom - see screenshot below).
3. Scroll down to view the Mini Cart block and confirm the icon color is back like all of the others in the list.

### Enable merchants to adjust the label of the Proceed to Checkout button according to their needs. ([7733](https://github.com/woocommerce/woocommerce-blocks/pull/7733))
1. Open up the Cart page in the editor
2. Click on the `Proceed to Checkout` button. You should be able to edit the text of this button
3. Edit the text and press "Update"
4. Visit the Cart page on the front end and make sure the changes are visible
### Remove hidden autocomplete fields in checkout. ([7953](https://github.com/woocommerce/woocommerce-blocks/pull/7953))
Prerequisite: Browser must have saved addresses that can be used to autocomplete forms. Preferably 2 from different counties.
1. On a new checkout, trigger autocomplete in the name field.
2. Select the address.
3. Ensure country and state fields are populated.
4. State should be a select for countries with states (US), or a text input if not.
### Show notices to the shopper if an item in the cart's quantity is updated automatically. ([7938](https://github.com/woocommerce/woocommerce-blocks/pull/7938))
1. Add a coupon to your store.
2. Add some items to your cart and go to the Cart block.
3. Test changing the quantities of some items.
4. Test applying the coupon, it should work and you should see the discount applied.
5. Try applying a nonexistent coupon, you should see an error.
6. Ensure removing an item from your cart works correctly.
7. Continue to checkout and ensure placing the order works OK.
8. Edit a page and add the All Products Block. Ensure it loads correctly in the editor and in the front-end.
9. Try adding products to your cart from the All Products Block.