 # Baby Buddy
[](https://opensource.org/licenses/BSD-2-Clause)
[](https://gitter.im/babybuddy/Lobby)
A buddy for babies! Helps caregivers track sleep, feedings, diaper changes,
tummy time and more to learn about and predict baby's needs without (*as much*)
guess work.
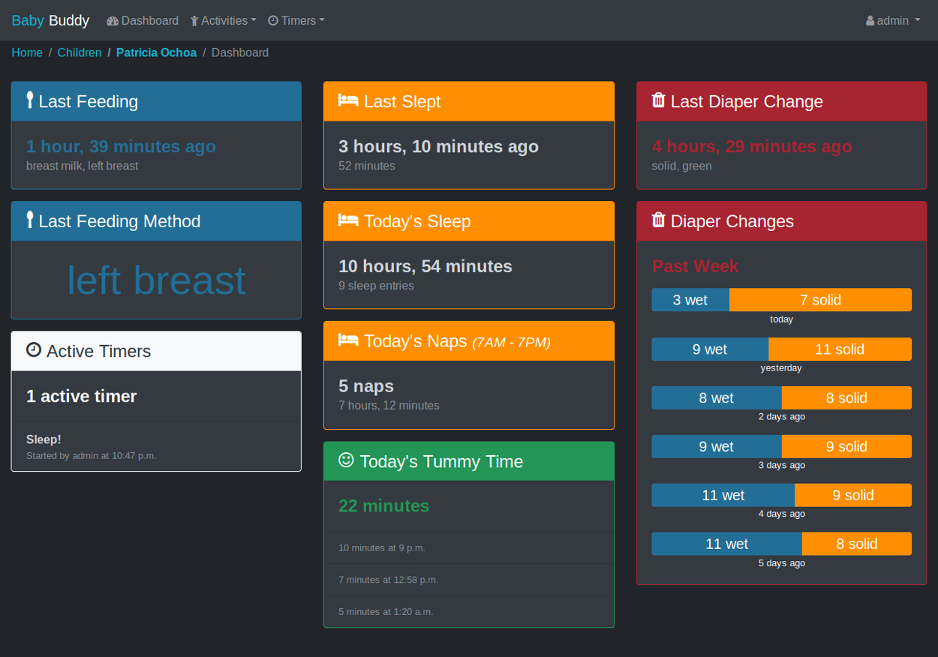
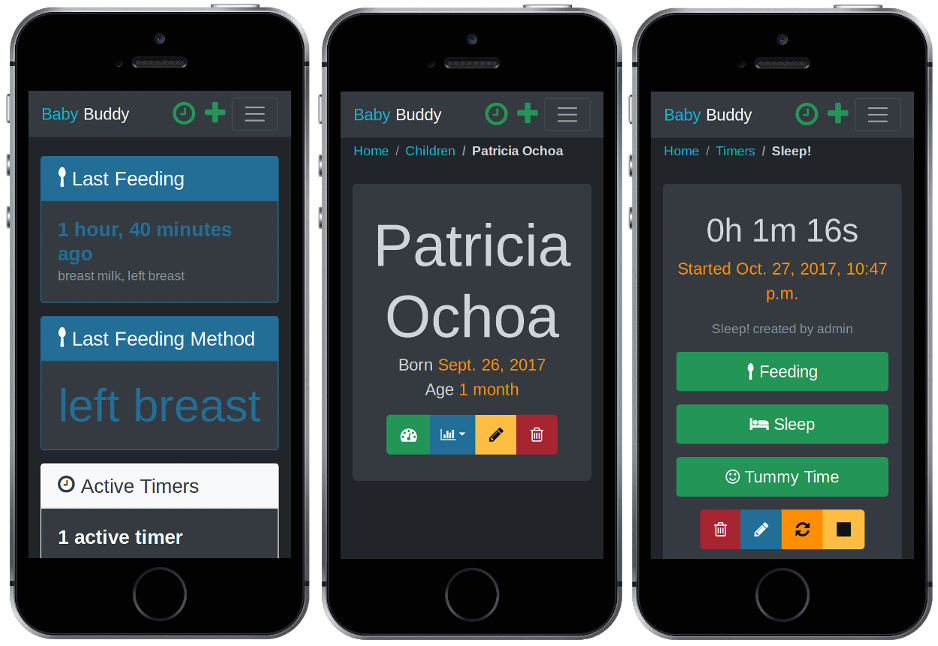
**Table of Contents**
- [Demo](#demo)
- [Deployment](#deployment)
- [AWS Elastic Beanstalk](#aws-elastic-beanstalk)
- [Docker](#docker)
- [Heroku](#heroku)
- [Manual](#manual)
- [Configuration](#configuration)
- [Languages](#languages)
- [Import/Export](#importexport)
- [Export](#export)
- [Import](#import)
- [API](#api)
- [Authentication](#authentication)
- [`GET` Method](#get-method)
- [`OPTIONS` Method](#options-method)
- [`POST` Method](#post-method)
- [`PATCH` Method](#patch-method)
- [`DELETE` Method](#delete-method)
- [Contributing](#contributing)
## Demo
A [demo of Baby Buddy](http://demo.baby-buddy.net) is available on Heroku.
The demo instance resets every hour. Login credentials are:
- Username: `admin`
- Password: `admin`
## Deployment
The default user name and password for Baby Buddy is `admin`/`admin`. For any
deployment, **log in and change the default admin password immediately**.
Many of Baby Buddy's configuration settings can be controlled using environment
variables - see [Configuration](#configuration) for detailed information.
### AWS Elastic Beanstalk
A basic [Elastic Beanstalk](https://aws.amazon.com/elasticbeanstalk/)
configuration is provided in `.ebextensions/babybuddy.config`. The steps
below are a rough guide to deployment. See [Working with Python](https://docs.aws.amazon.com/elasticbeanstalk/latest/dg/create-deploy-python-apps.html)
for detailed information.
1. Clone/download the Baby Buddy repo
git clone https://github.com/babybuddy/babybuddy.git
1. Enter the cloned/downloaded directory
cd babybuddy
1. Set (at least) the `SECRET_KEY` environment value in `.ebextensions/babybuddy.config`
*See [Configuration](#configuration) for other settings that can be
controlled by environment variables.
1. [Create an IAM user](http://docs.aws.amazon.com/IAM/latest/UserGuide/id_users_create.html) in AWS with EB, EC2, RDS and S3 privileges.
1. Initialize the Elastic Bean application (using the IAM user from the previous step)
eb init -p python-3.6
1. Create/deploy the environment! :rocket:
eb create -db -db.engine postgres
The create command will also do an initial deployment. Run `eb deploy` to
redeploy the app (e.g. if there are errors or settings are changed).
### Docker
A Docker deployment requires [Docker Engine](https://www.docker.com/) v18.06.0+
and [Docker Compose](https://docs.docker.com/compose/) v1.22.0+ to create two
containers: one for the database and one for the application.
The example `docker-compose.example.yml` file provided in this repository is
intended for production deployments. Baby Buddy is deployed to Docker Hub as
[babybuddy/babybuddy](https://hub.docker.com/r/babybuddy/babybuddy) so this is
the only file needed for a Docker deployment with Docker Compose.
A secondary example file `docker-compose.example.sqlite.yml` is also available
for a simpler SQLite-based deployment (the default example users PostgreSQL).
1. Copy the raw content of either `docker-compose.example.yml` or `docker-compose.example.sqlite.yml`
into a new file named `docker-compose.yml`
wget -O docker-compose.yml https://raw.githubusercontent.com/babybuddy/babybuddy/master/docker-compose.example.yml
*or*
wget -O docker-compose.yml https://raw.githubusercontent.com/babybuddy/babybuddy/master/docker-compose.example.sqlite.yml
1. Within `docker-compose.yml`, at the very least, set the `ALLOWED_HOSTS` and `SECRET_KEY` variables under
`services:app:environment`.
*See [Configuration](#configuration) for other settings that can be controlled by environment variables.*
1. Build/run the application
docker-compose up -d
The app should now be locally available at
[http://127.0.0.1:8000](http://127.0.0.1:8000). See
[Docker's "Get Started" documentation](https://docs.docker.com/get-started/)
for detailed information about deployment methods with Docker.
### Heroku
[](https://heroku.com/deploy)
For manual deployments to Heroku without using the deploy button, make sure to
create the following settings before pushing:
heroku config:set DJANGO_SETTINGS_MODULE=babybuddy.settings.heroku
heroku config:set SECRET_KEY=
heroku config:set DISABLE_COLLECTSTATIC=1
heroku config:set TIME_ZONE=
See [Configuration](#configuration) for other settings that can be controlled
by `heroku config:set`.
And after an initial push, execute the following commands:
heroku run python manage.py migrate
heroku run python manage.py createcachetable
### Manual
There are many ways to deploy Baby Buddy manually to any server/VPS. The basic
requirements are Python, a web server, an application server, and a database.
#### Requirements
- Python 3.6+, pip, pipenv
- Web server ([nginx](http://nginx.org/), [Apache](http://httpd.apache.org/), etc.)
- Application server ([uwsgi](http://projects.unbit.it/uwsgi), [gunicorn](http://gunicorn.org/), etc.)
- Database ([sqlite](https://sqlite.org/), [Postgres](https://www.postgresql.org/), [MySQL](https://www.mysql.com/), etc.)
#### Example deployment
*This example assumes a 512MB VPS instance with Ubuntu 18.04.* It uses
Python 3.6+, nginx, uwsgi and sqlite and should be sufficient for a few users
(e.g. two parents and 1+ child).
1. Install system packages
sudo apt-get install python3 python3-pip nginx uwsgi uwsgi-plugin-python3 git libopenjp2-7-dev
1. Default python3 to python for this session
alias python=python3
1. Install pipenv
sudo -H pip3 install pipenv
1. Set up directories and files
sudo mkdir /var/www/babybuddy
sudo chown $USER:$(id -gn $USER) /var/www/babybuddy
mkdir -p /var/www/babybuddy/data/media
git clone https://github.com/babybuddy/babybuddy.git /var/www/babybuddy/public
1. Move in to the application folder
cd /var/www/babybuddy/public
1. Set pipenv to install locally.
export PIPENV_VENV_IN_PROJECT=1
1. Initiate and enter the Python environment
pipenv install --three
pipenv shell
1. Create a production settings file and set the ``SECRET_KEY`` and ``ALLOWED_HOSTS`` values
cp babybuddy/settings/production.example.py babybuddy/settings/production.py
editor babybuddy/settings/production.py
1. Initiate the application
export DJANGO_SETTINGS_MODULE=babybuddy.settings.production
python manage.py migrate
python manage.py createcachetable
1. Set appropriate permissions on the database and data folder
sudo chown -R www-data:www-data /var/www/babybuddy/data
sudo chmod 640 /var/www/babybuddy/data/db.sqlite3
sudo chmod 750 /var/www/babybuddy/data
1. Create and configure the uwsgi app
sudo editor /etc/uwsgi/apps-available/babybuddy.ini
Example config:
[uwsgi]
plugins = python3
project = babybuddy
base_dir = /var/www/babybuddy
chdir = %(base_dir)/public
virtualenv = %(chdir)/.venv
module = %(project).wsgi:application
env = DJANGO_SETTINGS_MODULE=%(project).settings.production
master = True
vacuum = True
See the [uWSGI documentation](http://uwsgi-docs.readthedocs.io/en/latest/)
for more advanced configuration details.
1. Symlink config and restart uWSGI:
sudo ln -s /etc/uwsgi/apps-available/babybuddy.ini /etc/uwsgi/apps-enabled/babybuddy.ini
sudo service uwsgi restart
1. Create and configure the nginx server
sudo editor /etc/nginx/sites-available/babybuddy
Example config:
upstream babybuddy {
server unix:///var/run/uwsgi/app/babybuddy/socket;
}
server {
listen 80;
server_name babybuddy.example.com;
location / {
uwsgi_pass babybuddy;
include uwsgi_params;
}
location /media {
alias /var/www/babybuddy/data/media;
}
}
See the [nginx documentation](https://nginx.org/en/docs/) for more advanced
configuration details.
1. Symlink config and restart NGINX:
sudo ln -s /etc/nginx/sites-available/babybuddy /etc/nginx/sites-enabled/babybuddy
sudo service nginx restart
1. That's it (hopefully)! :tada:
## Configuration
Environment variables can be used to define a number of configuration settings.
Baby Buddy will check the application directory structure for an `.env` file or
take these variables from the system environment. **System environment variables
take precedence over the contents of an `.env` file.**
- [`ALLOWED_HOSTS`](#allowed_hosts)
- [`ALLOW_UPLOADS`](#allow_uploads)
- [`AWS_ACCESS_KEY_ID`](#aws_access_key_id)
- [`AWS_SECRET_ACCESS_KEY`](#aws_secret_access_key)
- [`AWS_STORAGE_BUCKET_NAME`](#aws_storage_bucket_name)
- [`DEBUG`](#debug)
- [`NAP_START_MAX`](#nap_start_max)
- [`NAP_START_MIN`](#nap_start_min)
- [`DB_ENGINE`](#db_engine)
- [`DB_HOST`](#db_host)
- ['DB_NAME'](#db_name)
- [`DB_PASSWORD`](#db_password)
- [`DB_PORT`](#db_port)
- [`DB_USER`](#db_user)
- [`SECRET_KEY`](#secret_key)
- [`TIME_ZONE`](#time_zone)
- [`USE_24_HOUR_TIME_FORMAT`](#use_24_hour_time_format)
### `ALLOWED_HOSTS`
*Default: * (any)*
This option may be set to a single host or comma-separated list of hosts
(without spaces). This should *always* be set to a specific host or hosts in
production deployments.
See also: [Django's documentation on the ALLOWED_HOSTS setting](https://docs.djangoproject.com/en/3.0/ref/settings/#allowed-hosts)
### `ALLOW_UPLOADS`
*Default: True*
Whether or not to allow uploads (e.g. of Child photos). For some deployments
(AWS, Heroku) this setting will default to False due to the lack of available
persistent storage.
### `AWS_ACCESS_KEY_ID`
*Default: None*
Required to access your AWS S3 bucket, should be uniquely generated per bucket
for security.
See also: [`AWS_STORAGE_BUCKET_NAME`](#aws_storage_bucket_name)
### `AWS_SECRET_ACCESS_KEY`
*Default: None*
Required to access your AWS S3 bucket, should be uniquely generated per bucket
for security.
See also: [`AWS_STORAGE_BUCKET_NAME`](#aws_storage_bucket_name)
### `AWS_STORAGE_BUCKET_NAME`
*Default: None*
If you would like to use AWS S3 for storage on ephemeral storage platforms like
Heroku you will need to create a bucket and add it's name. See django-storages'
[Amazon S3 documentation](https://django-storages.readthedocs.io/en/latest/backends/amazon-S3.html).
### `DEBUG`
*Default: False*
When in debug mode, Baby Buddy will print much more detailed error information
for exceptions. This setting should be *False* in production deployments.
See also [Django's documentation on the DEBUG setting](https://docs.djangoproject.com/en/3.0/ref/settings/#debug).
### `NAP_START_MAX`
*Default: 18:00*
The maximum *start* time (in the instance's time zone) before which a sleep
entry is consider a nap. Expects the 24-hour format %H:%M.
### `NAP_START_MIN`
*Default: 06:00*
The minimum *start* time (in the instance's time zone) after which a sleep
entry is considered a nap. Expects the 24-hour format %H:%M.
### 'DB_ENGINE'
*Default: django.db.backends.postgresql*
The database engine utilized for the deployment.
See also [Django's documentation on the ENGINE setting](https://docs.djangoproject.com/en/3.0/ref/settings/#engine) .
### 'DB_HOST'
*Default: db*
The name of the database host for the deployment.
### 'DB_NAME'
*Default: postgres*
The name of the database table utilized for the deployment.
### 'DB_PASSWORD'
*No Default*
The password for the database user for the deployment. In the default example, this is the root PostgreSQL password.
### 'DB_PORT'
*Default: 5432*
The listening port for the database. The default port is 5432 for PostgreSQL.
### 'DB_USER'
*Default: postgres*
The database username utilized for the deployment.
### `SECRET_KEY`
*Default: None*
A random, unique string must be set as the "secret key" before Baby Buddy can
be deployed and run.
See also [Django's documentation on the SECRET_KEY setting](https://docs.djangoproject.com/en/3.0/ref/settings/#secret-key).
### `TIME_ZONE`
*Default: UTC*
The default time zone to use for the instance. See [List of tz database time zones](https://en.wikipedia.org/wiki/List_of_tz_database_time_zones)
for all possible values. This value can be overridden per use from the user
settings form.
### `USE_24_HOUR_TIME_FORMAT`
*Default: False*
Whether to force 24-hour time format for locales that do not ordinarily use it
(e.g. `en`). Support for this feature must implemented on a per-locale basis.
See format files under [`babybuddy/formats`](babybuddy/formats) for supported
locales.
Note: This value for this setting is interpreted as a boolean from a string
using Python's built-in [`strtobool`](https://docs.python.org/3/distutils/apiref.html#distutils.util.strtobool)
tool. Only certain strings are supported (e.g. "True" for `True` and "False" for
`False`), other unrecognized strings will cause a `ValueError` and prevent Baby
Buddy from loading.
## Languages
Baby Buddy includes translation support as of v1.2.2. Language can be set on a
per-user basis from the user settings page (`/user/settings/`). See
[CONTRIBUTING.md](CONTRIBUTING.md#translation) for information about how to
create/update translations.
### Available languages
:us: English (U.S.) *(base)*
:netherlands: Dutch
:finland: Finnish
:fr: French
:de: German
:it: Italian
:mexico: :es: Spanish
:sweden: Swedish
:tr: Turkish
## Import/Export
Baby Buddy uses the [django-import-export application](https://django-import-export.readthedocs.io/)
to provide import and export functionality.
### Export
Export actions are accessible from Baby Buddy's "Database Admin" area (the
Django admin interface). For example, to export all diaper change entries from
Baby Buddy as an Excel file:
1. Log in as a user with "staff" access.
1. From the user menu, click "Database Admin" under the "Site" heading.
1. Click "Diaper Changes" in the list of data types.
1. Click the "Export" button above the filters list on the right side of the
screen.
1. Select the "xlxs" format and click "Submit"
Note: any applied filters will also filter the exported entries. Alternatively,
on the Diaper Change list screen (step 3 above), it is possible to select one
or many individual records and select "Export selected Diaper Changes" from the
"Actions" list.
### Import
Import actions are accessible from Baby Buddy's "Database Admin" area (the
Django admin interface). From the list of entry types in the Database Admin,
select the type to import and click the "Import" button on the list page. The
import screen for a particular type will list the fields generally expected to
be present for an import. Multiple file types -- including csv, xlsx, etc. --
are supported for the import.
The import pages do not provide *detailed* information about the required data
and formats. When an import is attempted, all rows will be checked for errors
and any issues will be reported on screen and will need to be resolved before
the import can be performed.
See the [example import files](core/tests/import) used for tests to get an idea
of the expected data format.
## API
Baby Buddy uses the [Django REST Framework](https://www.django-rest-framework.org/)
(DRF) to provide a REST API.
The only requirement for (most) requests is that the `Authorization` header is
set as described in the [Authentication](#authentication) section. The one
exception is the `/api` endpoint, which lists all available endpoints.
Currently, the following endpoints are available for `GET`, `OPTIONS`, and
`POST` requests:
- `/api/children/`
- `/api/changes/` (Diaper Changes)
- `/api/feedings/`
- `/api/notes/`
- `/api/sleep/`
- `/api/temperature/`
- `/api/timers/`
- `/api/tummy-times/`
- `/api/weight/`
### Authentication
By default, the [TokenAuthentication](https://www.django-rest-framework.org/api-guide/authentication/#tokenauthentication)
and [SessionAuthentication](https://www.django-rest-framework.org/api-guide/authentication/#sessionauthentication)
classes are enabled. Session authentication covers local API requests made by
the application itself. Token authentication allows external requests to be
made.
:exclamation: **In a production environment, token authentication should only
be used for API calls to an `https` endpoint.** :exclamation:
Each user is automatically assigned an API key that can be used for token
authentication. This key can be found on the User Settings page for the logged
in the user. To use a key for an API request, set the request `Authorization`
header to `Token `. E.g.
Authorization: Token 2h23807gd72h7hop382p98hd823dw3g665g56
If the `Authorization` header is not set or the key is not valid, the API will
return `403 Forbidden` with additional details in the response body.
### Schema
API schema information in the [OpenAPI format](https://swagger.io/specification/)
can be found in the `openapi-schema.yml` file in the project root. A live
version is also available at the `/api/scehma` path of a running instance.
### `GET` Method
#### Request
The `limit` and `offset` request parameters can be used to limit
and offset the results set respectively. For example, the following request
will return five diaper changes starting from the 10th diaper change entry:
curl -X GET 'https://[...]/api/changes/?limit=5&offset=10' -H 'Authorization: Token [...]'
{
"count": ,
"next": "https://[...]/api/changes/?limit=5&offset=15",
"previous": "https://[...]/api/changes/?limit=5&offset=5",
"results": [...]
}
Field-based filters for specific endpoints can be found the in the `filters`
field of the `OPTIONS` response for specific endpoints.
Single entries can also be retrieved by adding the ID (or in the case of a
Child entry, the slug) of a particular entry:
curl -X GET https://[...]/api/children/gregory-hill/ -H 'Authorization: Token [...]'
{
"id":3,
"first_name":"Gregory",
"last_name":"Hill",
"birth_date":"2020-02-11",
"slug":"gregory-hill",
"picture":null
}
curl -X GET https://[...]/api/sleep/1/ -H 'Authorization: Token [...]'
{
"id":480,
"child":3,
"start":"2020-03-12T21:25:28.916016-07:00",
"end":"2020-03-13T01:34:28.916016-07:00",
"duration":"04:09:00",
"nap":false
}
#### Response
Returns JSON data in the response body in the following format:
{
"count":,
"next":,
"previous":,
"results":[{...}]
}
- `count`: Total number of records (*in the database*, not just the response).
- `next`: URL for the next set of results.
- `previous`: URL for the previous set of results.
- `results`: An array of the results of the request.
For single entries, returns JSON data in the response body keyed by model field
names. This will vary between models.
### `OPTIONS` Method
#### Request
All endpoints will respond to an `OPTIONS` request with detailed information
about the endpoint's purpose, parameters, filters, etc.
#### Response
Returns JSON data in the response body describing the endpoint, available
options for `POST` requests, and available filters for `GET` requests. The
following example describes the `/api/children` endpoint:
{
"name": "Child List",
"renders": [
"application/json",
"text/html"
],
"parses": [
"application/json",
"application/x-www-form-urlencoded",
"multipart/form-data"
],
"actions": {
"POST": {
"id": {
"type": "integer",
"required": false,
"read_only": true,
"label": "ID"
},
[...]
}
},
"filters": [
"first_name",
"last_name",
"slug"
]
}
### `POST` Method
#### Request
To add new entries for a particular endpoint, send a `POST` request with the
entry data in JSON format in the request body. The `Content-Type` header for
`POST` request must be set to `application/json`.
Regular sanity checks will be performed on relevant data. See the `OPTIONS`
response for a particular endpoint for details on required fields and data
formats.
#### Timer Field
The "timer" field is a special field available for `POST` operations to model
endpoints supporting duration (Feeding, Sleep, Tummy Time). When the "timer"
field is set in the request, the `start` and `end` fields will be filled in
automatically using the `start` and `end` values *from the Timer* (the Timer
will be stopped if it is currently running).
Additionally, if the Timer has a Child relationship, the `child` field will be
filled in automatically use the `child` value from the Timer.
If the "timer" field is set, it's values will **always override** the relevant
fields in the request. E.g. if a `POST` request is sent with both the `timer`
and `end` fields, the value for the `end` field will be ignored and replaced by
the Timer's `end` value. The same applies for `start` and `child`. These fields
can all be left out of the request when the Timer is provided, otherwise they
are required fields.
#### Response
Returns JSON data in the response body describing the added/updated instance or
error details if errors exist. Errors are keyed by either the field in error or
the general string `non_field_errors` (usually when validation involves
multiple fields).
### `PATCH` Method
#### Request
To update existing entries, send a `PATCH` request to the single entry endpoint
for the entry to be updated. The `Content-Type` header for `PATCH` request must
be set to `application/json`. For example, to update a Diaper Change entry with
ID 947 to indicate a "wet" diaper only:
curl -X PATCH \
-H 'Authorization: Token [...]' \
-H "Content-Type: application/json" \
-d '{"wet":1, "solid":0}' \
https://[...]/api/changes/947/
Regular sanity checks will be performed on relevant data. See the `OPTIONS`
response for a particular endpoint for details on required fields and data
formats.
#### Response
Returns JSON data in the response body describing the added/updated instance or
error details if errors exist. Errors are keyed by either the field in error or
the general string `non_field_errors` (usually when validation involves
multiple fields).
### `DELETE` Method
#### Request
To delete an existing entry, send a `DELETE` request to the single entry
endpoint to be deleted. For example, to delete a Diaper Change entry with ID
947:
curl -X DELETE https://[...]/api/changes/947/ -H 'Authorization: Token [...]'
#### Response
Returns an empty response with HTTP status code `204` on success, or a JSON
encoded error detail if an error occurred (e.g. `{"detail":"Not found."}` if
the requested ID does not exist).
## Contributing
Contributions are welcome! See [CONTRIBUTING.md](CONTRIBUTING.md) for detailed
information about how to contribute to Baby Buddy.
# Baby Buddy
[](https://opensource.org/licenses/BSD-2-Clause)
[](https://gitter.im/babybuddy/Lobby)
A buddy for babies! Helps caregivers track sleep, feedings, diaper changes,
tummy time and more to learn about and predict baby's needs without (*as much*)
guess work.


**Table of Contents**
- [Demo](#demo)
- [Deployment](#deployment)
- [AWS Elastic Beanstalk](#aws-elastic-beanstalk)
- [Docker](#docker)
- [Heroku](#heroku)
- [Manual](#manual)
- [Configuration](#configuration)
- [Languages](#languages)
- [Import/Export](#importexport)
- [Export](#export)
- [Import](#import)
- [API](#api)
- [Authentication](#authentication)
- [`GET` Method](#get-method)
- [`OPTIONS` Method](#options-method)
- [`POST` Method](#post-method)
- [`PATCH` Method](#patch-method)
- [`DELETE` Method](#delete-method)
- [Contributing](#contributing)
## Demo
A [demo of Baby Buddy](http://demo.baby-buddy.net) is available on Heroku.
The demo instance resets every hour. Login credentials are:
- Username: `admin`
- Password: `admin`
## Deployment
The default user name and password for Baby Buddy is `admin`/`admin`. For any
deployment, **log in and change the default admin password immediately**.
Many of Baby Buddy's configuration settings can be controlled using environment
variables - see [Configuration](#configuration) for detailed information.
### AWS Elastic Beanstalk
A basic [Elastic Beanstalk](https://aws.amazon.com/elasticbeanstalk/)
configuration is provided in `.ebextensions/babybuddy.config`. The steps
below are a rough guide to deployment. See [Working with Python](https://docs.aws.amazon.com/elasticbeanstalk/latest/dg/create-deploy-python-apps.html)
for detailed information.
1. Clone/download the Baby Buddy repo
git clone https://github.com/babybuddy/babybuddy.git
1. Enter the cloned/downloaded directory
cd babybuddy
1. Set (at least) the `SECRET_KEY` environment value in `.ebextensions/babybuddy.config`
*See [Configuration](#configuration) for other settings that can be
controlled by environment variables.
1. [Create an IAM user](http://docs.aws.amazon.com/IAM/latest/UserGuide/id_users_create.html) in AWS with EB, EC2, RDS and S3 privileges.
1. Initialize the Elastic Bean application (using the IAM user from the previous step)
eb init -p python-3.6
1. Create/deploy the environment! :rocket:
eb create -db -db.engine postgres
The create command will also do an initial deployment. Run `eb deploy` to
redeploy the app (e.g. if there are errors or settings are changed).
### Docker
A Docker deployment requires [Docker Engine](https://www.docker.com/) v18.06.0+
and [Docker Compose](https://docs.docker.com/compose/) v1.22.0+ to create two
containers: one for the database and one for the application.
The example `docker-compose.example.yml` file provided in this repository is
intended for production deployments. Baby Buddy is deployed to Docker Hub as
[babybuddy/babybuddy](https://hub.docker.com/r/babybuddy/babybuddy) so this is
the only file needed for a Docker deployment with Docker Compose.
A secondary example file `docker-compose.example.sqlite.yml` is also available
for a simpler SQLite-based deployment (the default example users PostgreSQL).
1. Copy the raw content of either `docker-compose.example.yml` or `docker-compose.example.sqlite.yml`
into a new file named `docker-compose.yml`
wget -O docker-compose.yml https://raw.githubusercontent.com/babybuddy/babybuddy/master/docker-compose.example.yml
*or*
wget -O docker-compose.yml https://raw.githubusercontent.com/babybuddy/babybuddy/master/docker-compose.example.sqlite.yml
1. Within `docker-compose.yml`, at the very least, set the `ALLOWED_HOSTS` and `SECRET_KEY` variables under
`services:app:environment`.
*See [Configuration](#configuration) for other settings that can be controlled by environment variables.*
1. Build/run the application
docker-compose up -d
The app should now be locally available at
[http://127.0.0.1:8000](http://127.0.0.1:8000). See
[Docker's "Get Started" documentation](https://docs.docker.com/get-started/)
for detailed information about deployment methods with Docker.
### Heroku
[](https://heroku.com/deploy)
For manual deployments to Heroku without using the deploy button, make sure to
create the following settings before pushing:
heroku config:set DJANGO_SETTINGS_MODULE=babybuddy.settings.heroku
heroku config:set SECRET_KEY=
heroku config:set DISABLE_COLLECTSTATIC=1
heroku config:set TIME_ZONE=
See [Configuration](#configuration) for other settings that can be controlled
by `heroku config:set`.
And after an initial push, execute the following commands:
heroku run python manage.py migrate
heroku run python manage.py createcachetable
### Manual
There are many ways to deploy Baby Buddy manually to any server/VPS. The basic
requirements are Python, a web server, an application server, and a database.
#### Requirements
- Python 3.6+, pip, pipenv
- Web server ([nginx](http://nginx.org/), [Apache](http://httpd.apache.org/), etc.)
- Application server ([uwsgi](http://projects.unbit.it/uwsgi), [gunicorn](http://gunicorn.org/), etc.)
- Database ([sqlite](https://sqlite.org/), [Postgres](https://www.postgresql.org/), [MySQL](https://www.mysql.com/), etc.)
#### Example deployment
*This example assumes a 512MB VPS instance with Ubuntu 18.04.* It uses
Python 3.6+, nginx, uwsgi and sqlite and should be sufficient for a few users
(e.g. two parents and 1+ child).
1. Install system packages
sudo apt-get install python3 python3-pip nginx uwsgi uwsgi-plugin-python3 git libopenjp2-7-dev
1. Default python3 to python for this session
alias python=python3
1. Install pipenv
sudo -H pip3 install pipenv
1. Set up directories and files
sudo mkdir /var/www/babybuddy
sudo chown $USER:$(id -gn $USER) /var/www/babybuddy
mkdir -p /var/www/babybuddy/data/media
git clone https://github.com/babybuddy/babybuddy.git /var/www/babybuddy/public
1. Move in to the application folder
cd /var/www/babybuddy/public
1. Set pipenv to install locally.
export PIPENV_VENV_IN_PROJECT=1
1. Initiate and enter the Python environment
pipenv install --three
pipenv shell
1. Create a production settings file and set the ``SECRET_KEY`` and ``ALLOWED_HOSTS`` values
cp babybuddy/settings/production.example.py babybuddy/settings/production.py
editor babybuddy/settings/production.py
1. Initiate the application
export DJANGO_SETTINGS_MODULE=babybuddy.settings.production
python manage.py migrate
python manage.py createcachetable
1. Set appropriate permissions on the database and data folder
sudo chown -R www-data:www-data /var/www/babybuddy/data
sudo chmod 640 /var/www/babybuddy/data/db.sqlite3
sudo chmod 750 /var/www/babybuddy/data
1. Create and configure the uwsgi app
sudo editor /etc/uwsgi/apps-available/babybuddy.ini
Example config:
[uwsgi]
plugins = python3
project = babybuddy
base_dir = /var/www/babybuddy
chdir = %(base_dir)/public
virtualenv = %(chdir)/.venv
module = %(project).wsgi:application
env = DJANGO_SETTINGS_MODULE=%(project).settings.production
master = True
vacuum = True
See the [uWSGI documentation](http://uwsgi-docs.readthedocs.io/en/latest/)
for more advanced configuration details.
1. Symlink config and restart uWSGI:
sudo ln -s /etc/uwsgi/apps-available/babybuddy.ini /etc/uwsgi/apps-enabled/babybuddy.ini
sudo service uwsgi restart
1. Create and configure the nginx server
sudo editor /etc/nginx/sites-available/babybuddy
Example config:
upstream babybuddy {
server unix:///var/run/uwsgi/app/babybuddy/socket;
}
server {
listen 80;
server_name babybuddy.example.com;
location / {
uwsgi_pass babybuddy;
include uwsgi_params;
}
location /media {
alias /var/www/babybuddy/data/media;
}
}
See the [nginx documentation](https://nginx.org/en/docs/) for more advanced
configuration details.
1. Symlink config and restart NGINX:
sudo ln -s /etc/nginx/sites-available/babybuddy /etc/nginx/sites-enabled/babybuddy
sudo service nginx restart
1. That's it (hopefully)! :tada:
## Configuration
Environment variables can be used to define a number of configuration settings.
Baby Buddy will check the application directory structure for an `.env` file or
take these variables from the system environment. **System environment variables
take precedence over the contents of an `.env` file.**
- [`ALLOWED_HOSTS`](#allowed_hosts)
- [`ALLOW_UPLOADS`](#allow_uploads)
- [`AWS_ACCESS_KEY_ID`](#aws_access_key_id)
- [`AWS_SECRET_ACCESS_KEY`](#aws_secret_access_key)
- [`AWS_STORAGE_BUCKET_NAME`](#aws_storage_bucket_name)
- [`DEBUG`](#debug)
- [`NAP_START_MAX`](#nap_start_max)
- [`NAP_START_MIN`](#nap_start_min)
- [`DB_ENGINE`](#db_engine)
- [`DB_HOST`](#db_host)
- ['DB_NAME'](#db_name)
- [`DB_PASSWORD`](#db_password)
- [`DB_PORT`](#db_port)
- [`DB_USER`](#db_user)
- [`SECRET_KEY`](#secret_key)
- [`TIME_ZONE`](#time_zone)
- [`USE_24_HOUR_TIME_FORMAT`](#use_24_hour_time_format)
### `ALLOWED_HOSTS`
*Default: * (any)*
This option may be set to a single host or comma-separated list of hosts
(without spaces). This should *always* be set to a specific host or hosts in
production deployments.
See also: [Django's documentation on the ALLOWED_HOSTS setting](https://docs.djangoproject.com/en/3.0/ref/settings/#allowed-hosts)
### `ALLOW_UPLOADS`
*Default: True*
Whether or not to allow uploads (e.g. of Child photos). For some deployments
(AWS, Heroku) this setting will default to False due to the lack of available
persistent storage.
### `AWS_ACCESS_KEY_ID`
*Default: None*
Required to access your AWS S3 bucket, should be uniquely generated per bucket
for security.
See also: [`AWS_STORAGE_BUCKET_NAME`](#aws_storage_bucket_name)
### `AWS_SECRET_ACCESS_KEY`
*Default: None*
Required to access your AWS S3 bucket, should be uniquely generated per bucket
for security.
See also: [`AWS_STORAGE_BUCKET_NAME`](#aws_storage_bucket_name)
### `AWS_STORAGE_BUCKET_NAME`
*Default: None*
If you would like to use AWS S3 for storage on ephemeral storage platforms like
Heroku you will need to create a bucket and add it's name. See django-storages'
[Amazon S3 documentation](https://django-storages.readthedocs.io/en/latest/backends/amazon-S3.html).
### `DEBUG`
*Default: False*
When in debug mode, Baby Buddy will print much more detailed error information
for exceptions. This setting should be *False* in production deployments.
See also [Django's documentation on the DEBUG setting](https://docs.djangoproject.com/en/3.0/ref/settings/#debug).
### `NAP_START_MAX`
*Default: 18:00*
The maximum *start* time (in the instance's time zone) before which a sleep
entry is consider a nap. Expects the 24-hour format %H:%M.
### `NAP_START_MIN`
*Default: 06:00*
The minimum *start* time (in the instance's time zone) after which a sleep
entry is considered a nap. Expects the 24-hour format %H:%M.
### 'DB_ENGINE'
*Default: django.db.backends.postgresql*
The database engine utilized for the deployment.
See also [Django's documentation on the ENGINE setting](https://docs.djangoproject.com/en/3.0/ref/settings/#engine) .
### 'DB_HOST'
*Default: db*
The name of the database host for the deployment.
### 'DB_NAME'
*Default: postgres*
The name of the database table utilized for the deployment.
### 'DB_PASSWORD'
*No Default*
The password for the database user for the deployment. In the default example, this is the root PostgreSQL password.
### 'DB_PORT'
*Default: 5432*
The listening port for the database. The default port is 5432 for PostgreSQL.
### 'DB_USER'
*Default: postgres*
The database username utilized for the deployment.
### `SECRET_KEY`
*Default: None*
A random, unique string must be set as the "secret key" before Baby Buddy can
be deployed and run.
See also [Django's documentation on the SECRET_KEY setting](https://docs.djangoproject.com/en/3.0/ref/settings/#secret-key).
### `TIME_ZONE`
*Default: UTC*
The default time zone to use for the instance. See [List of tz database time zones](https://en.wikipedia.org/wiki/List_of_tz_database_time_zones)
for all possible values. This value can be overridden per use from the user
settings form.
### `USE_24_HOUR_TIME_FORMAT`
*Default: False*
Whether to force 24-hour time format for locales that do not ordinarily use it
(e.g. `en`). Support for this feature must implemented on a per-locale basis.
See format files under [`babybuddy/formats`](babybuddy/formats) for supported
locales.
Note: This value for this setting is interpreted as a boolean from a string
using Python's built-in [`strtobool`](https://docs.python.org/3/distutils/apiref.html#distutils.util.strtobool)
tool. Only certain strings are supported (e.g. "True" for `True` and "False" for
`False`), other unrecognized strings will cause a `ValueError` and prevent Baby
Buddy from loading.
## Languages
Baby Buddy includes translation support as of v1.2.2. Language can be set on a
per-user basis from the user settings page (`/user/settings/`). See
[CONTRIBUTING.md](CONTRIBUTING.md#translation) for information about how to
create/update translations.
### Available languages
:us: English (U.S.) *(base)*
:netherlands: Dutch
:finland: Finnish
:fr: French
:de: German
:it: Italian
:mexico: :es: Spanish
:sweden: Swedish
:tr: Turkish
## Import/Export
Baby Buddy uses the [django-import-export application](https://django-import-export.readthedocs.io/)
to provide import and export functionality.
### Export
Export actions are accessible from Baby Buddy's "Database Admin" area (the
Django admin interface). For example, to export all diaper change entries from
Baby Buddy as an Excel file:
1. Log in as a user with "staff" access.
1. From the user menu, click "Database Admin" under the "Site" heading.
1. Click "Diaper Changes" in the list of data types.
1. Click the "Export" button above the filters list on the right side of the
screen.
1. Select the "xlxs" format and click "Submit"
Note: any applied filters will also filter the exported entries. Alternatively,
on the Diaper Change list screen (step 3 above), it is possible to select one
or many individual records and select "Export selected Diaper Changes" from the
"Actions" list.
### Import
Import actions are accessible from Baby Buddy's "Database Admin" area (the
Django admin interface). From the list of entry types in the Database Admin,
select the type to import and click the "Import" button on the list page. The
import screen for a particular type will list the fields generally expected to
be present for an import. Multiple file types -- including csv, xlsx, etc. --
are supported for the import.
The import pages do not provide *detailed* information about the required data
and formats. When an import is attempted, all rows will be checked for errors
and any issues will be reported on screen and will need to be resolved before
the import can be performed.
See the [example import files](core/tests/import) used for tests to get an idea
of the expected data format.
## API
Baby Buddy uses the [Django REST Framework](https://www.django-rest-framework.org/)
(DRF) to provide a REST API.
The only requirement for (most) requests is that the `Authorization` header is
set as described in the [Authentication](#authentication) section. The one
exception is the `/api` endpoint, which lists all available endpoints.
Currently, the following endpoints are available for `GET`, `OPTIONS`, and
`POST` requests:
- `/api/children/`
- `/api/changes/` (Diaper Changes)
- `/api/feedings/`
- `/api/notes/`
- `/api/sleep/`
- `/api/temperature/`
- `/api/timers/`
- `/api/tummy-times/`
- `/api/weight/`
### Authentication
By default, the [TokenAuthentication](https://www.django-rest-framework.org/api-guide/authentication/#tokenauthentication)
and [SessionAuthentication](https://www.django-rest-framework.org/api-guide/authentication/#sessionauthentication)
classes are enabled. Session authentication covers local API requests made by
the application itself. Token authentication allows external requests to be
made.
:exclamation: **In a production environment, token authentication should only
be used for API calls to an `https` endpoint.** :exclamation:
Each user is automatically assigned an API key that can be used for token
authentication. This key can be found on the User Settings page for the logged
in the user. To use a key for an API request, set the request `Authorization`
header to `Token `. E.g.
Authorization: Token 2h23807gd72h7hop382p98hd823dw3g665g56
If the `Authorization` header is not set or the key is not valid, the API will
return `403 Forbidden` with additional details in the response body.
### Schema
API schema information in the [OpenAPI format](https://swagger.io/specification/)
can be found in the `openapi-schema.yml` file in the project root. A live
version is also available at the `/api/scehma` path of a running instance.
### `GET` Method
#### Request
The `limit` and `offset` request parameters can be used to limit
and offset the results set respectively. For example, the following request
will return five diaper changes starting from the 10th diaper change entry:
curl -X GET 'https://[...]/api/changes/?limit=5&offset=10' -H 'Authorization: Token [...]'
{
"count": ,
"next": "https://[...]/api/changes/?limit=5&offset=15",
"previous": "https://[...]/api/changes/?limit=5&offset=5",
"results": [...]
}
Field-based filters for specific endpoints can be found the in the `filters`
field of the `OPTIONS` response for specific endpoints.
Single entries can also be retrieved by adding the ID (or in the case of a
Child entry, the slug) of a particular entry:
curl -X GET https://[...]/api/children/gregory-hill/ -H 'Authorization: Token [...]'
{
"id":3,
"first_name":"Gregory",
"last_name":"Hill",
"birth_date":"2020-02-11",
"slug":"gregory-hill",
"picture":null
}
curl -X GET https://[...]/api/sleep/1/ -H 'Authorization: Token [...]'
{
"id":480,
"child":3,
"start":"2020-03-12T21:25:28.916016-07:00",
"end":"2020-03-13T01:34:28.916016-07:00",
"duration":"04:09:00",
"nap":false
}
#### Response
Returns JSON data in the response body in the following format:
{
"count":,
"next":,
"previous":,
"results":[{...}]
}
- `count`: Total number of records (*in the database*, not just the response).
- `next`: URL for the next set of results.
- `previous`: URL for the previous set of results.
- `results`: An array of the results of the request.
For single entries, returns JSON data in the response body keyed by model field
names. This will vary between models.
### `OPTIONS` Method
#### Request
All endpoints will respond to an `OPTIONS` request with detailed information
about the endpoint's purpose, parameters, filters, etc.
#### Response
Returns JSON data in the response body describing the endpoint, available
options for `POST` requests, and available filters for `GET` requests. The
following example describes the `/api/children` endpoint:
{
"name": "Child List",
"renders": [
"application/json",
"text/html"
],
"parses": [
"application/json",
"application/x-www-form-urlencoded",
"multipart/form-data"
],
"actions": {
"POST": {
"id": {
"type": "integer",
"required": false,
"read_only": true,
"label": "ID"
},
[...]
}
},
"filters": [
"first_name",
"last_name",
"slug"
]
}
### `POST` Method
#### Request
To add new entries for a particular endpoint, send a `POST` request with the
entry data in JSON format in the request body. The `Content-Type` header for
`POST` request must be set to `application/json`.
Regular sanity checks will be performed on relevant data. See the `OPTIONS`
response for a particular endpoint for details on required fields and data
formats.
#### Timer Field
The "timer" field is a special field available for `POST` operations to model
endpoints supporting duration (Feeding, Sleep, Tummy Time). When the "timer"
field is set in the request, the `start` and `end` fields will be filled in
automatically using the `start` and `end` values *from the Timer* (the Timer
will be stopped if it is currently running).
Additionally, if the Timer has a Child relationship, the `child` field will be
filled in automatically use the `child` value from the Timer.
If the "timer" field is set, it's values will **always override** the relevant
fields in the request. E.g. if a `POST` request is sent with both the `timer`
and `end` fields, the value for the `end` field will be ignored and replaced by
the Timer's `end` value. The same applies for `start` and `child`. These fields
can all be left out of the request when the Timer is provided, otherwise they
are required fields.
#### Response
Returns JSON data in the response body describing the added/updated instance or
error details if errors exist. Errors are keyed by either the field in error or
the general string `non_field_errors` (usually when validation involves
multiple fields).
### `PATCH` Method
#### Request
To update existing entries, send a `PATCH` request to the single entry endpoint
for the entry to be updated. The `Content-Type` header for `PATCH` request must
be set to `application/json`. For example, to update a Diaper Change entry with
ID 947 to indicate a "wet" diaper only:
curl -X PATCH \
-H 'Authorization: Token [...]' \
-H "Content-Type: application/json" \
-d '{"wet":1, "solid":0}' \
https://[...]/api/changes/947/
Regular sanity checks will be performed on relevant data. See the `OPTIONS`
response for a particular endpoint for details on required fields and data
formats.
#### Response
Returns JSON data in the response body describing the added/updated instance or
error details if errors exist. Errors are keyed by either the field in error or
the general string `non_field_errors` (usually when validation involves
multiple fields).
### `DELETE` Method
#### Request
To delete an existing entry, send a `DELETE` request to the single entry
endpoint to be deleted. For example, to delete a Diaper Change entry with ID
947:
curl -X DELETE https://[...]/api/changes/947/ -H 'Authorization: Token [...]'
#### Response
Returns an empty response with HTTP status code `204` on success, or a JSON
encoded error detail if an error occurred (e.g. `{"detail":"Not found."}` if
the requested ID does not exist).
## Contributing
Contributions are welcome! See [CONTRIBUTING.md](CONTRIBUTING.md) for detailed
information about how to contribute to Baby Buddy.