|
|
||
|---|---|---|
| .ebextensions | ||
| api | ||
| babybuddy | ||
| core | ||
| dashboard | ||
| etc | ||
| gulpfile.js | ||
| reports | ||
| .coveragerc | ||
| .gitignore | ||
| .travis.yml | ||
| Dockerfile | ||
| LICENSE | ||
| Pipfile | ||
| Pipfile.lock | ||
| Procfile | ||
| README.md | ||
| app.json | ||
| boxfile.yml | ||
| docker-compose.yml | ||
| docker.env.example | ||
| manage.py | ||
| package-lock.json | ||
| package.json | ||
| screenshot.png | ||
| screenshot_mobile.png | ||
README.md
Baby Buddy

![]()
![]()

A buddy for babies! Helps caregivers track sleep, feedings, diaper changes, and tummy time to learn about and predict baby's needs without (as much) guess work.
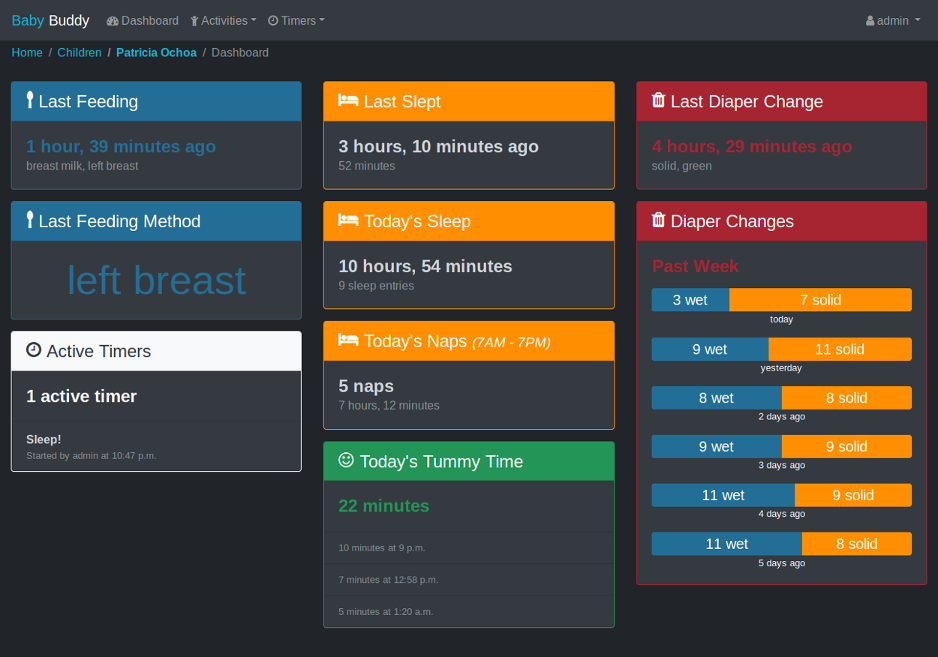
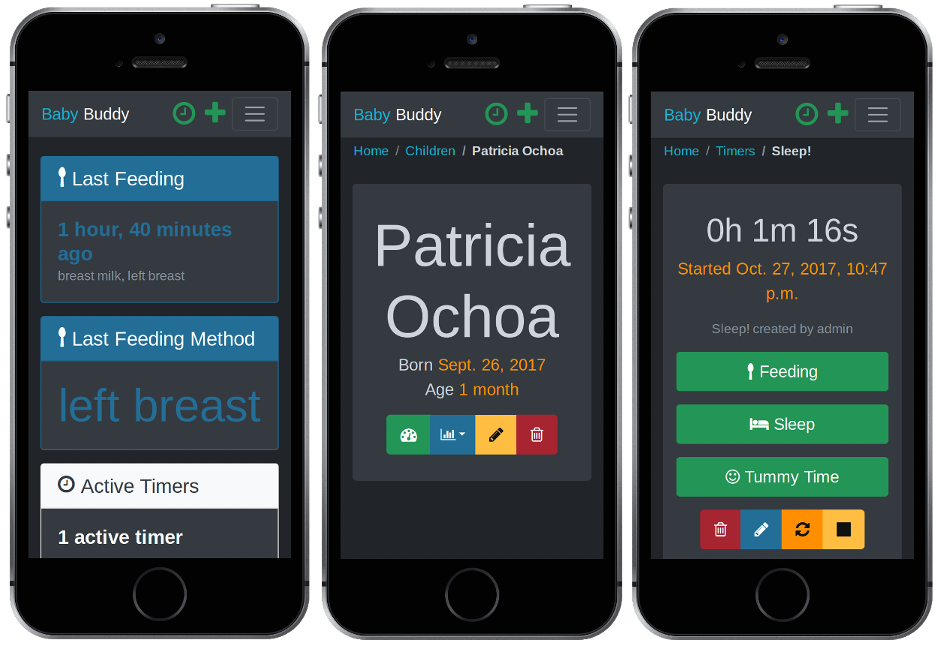
Table of Contents
Demo
A demo of Baby Buddy is available on Heroku. The demo instance resets every hour. Login credentials are:
- Username:
admin - Password:
admin
Deployment
⚠️ Baby Buddy is still in early development and does not yet have a stable production deployment flow. ⚠️
The default user name and password for Baby Buddy is admin/admin. For any
deployment, log in and change the default password immediately.
AWS Elastic Beanstalk
A basic Elastic Beanstalk
configuration is provided in .ebextensions/babybuddy.config. The steps
below are a rough guide to deployment. See Working with Python
for detailed information.
-
Clone/download the Baby Buddy repo
git clone https://github.com/cdubz/babybuddy.git -
Enter the cloned/downloaded directory
cd babybuddy -
Change the
SECRET_KEYvalue to something random in.ebextensions/babybuddy.config -
Create an IAM user in AWS with EB, EC2, RDS and S3 privileges.
-
Initialize the Elastic Bean application (using the IAM user from the previous step)
eb init -
Create/deploy the environment! 🚀
eb create -db -db.engine postgres
The create command will also do an initial deployment. Run eb deploy to
redeploy the app (e.g. if there are errors or settings are changed).
Docker
A Docker deploy requires Docker and Docker Compose to create two containers - one for the database and one for the application.
-
Copy the
docker.env.exampletodocker.envand set theALLOWED_HOSTSandSECRET_KEYvariables withincp docker.env.example docker.env editor docker.env -
Build/run the application
docker-compose up -d -
Initialize the database (first run/after updates)
docker-compose exec app python manage.py migrate -
Initialize static assets (first run/after updates)
docker-compose exec app python manage.py collectstatic
The app should now be locally available at http://127.0.0.1:8000. See Get Started, Part 6: Deploy your app for detailed information about how to deployment methods with Docker.
Nanobox
An example Nanobox configuration, boxfile.yml, is
provided with Baby Buddy. The steps below are a rough guide to deployment. See
Create and Deploy a Custom Django App
for detailed information about Nanobox's deployment and configuration process.
-
Clone/download the Baby Buddy repo
git clone https://github.com/cdubz/babybuddy.git -
Enter the cloned/downloaded directory
cd babybuddy -
Add the
SECRET_KEYandDJANGO_SETTINGS_MODULEenvironment variablesnanobox evar add DJANGO_SETTINGS_MODULE=babybuddy.settings.nanobox nanobox evar add SECRET_KEY=<CHANGE TO SOMETHING RANDOM> -
Deploy! 🚀
nanobox deploy
Heroku

For manual deployments to Heroku without using the deploy button, make sure to
create two settings before pushing using heroku config:set:
heroku config:set DJANGO_SETTINGS_MODULE=babybuddy.settings.heroku
heroku config:set SECRET_KEY=<CHANGE TO SOMETHING RANDOM>
Manual
There are a number of ways to deploy Baby Buddy manually to any server/VPS. The application can run fine in low memory (below 1GB) situations, however a 32-bit operating system is recommended in such cases. This is primarily because the build process can be memory intensive and cause excessive memory usage on 64-bit systems. If all fails, assets can be built on a local machine and then uploaded to a server.
Requirements
- Python 2.7+, pip, pipenv
- Web server (nginx, Apache, etc.)
- Application server (uwsgi, gunicorn, etc.)
- Database (sqlite, Postgres, MySQL, etc.)
- NodeJS 8.x and NPM 5.x (for building assets)
- Gulp (for building assets)
Example deployment
This example assumes a 512MB VPS instance with Ubuntu 16.04 x32. It uses Python 3.x, nginx, uwsgi and sqlite and should be sufficient for a few users (e.g. two parents and 1+ child).
-
Install Python 3.x, pip, nginx and uwsgi
sudo apt-get install python3 python3-pip nginx uwsgi uwsgi-plugin-python3 -
Install pipenv
sudo -H pip install pipenv -
Install NodeJS, NPM and Gulp
curl -sL https://deb.nodesource.com/setup_8.x | sudo -E bash - sudo apt-get install nodejs sudo npm install -g gulp-cli -
Set up directories and files
sudo mkdir /var/www/babybuddy sudo chown user:user /var/www/babybuddy mkdir -p /var/www/babybuddy/data/media sudo chown -R www-data:www-data /var/www/babybuddy/data git clone https://github.com/cdubz/babybuddy.git /var/www/babybuddy/public -
Move in to the application folder
cd /var/www/babybuddy/public -
Initiate the Python environment
pipenv --three --dev -
Build static assets
npm install gulp build -
Create a production settings file and set the
SECRET_KEYandALLOWED_HOSTSvaluescp babybuddy/settings/production.example.py babybuddy/settings/production.py editor babybuddy/settings/production.py -
Initiate the application
export DJANGO_SETTINGS_MODULE=babybuddy.settings.production gulp collectstatic gulp migrate -
Set appropriate permissions on the database and data folder
sudo chown www-data:www-data /var/www/babybuddy/data/db.sqlite3 sudo chmod 640 /var/www/babybuddy/data/db.sqlite3 sudo chmod 750 /var/www/babybuddy/data -
Create and configure the uwsgi app
 sudo editor /etc/uwsgi/apps-available/babybuddy.ini
 sudo ln -s /etc/uwsgi/apps-available/babybuddy.ini /etc/uwsgi/apps-enabled/babybuddy.ini
 sudo service uwsgi restart
Example config:
 [uwsgi]
 plugins = python3
 project = babybuddy
 base_dir = /var/www/babybuddy

 virtualenv = /home/user/.local/share/virtualenvs/babybuddy-XXXXXXXX
 chdir = %(base_dir)/babybuddy
 module =  %(project).wsgi:application
 env = DJANGO_SETTINGS_MODULE=%(project).settings.production
 master = True
 vacuum = True
See the uWSGI documentation for more advanced configuration details.
Note: Find the location of the pipenv virtual environment with the command
pipenv --venv. -
Create and configure the nginx server
 sudo vim /etc/nginx/sites-available/babybuddy
 sudo ln -s /etc/nginx/sites-available/babybuddy /etc/nginx/sites-enabled/babybuddy
 sudo service nginx restart
Example config:
 upstream babybuddy {
     server unix:///var/run/uwsgi/app/babybuddy/socket;
 }

 server {
     listen 80;
     server_name babybuddy.example.com;

     location / {
         uwsgi_pass babybuddy;
         include uwsgi_params;
     }
 }
See the nginx documentation for more advanced configuration details.
-
That's it (hopefully)! 🎉
Development
Installation
pip install pipenv
pipenv install --dev
npm install -g gulp-cli
npm install
gulp migrate
gulp
Open http://127.0.0.1:8000 and log in with the default
user name and password (admin/admin).
Fake data
Add some fake data to the database with the following command:
gulp fake
By default, fake creates one child and 31 days of random data. Use the
--children and --days flags to change the default values, e.g.
gulp fake --children 5 --days 7 to generate five fake children and seven
days of data for each.
Testing
❗ Tests require static files to be collected, it may be necessary
to execute gulp build && gulp collectstatic before tests (if static files
have changed).
gulp test