WooCommerce's documentation lives in the [WooCommerce monorepo](https://github.com/woocommerce/woocommerce) alongside the project's code. Specifically, the technical documentation that appears on this site can be found in the [/docs](https://github.com/woocommerce/woocommerce/tree/trunk/docs) folder of the monorepo. Therefore, contributing technical documentation to WooCommerce is very similar to contributing code.
This guide will outline how to add, modify and delete pages in WooCommerce's developer documentation.
## Docs Folder Anatomy
Inside the `/docs` folder of the monorepo you'll find various sub-folders such as `getting-started` and `extension-development`. When imported into the Woo Developer Docs site, these folders become categories. The `README.md` file inside each category contains metadata about the category, as well as the category page's content.
Inside each subfolder you'll find various markdown files. When imported into the Woo Developer Docs site, each markdown file becomes a page. Currently, you're reading `/docs/contributing-docs/contributing-docs.md`!
## Getting Setup
> This guide presumes that you're familar with basic Git and GitHub functionality, that you're signed into a GitHub account, and that you have Git setup locally. If you're new to GitHub, we recommend reading their [quickstart](https://docs.github.com/en/get-started/quickstart/hello-world) and [working with forks](https://docs.github.com/en/pull-requests/collaborating-with-pull-requests/working-with-forks/fork-a-repo) guides before getting started.
### Initial Setup
1. Fork the [WooCommerce monorepo](https://github.com/woocommerce/woocommerce) on GitHub. If asked, you can safely check the `copy the trunk branch only` option.
2. [Clone the fork that you just created](https://docs.github.com/en/repositories/creating-and-managing-repositories/cloning-a-repository). This will allow you to edit it locally.
### Making and Contributing Changes
1. Prior to making any changes, ensure your `trunk` branch is up to date with the monorepo's `trunk` [by syncing it](https://docs.github.com/en/pull-requests/collaborating-with-pull-requests/working-with-forks/syncing-a-fork).
2. For each modification you'd like to make, create a new branch off `trunk` in your fork that starts with `docs/`. For example, if you're adding a doc about improving extension performance, you could call your branch `docs/improve-extension-performance`.
* Note that you don't need to create a new branch for each file that you change. If you have lots of very similar modifications, you can make them all at once on a single branch.
3. Create and modify docs as required. Make sure you reference the guidelines below when doing so.
4. Verify whether you need to regenerate the docs manifest using the instructions at the bottom of this page. If you do, regenerate it.
5. Commit the changes you just made, then push them to your remote GitHub repo.
6. [Open a pull request](https://docs.github.com/en/pull-requests/collaborating-with-pull-requests/proposing-changes-to-your-work-with-pull-requests/creating-a-pull-request) that merges your branch with the WooCommerce monorepo's trunk branch.
* To do this, when creating the pull request, set the `base repository` to `woocommerce/woocommerce`, the `base` to `trunk`, the `head repository` to `yourgithubusername/woocommerce` and the `compare` to the branch you created (eg: `docs/improve-extension-performance`).
* When creating the pull request, set a descriptive title. Additionally, ensure you fill out the template provided in the description. For purely docs changes, your testing instructions should reference any major changes you think should be checked.
7. The WooCommerce Developer Advocacy team will review your pull request and provide feedback via the comments as neccesary. Once the content is ready, we'll merge it into `trunk` and it'll appear on the Woo Developer Docs site!
## Creating New Pages
1. Create a new markdown file inside the category folder with a descriptive name. For example, to add a `Building Responsive Themes` page to the `Theme Development` category, you could create a file called `docs/theme-development/building-responsive-themes.md`. Note that the file name you choose will determine the document's URL. File names shouldn't include spaces.
2. Referencing the instructions below, set the page's metadata at the very top of your file.
3. Write your content below the metadata. If your content includes images, refer to the including images section of this guide.
* Please note that you don't need to include your page's title (eg: `# Building Responsive Themes`) in the content, as this will automatically be included.
### Using Front Matter
We use [Front Matter](https://jekyllrb.com/docs/front-matter/) to set metadata about a page. At a minimum, the following must be included at the start of your markdown file:
```yaml
---
post_title: Your Post Title Goes Here
---
```
Optionally, you can set additional metadata. The following fields are supported:
```yaml
---
post_title: Your Post Title Goes Here
menu_title: Short Title Goes Here
tags: tag1, tag2, tag3
---
```
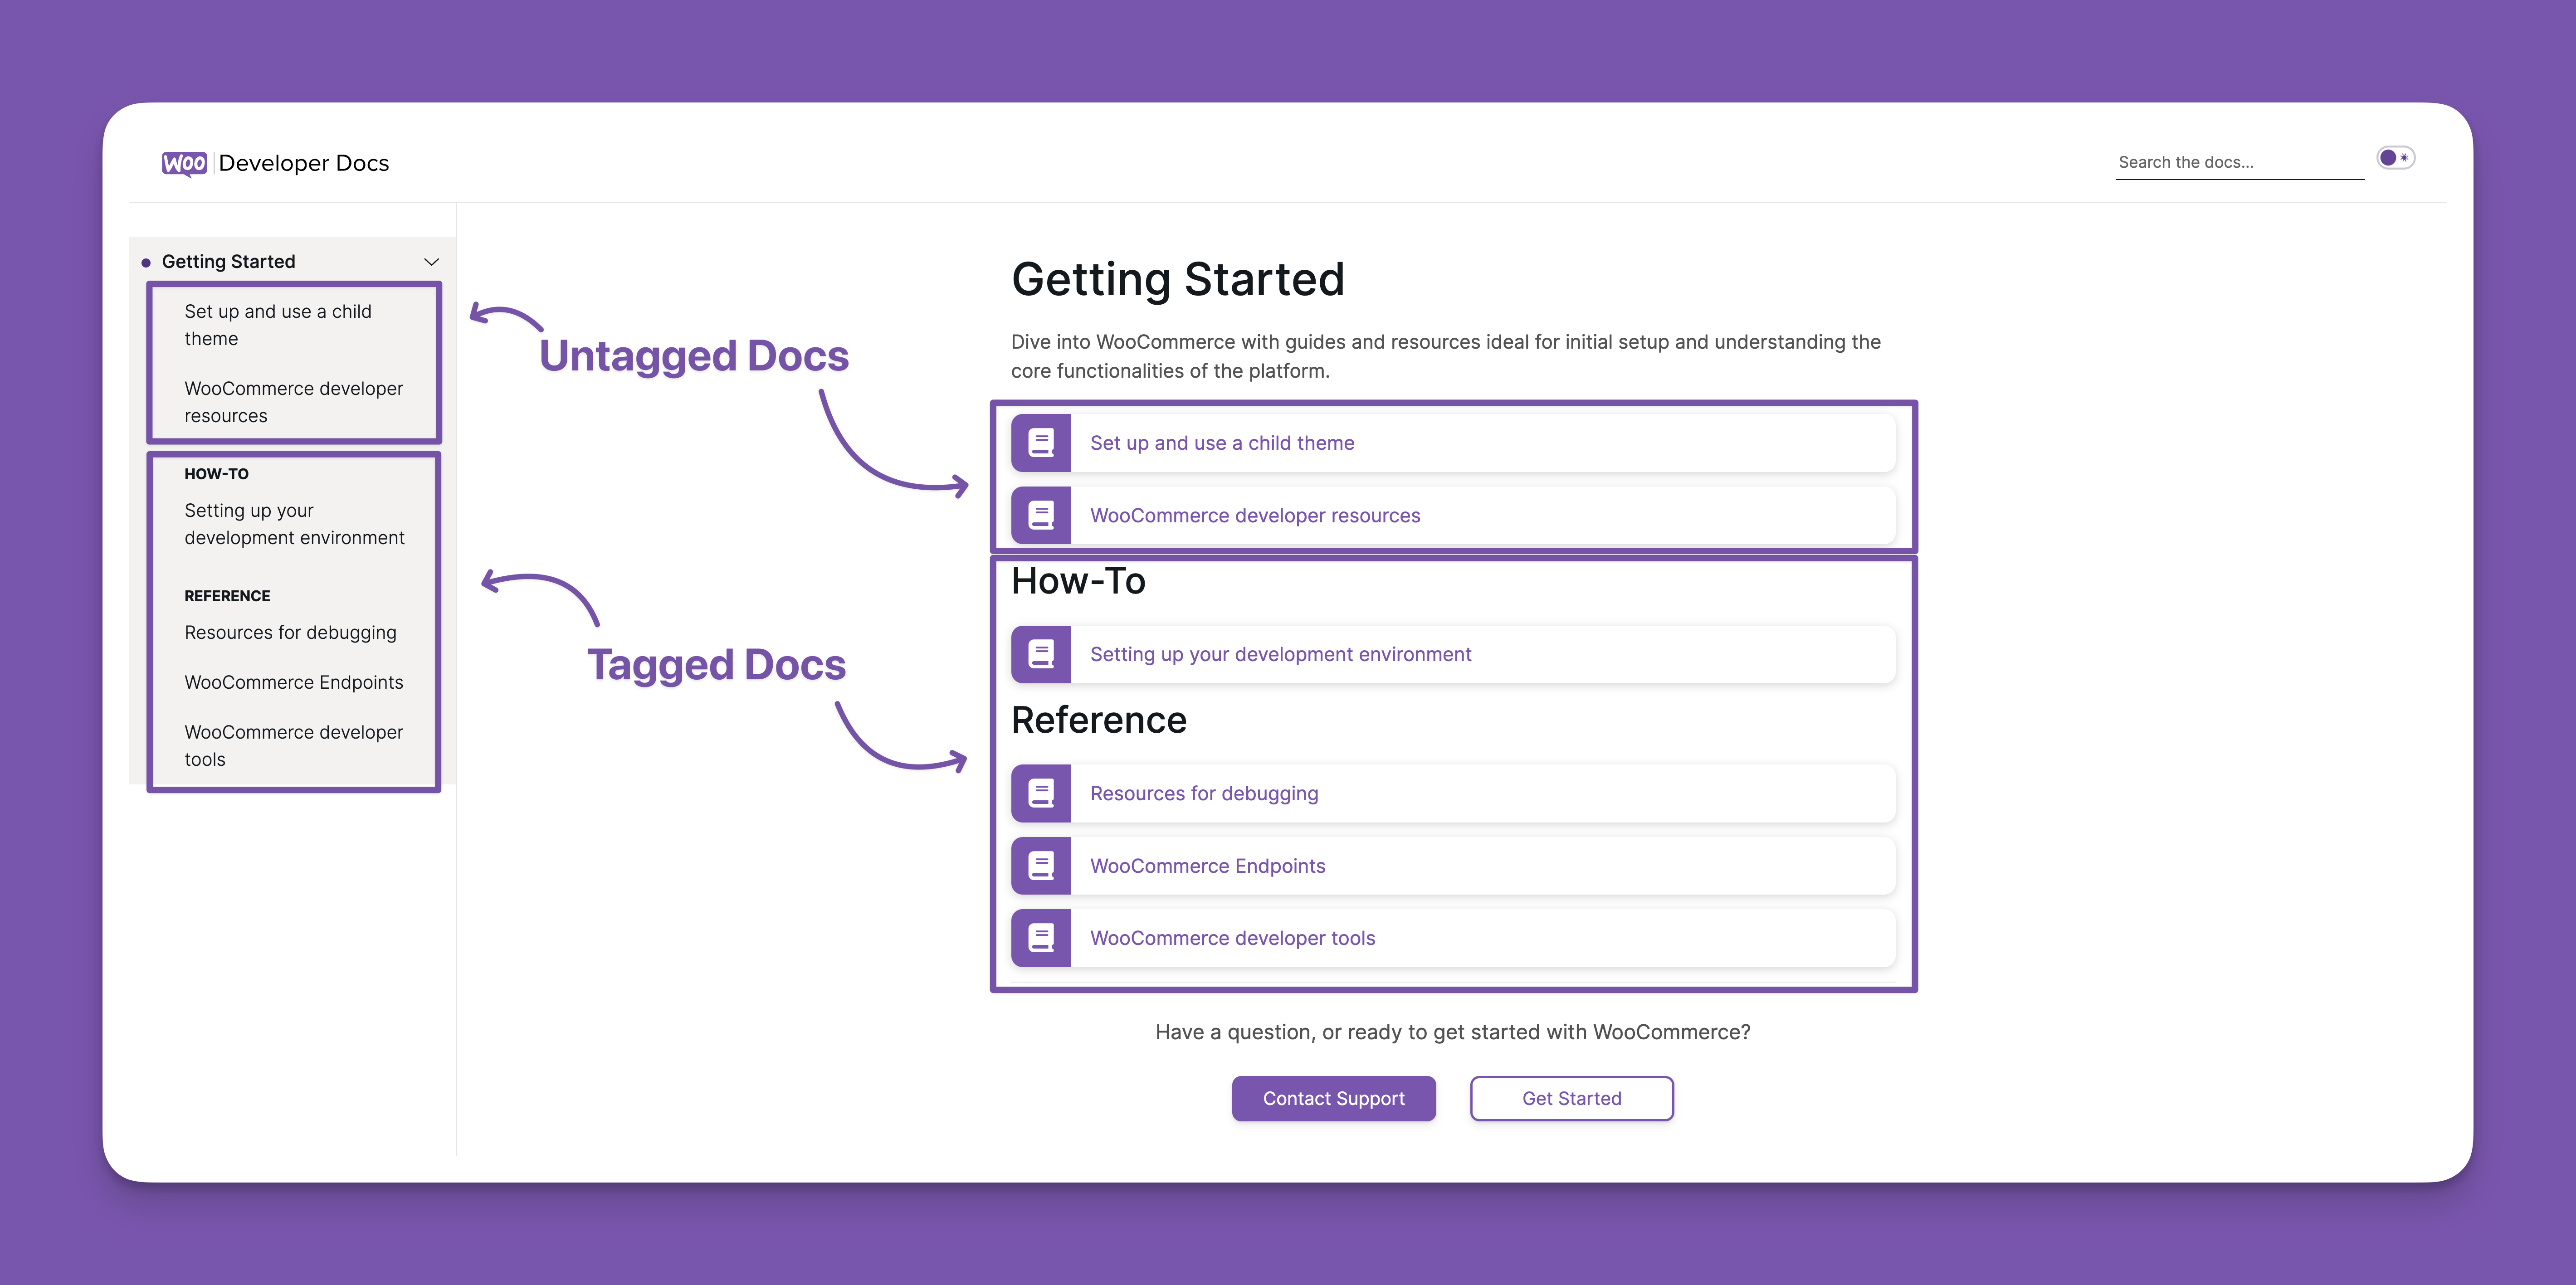
#### Tagging Content Types
To help reduce sidebar clutter, you can optionally tag content types in Front Matter. The supported tags are `reference`, `how-to`, and `code-snippet`. Content tagged with one of these types will appear under a sub-heading in its category on the sidebar and on the category's page. Untagged pages will appear at the top of the category.
Tags other than `reference`, `how-to` and `code-snippet` will function like regular WordPress tags. While you're welcome to include any tags you think are relevant, you should only tag a page with a maximum of one of the three special tags.
### Including Images in Pages
For technical reasons, images cannot currently be imported into the Woo Developer Docs site from the monorepo. Therefore, to include images in a page, you should follow this process:
1. In the markdown for your page, add placeholders for each image with the correct alt text (eg: ``).
2. When creating your pull request, upload the images into the description and note which image relates to each placeholder.
3. A member of the Woo Developer Advocacy team will upload your images to the docs site and provide next steps.
We understand that this process currently isn't ideal, and we're working to improve the contributor experience.
## Creating New Categories
Before creating a new category, you should consider whether it is truly necessary to do so. Where possible, you should default to creating content in an existing category. If you do need to create a new category, follow these steps:
1. Inside the `/docs` folder, create a sub-title with a descriptive name. For example, if you wanted to create a `Checkout Design Guidelines` section, you'd create a folder called `/docs/checkout-design-guidelines`.
2. Create a `README.md` file inside the folder you just created. Reference the instructions below to set the required category metadata.
3. Below the metadata, add a category description to your `README.md` file. This will be the text that appears on the category's page. Your description should clearly explain the contents of the category in sufficient detail.
When creating new categories, please include rationale about why the category was created in your pull request's description.
### Setting Category Metadata
Similarly to pages, a category's metadata is set using Front Matter. At the top of your category's `README.md` file, include the following:
The WooCommerce Developer Docs site pulls content from the monorepo using the [Docs Manifest](https://github.com/woocommerce/woocommerce/blob/trunk/docs/docs-manifest.json). It's important that this manifest remains in sync with docs changes to keep the site up to date.
### When should you regenerate the manifest
If you make any of the following changes, you must regenerate the docs manifest:
* You create, delete or move a file in the `docs/` folder
* You modify a page's Front Matter (eg: its title or tags)
* You create, rename or delete a category
You don't need to regenerate the manifest if you only make changes to a page's content.
### How to regenerate the manifest
These instructions presume you're currently have your `docs/` branch open and you've made your required changes to any files.
1. In your command line, navigate to your repo's folder.
2. Run `pnpm utils md-docs create docs woocommerce -o docs/manifest.json`.
3. The `docs-manifest.json` file in the `/docs` folder of your repo will be updated. Verify that the changes to the manifest reflect the changes that you made to the docs.
If you are a non-technical contributor who isn't experienced with command line tools, we're still happy to receive your contributions. If you're unable to include an updated manifest, please ensure that you mention this in your pull request's description.
If you're a technical contributor who is able to regenerate the manifest, we request that you do so where possible.