20 KiB
20 KiB
Testing notes and ZIP for release 9.8.0
Zip file for testing: woocommerce-gutenberg-products-block.zip
WooCommerce Core
Cart and Checkout blocks
Add filter to change proceed to checkout button text and URL #8613
- Add items to your cart, go to the Cart block and ensure the button to proceed to checkout works and looks normal.
Fix / Return associative array for woocommerce_order_get_tax_location filter #8681
- Enable taxes, and create multiple shipping methods
- Add an item to cart and proceed to checkout
- Change between shipping methods and verify no errors are displayed, and the correct taxes are applied to the order.
Add LocalPickupSelect component #8634
- Go to WooCommerce -> Settings -> Shipping -> Local Pickup and activate Local Pickup. Ensure you have added a couple of locations.
- Add an item to your cart and go to the Checkout block.
- Select Local Pickup and ensure the options you set up in step 1 are visible.
Allow view switcher to toggle view when using Gutenberg list view #8429
- Edit the Cart Block page
- Toggle the view between empty cart/filled cart using the switcher - focus on the block to see the toggle.
- Open list view:
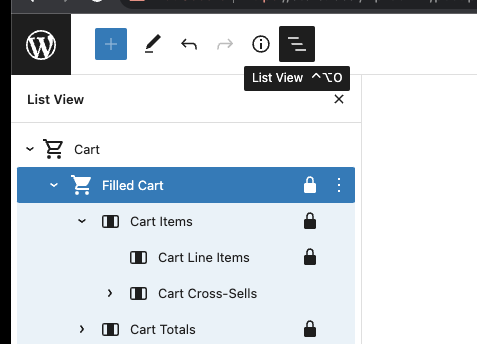
- Click on "empty cart" in the list view. The view should change.
- Click back to "filled cart" in the list view. The view should change.
- Select a child of empty cart. Again, the view should change.
Revert "Show Cart and Checkout blocks in Style Book" #8602
- Create a new page or post and open the block inserter.
- Hover over the Cart and Checkout blocks.
- Verify that the editor no longer freezes.
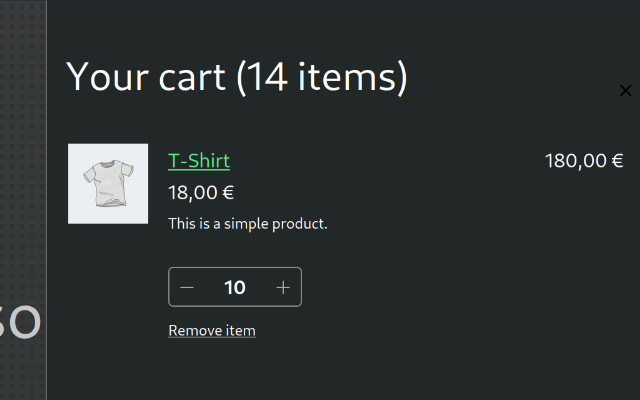
Add Debounce to Shipping Calculation selection #8498
- Add the Cart block to a page and make sure you have at least two shipping options added and the shipping calculator enabled
- Add products to the cart and go to the Cart block
- Quickly click through all the shipping options multiple times
- Expect the total to change only after the final selection is made.
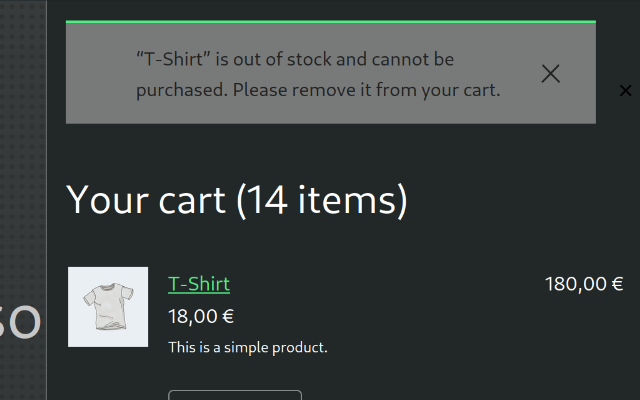
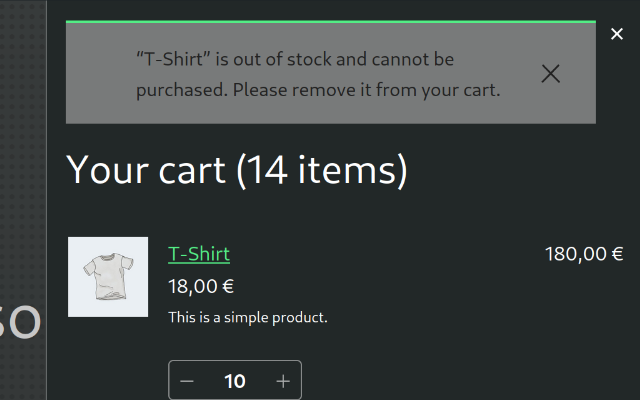
Ignore shipping address from server when updating shipping methods #8718
- In the Checkout page with the Checkout block, fill out your shipping address. Wait a few moments for it to persist to server.
- Clear the first name field. There will be a validation error.
- Select a different shipping method.
- When the totals are updated, confirm the first name field is still empty.
Mini Cart block
Remove wc-blocks-registry from Mini Cart block dependencies so more scripts can be lazy-loaded #8657
- Install Page Optimize and Product Bundles.
- Enable a block theme, like TT3.
- Go to Appearance > Editor and add the Mini Cart block to the store header.
- Save the changes.
- In the frontend, click on the Mini Cart. The drawer should open and show the "empty cart" message.
- Go to the shop page and add a product to your cart.
- Click on the Mini Cart. The drawer should open and show the product you just added.
- Disable the plugins to installed in step 1.
Remove wc-settings from Mini Cart block dependencies #8703, Preload Mini Cart inner blocks frontend scripts #8653
- Add the Mini Cart block to the header of your store.
- In the frontend, open the Network tab of your browser devtools and verify the Mini Cart inner blocks are being preloaded (you can search for
empty-cart-frontendorfilled-cart-frontendscripts). - Also in the frontend, verify you can open the Mini Cart, interact with its inner blocks (ie: change the quantity of a product, remove a product, etc.).
Only print wp.apiFetch.createPreloadingMiddleware() when needed #8647
- Add the Mini Cart block to the header of your store.
- Create a post or page with the Cart block and another one with the Checkout block.
- In the frontend, add some products to your cart and open the Mini Cart. Verify you can change the quantity of products and you can remove them.
- Go to the Cart page and check that there are no extra
fetchrequests towc/store/cartin the Network tab of your browser devtools (you can open them with F12). - Go to the Checkout page and make sure there is no error and you can place an order (checkout works as normal).
Mini Cart drawer close button: inherit text color and improve alignment #8605
- Switch to a dark theme (ie: TT3) and set a dark styling (ie: Appearance > Editor > edit a template > Style > Browse styles > Pilgrimage).
- Add the Mini Cart block to the header of a template.
- In the frontend, click on it so it opens the drawer.
- Verify the close button inherits the text color and on the right it's aligned with the product prices below.
| Before | After |
|---|---|
 |
 |
- Now, to verify the layout still works if there are notices, edit one of the products you have in the cart and set it out of stock.
- Go back to the frontend, open the drawer and verify the close button is still visible.
| Before | After |
|---|---|
 |
 |
Fix Mini Cart missing translations #8591
- Set your store language to a language with WC Blocks translations, ie: Spanish (Español).
- With a block theme (ie: TT3), go to Appearance > Editor > Template Parts and edit the Mini Cart block template part.
- Open the sidebar list view and navigate to the
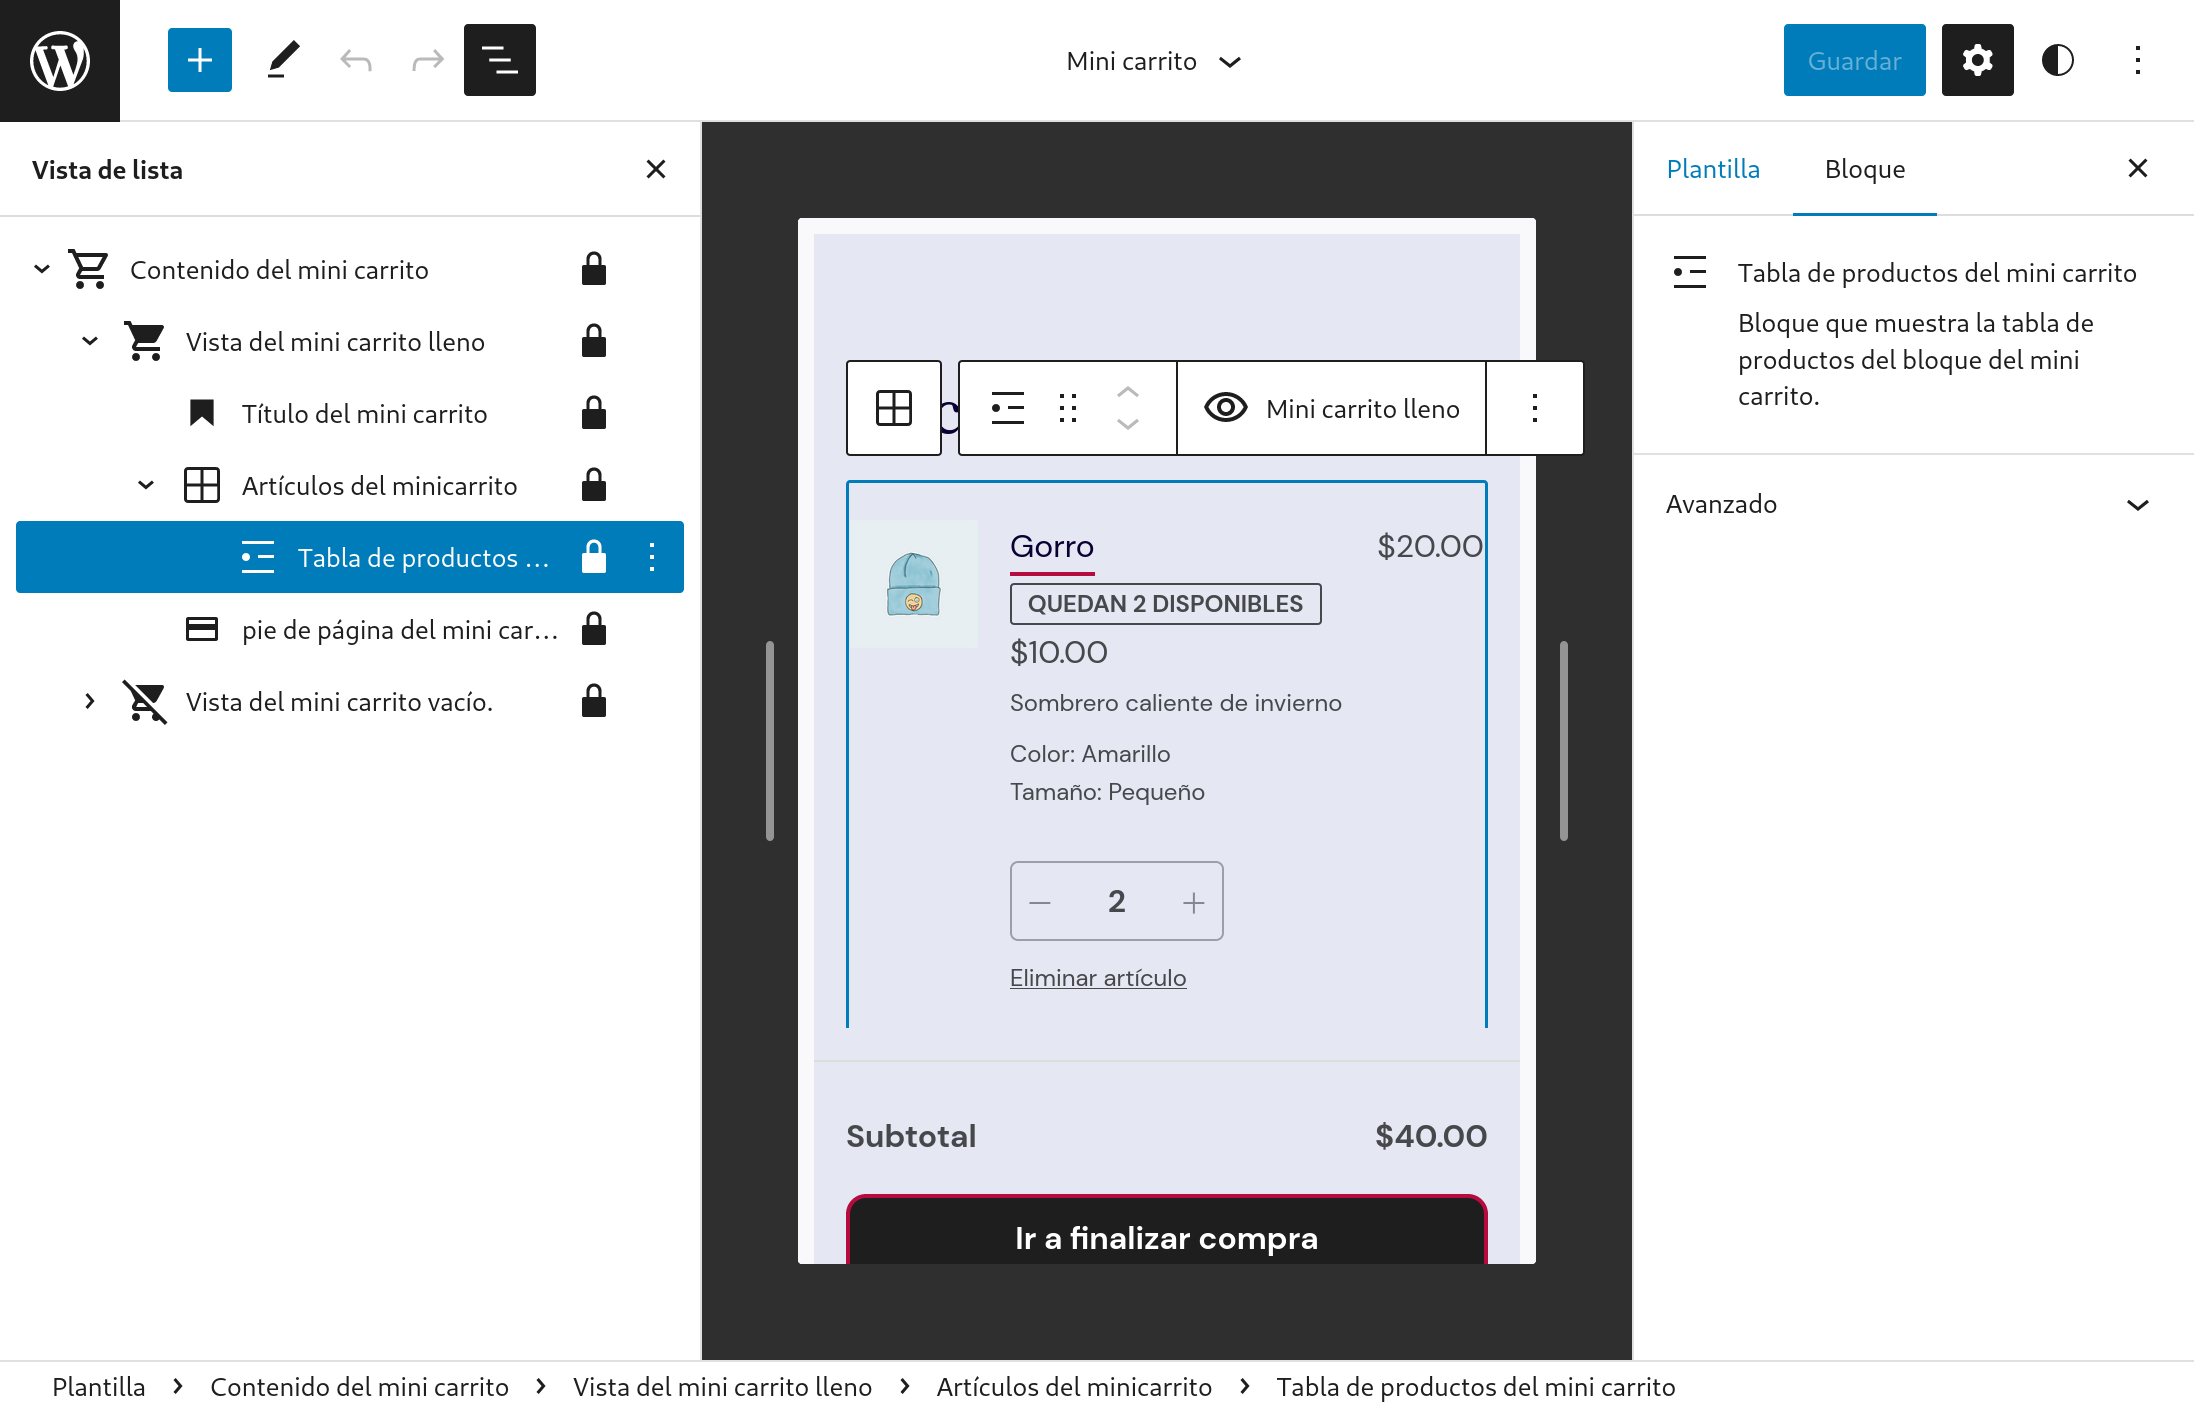
Tabla de productos del mini carritoblock. Verify the block name is correctly translated.
| Before | After |
|---|---|
 |
 |
Make the customer account icon bigger to match the mini-cart one #8594
Check the icon size
-
Go to the Site Editor and edit the Header template.
-
Insert the
Customer accountandMini-cartblocks next to the menu, to look like this 👇
-
Check the
Customer accounticon is bigger than before and matches theMini carticon size.
| Before | After |
|---|---|
 |
 |
- Modify the font size on both blocks to M, L, and XL and check the icon sizes also match.
Check the icon size of existing blocks does not change
- Disable WC Blocks (if testing WC core, install WC 7.5 and disable WC Blocks if you have it enabled).
- Create a new page/post, add a
Customer accountblock, and save. - Enable WC Blocks (if testing WC core, install WC 7.6).
- Reload the page from step 2.
- Insert another
Customer accountblock and save. - Check in the editor that the block icon inserted in step 1 keeps its size and the one inserted in step 5 is bigger.
- Check the same in the frontend.
Make the start shopping button show the theme style #8567
- Switch to the TT3 theme (aubergine style on the screenshots above).
- Go to the Site Editor, add the mini-cart block to the header and save.
- Go to the frontend, click on the mini-cart icon to open it. Empty the cart if it has items.
- Check that the
Start shoppingbutton follows the styles of the theme.
| Before | After |
|---|---|
 |
 |
Switch Select by Toggle for the 'Add-to-Cart behaviour' #8558
- Create a new page and add the
Mini cartblock. - Open the settings and make sure the
Add-to-Cart behaviourselector is using a toggle button, not a select dropdown. - Make sure both options can be saved, and keep working as expected (there are no regressions).
| Before | After |
|---|---|
 |
 |
Remove colorClassName and style from QuantityBadge #8557
- Create a new page and add the
Mini cartblock. - Go to the frontend and with your browser devtools (F12) check the
undefinedclass is no longer showing next to thewc-block-mini-cart__badgeclass.
Fix 'Edit Mini Cart template part' link in WP 6.2 #8574
- Make sure you use a block theme, like TT3, and install the latest version of Gutenberg.
- Create a post or page and add the Mini Cart block.
- In the sidebar, click on the "Edit Mini Cart template part" link.
- Verify the Site Editor open in a new tab and the Mini Cart template part is opened by default.
- Repeat the testing steps but having Gutenberg disabled and verify the link keeps working. (This step is to verify no regressions were introduced)
Add explicit CSS styling to mini-cart block amount in inserter preview #8516
- Create a new page.
- Click on the
inserterplus icon/button. - In the search bar, search for
mini cart. - Hover your mouse over the
mini cartblock icon. - Ensure you see the cart dollar amount in the preview.
Products block
Products: Update product element margins in patterns #8401
-
Add the Products block to a post or page.
-
Add WooCommerce Products patterns:
- WooCommerce 1:1 Image 4-Column Products Row
- WooCommerce 3-Column Product Row
- WooCommerce 4-Column Product Row
- WooCommerce Large Image Product Gallery
- WooCommerce Minimal 5-Column Products Row
- WooCommerce Minimal Product List
- WooCommerce Product Gallery
- WooCommerce Product list with 1:1 images
- WooCommerce Product list with full product description
-
Ensure all margins are displaying correctly both in the editor and the frontend.
Improve Products block Attributes Filter Inspector Controls #8583
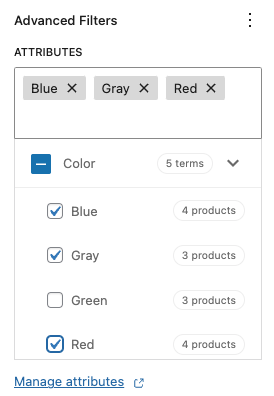
Simple happy path
- Add a Products (Beta) block to your page.
- Open the Inspector Controls and add the “Product Attributes” advanced filter.
- The Attributes selector component should show up in an uninteractable loading state.
- Once loading finishes, the Attributes should appear, collapsed.
- Uncollapse a section
- Select a few attributes.
- Publish your page.
- Check on the frontend to see that the correct products are displayed.
Checkbox behavior
- Repeat steps 1–5 above.
- Click on some terms checkboxes.
- Notice that the parent checkbox will be in the indeterminate state (
[-]). - Select all the children.
- Notice parent checkbox will be checked.
- Uncheck the parent checkbox.
- All the children should be unchecked.
- Check the parent checkbox.
- All the children should be checked.
- Uncheck a few children.
- Check the parent checkbox.
- All children should be checked.
Token input behavior
- Repeat steps 1–4 above.
- Start typing something within the input.
- The checklist should be correctly filtered showing breadcrumbs.
- Try the behavior for both collapsed and uncollapsed states.
- Every time a checkbox is checked, it should have the corresponding token in the input field and viceversa.
- Tokens can be correctly removed from the input field and this will uncheck the corresponding checkbox.
Fix Products block Add to Cart button when AJAX on archives is disabled #8532
- Go to WooCommerce > Settings > Products and disable the Enable AJAX add to cart buttons on archives checkbox.
- Add a Products block to a post or page.
- In the frontend, verify clicking on “Add to cart” adds the product to the cart with a page refresh.
- Optionally, test also the option Redirect to the cart page after successful addition, test variable products, out of stock products, etc. and verify they can (or cannot) be added to the cart as you would expect.
[Products]: Fix attributes filters that do not update the editor preview correctly #8611
- Create new post
- Add Products block
- Add “Product Attributes” filter from “Advanced Filters” in the inspector controls.
- Add some attributes filter
- Expected: Preview changes according to the applied attribute
Single Product
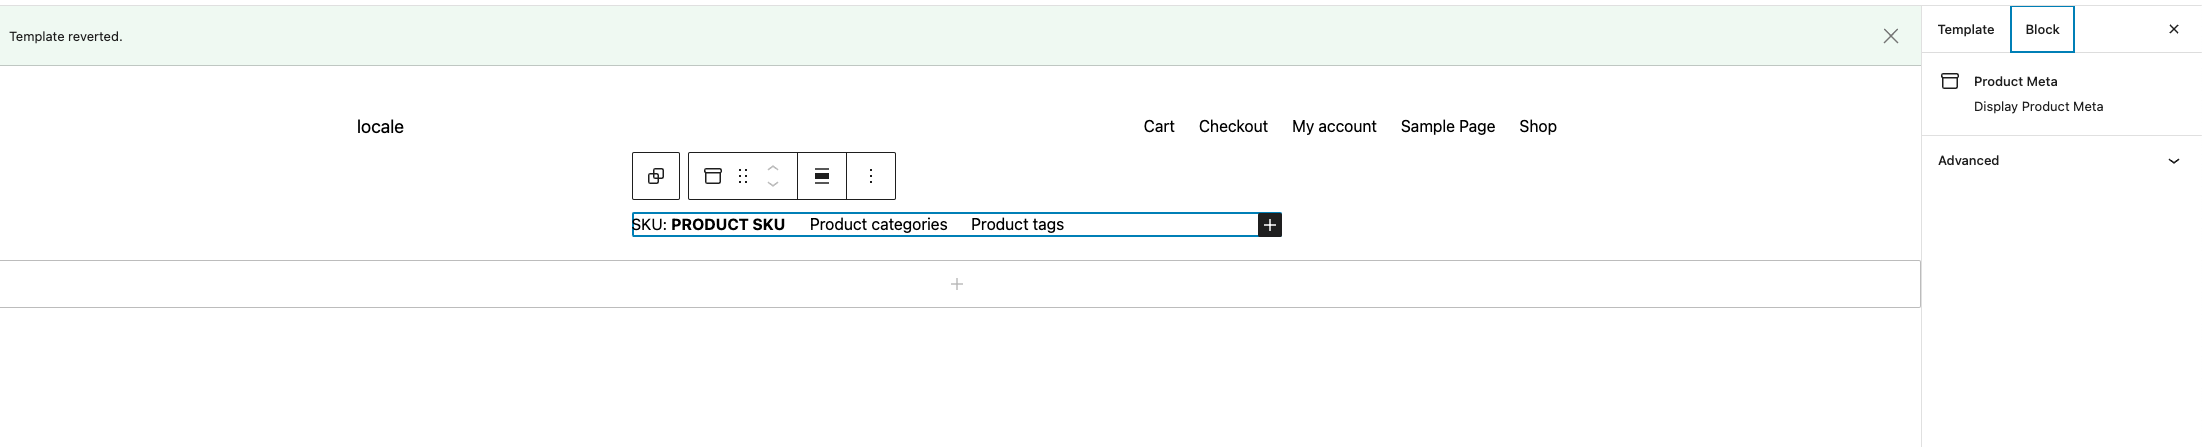
Add Product Meta Block #8484
- Edit the Single Product Template.
- Add the
Product Metablock. - Be sure that the blocks look like the image above.
- Save the template.
- On the front end, visit a Single Product page. Be sure that the blocks render the right data.
Product Price block: add support to the Single Product Template #8609
- Switch to the TT3 theme.
- Go to the Site Editor, and edit the Single Product Template.
- Add the Product Price. It should have a price of 50.00 with the currency set in WC options. Save.
- On the front end, click a product and check that the block shows the right price.
Enable the compatibility layer when Product Meta, Product Price and Breadcrumbs blocks are added #8719
- Switch to the TT3 theme.
- Go to the Site Editor, and edit the Single Product Template.
- Add the Product Meta, Product Price and Breadcrumbs blocks inside the group block.
- Add the Product Meta, Product Price and Breadcrumbs blocks outside the group block.
- Save.
- Go to the frontend and check that all the blocks are visible.
Product Catalog
Product Result Count block: Add support for global styles #8517
- Go to the
Site Editor » Browse all templatesand edit theProduct Catalogtemplate. - Add the
Product Results Countblock. - In the toolbar, select Styles (black and white circle) and click Blocks options.
- Search
Product Results Countblock and select it. - Change the color/font styles to the block and make sure styles are applied to the block in editor.
- Save, go to frontend, and check that the styles are correctly applied as well.
Feature plugin
Add border support to mini cart contents #8654
- Enable a blocks theme, go to Site Editor, and add the
Mini Cartblock to the header. - Go to Template Parts and open the
Mini Carttemplate. - Open the List View, select the
Mini Cart contentsblock and check that in the settings sidebar you can see theBordercontrols. - Click the
+button and add a border and save the template. - Go to the frontend, click on the
Mini Cartbutton, and check you see the same border in the editor and in the frontend. - Check that all the buttons in the mini cart modal are correctly displayed.
- Double check in different browsers and logged in/out of the admin.
| Before | After |
|---|---|
 |
 |
 |
 |