304 lines
20 KiB
Markdown
304 lines
20 KiB
Markdown
# Testing notes and ZIP for release 9.9.0
|
|
|
|
Zip file for testing: [woocommerce-gutenberg-products-block.zip](https://github.com/woocommerce/woocommerce-blocks/files/11113569/woocommerce-gutenberg-products-block.zip)
|
|
|
|
## WooCommerce Core
|
|
|
|
|
|
### Move Related Products's notice component to the Inspector Control section. ([8843](https://github.com/woocommerce/woocommerce-blocks/pull/8843))
|
|
|
|
1. Go to Appearance > Themes and activate a Blockfied theme, such as: Twenty-twenty Three;
|
|
2. After the theme is activated, go to Appearance > Editor (Beta);
|
|
3. Inside the Design section, click on Templates;
|
|
4. Select the Single Product template;
|
|
5. On the top left of the page, click on the Edit button;
|
|
6. Using the Block Inserter, type: Related Products, and add the block to the Site Editor;
|
|
7. Click on the Save button;
|
|
8. Check that the Skeleton component appears above the Add To Cart button.
|
|
|
|
| Before | After |
|
|
| ------ | ----- |
|
|
| <img width="1644" alt="image" src="https://user-images.githubusercontent.com/20469356/227358037-a753a748-7033-4d30-878b-9d218157156b.png"> | <img width="1647" alt="image" src="https://user-images.githubusercontent.com/20469356/227357464-4720cf26-bfc8-42a2-8db7-7b1979e2518f.png"> |
|
|
|
|
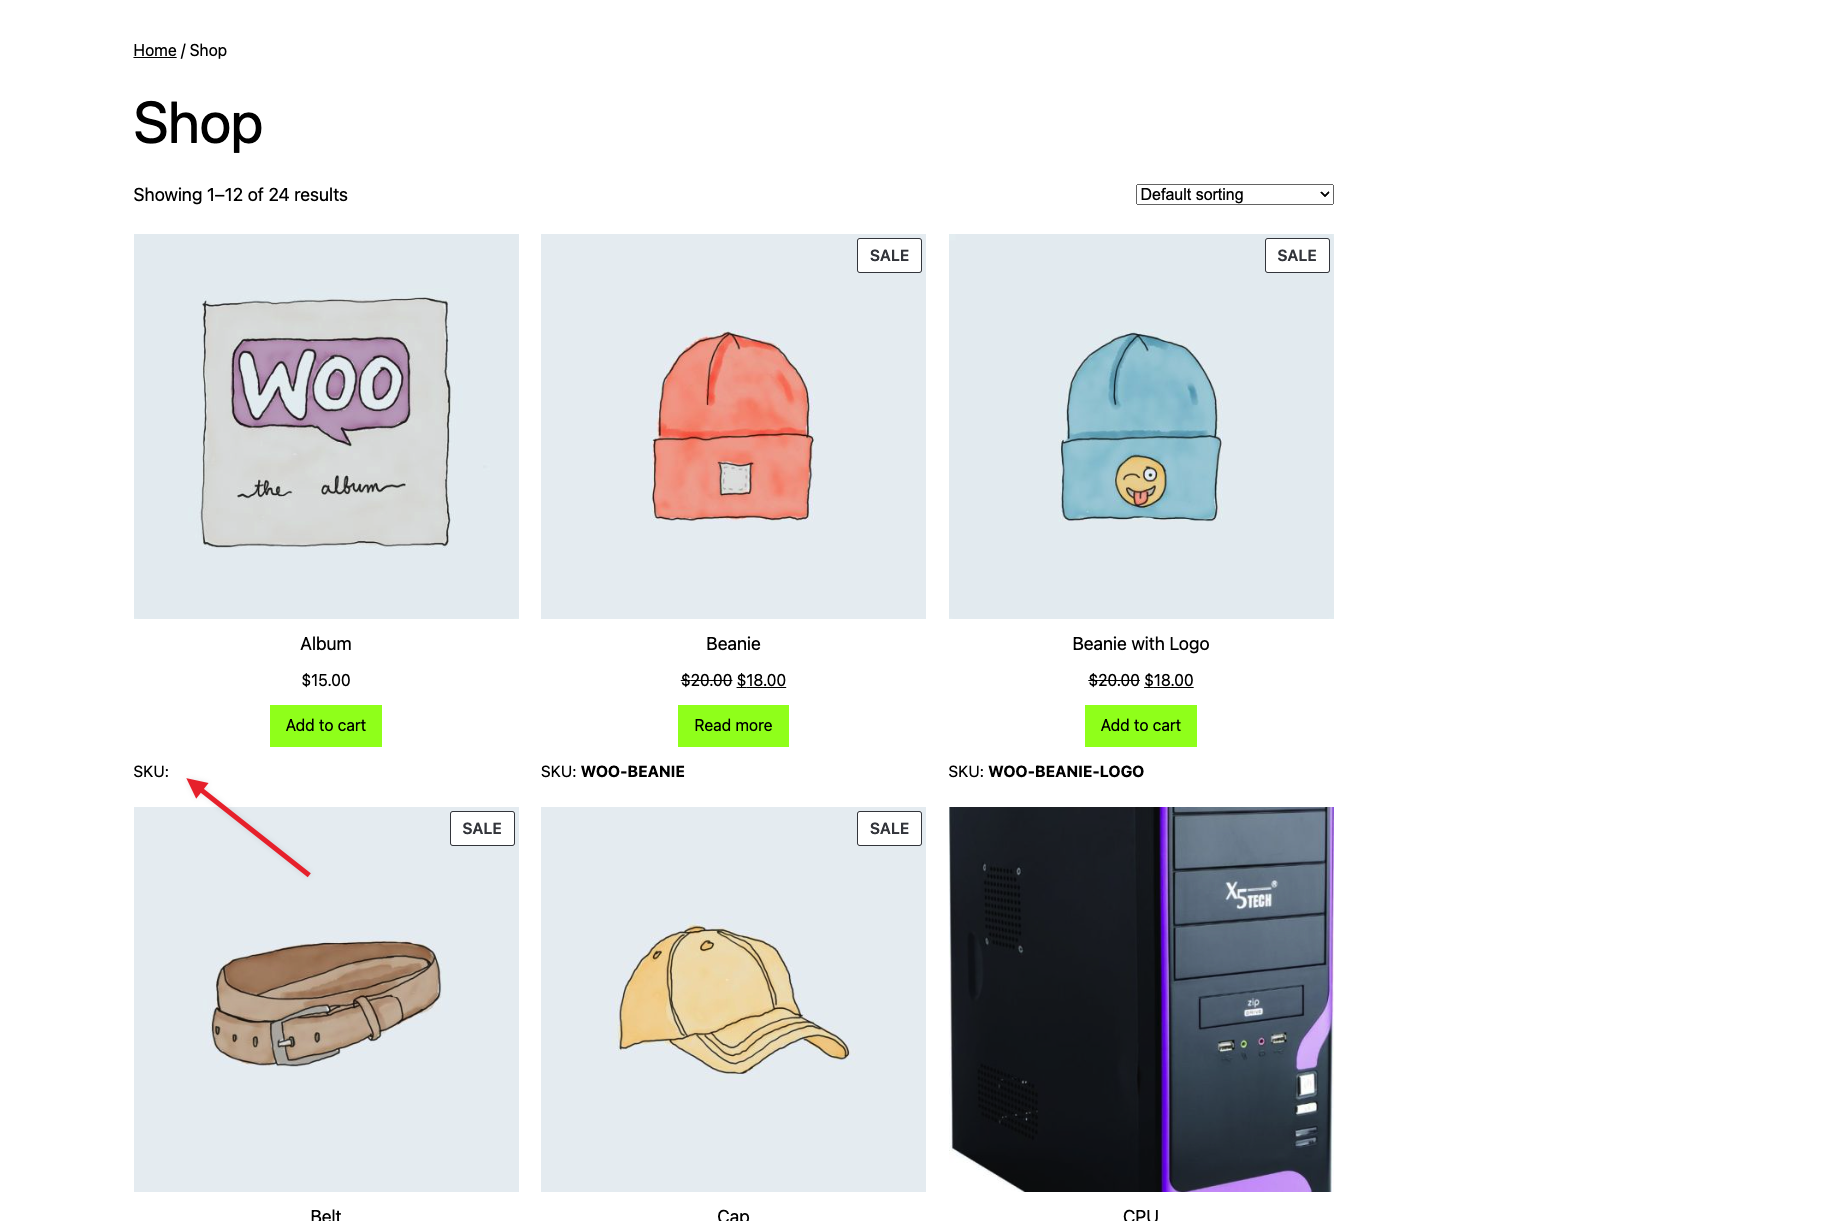
### Product SKU Block: Don't render the prefix when the SKU isn't defined. ([8837](https://github.com/woocommerce/woocommerce-blocks/pull/8837))
|
|
|
|
1. Create a post/page.
|
|
2. Add the `Products` block.
|
|
3. Inside the `Products` block, add the Product SKU block.
|
|
4. Save the post/page.
|
|
5. Edit a Product that will be visible in `Products` block.
|
|
6. Scroll down until you see the “Inventory” section. In that section, it is visible a field labeled “SKU.” Remove the SKU in that field, and then click on the “Update” button at the bottom of the page.
|
|
7. On the front end, visit the saved post/page and check the `Products` block.
|
|
8. Ensure that the edited product doesn't have the SKU prefix visible.
|
|
|
|
| Before | After |
|
|
|--------|--------|
|
|
|||
|
|
|
|
### Mini-cart: Add the option to change the style between 'Outline' and 'Fill' in all the buttons. ([8835](https://github.com/woocommerce/woocommerce-blocks/pull/8835))
|
|
|
|
1. Add the `Mini cart` block to the header template of your site.
|
|
2. Go to the `Site Editor` and edit the `Mini cart` template part.
|
|
3. Open the `List view` and select the `Empty Mini Cart view`.
|
|
4. Click on the `Start shopping` button, check that you can change the button style between `Default` and `Outline` in the sidebar settings and change it from the default and save.
|
|
6. Go to the frontend and check the button has the style you just picked on the Site editor.
|
|
7. Repeat the same steps for the `Filled Mini Cart view` and the `View my cart` and the `Go to checkout` buttons.
|
|
|
|
### Product SKU: Make the block focusable in editor. ([8804](https://github.com/woocommerce/woocommerce-blocks/pull/8804))
|
|
|
|
1. Create a new post
|
|
2. Add Products block
|
|
3. Add Product SKU block to Products
|
|
4. Hover and click on the product
|
|
5. **Expected:** Product SKU can be focused on and contextual menu is displayed. Block can be moved up and down to switch places with other blocks.
|
|
|
|
| Before | After |
|
|
| ------ | ----- |
|
|
| <img width="260" alt="image" src="https://user-images.githubusercontent.com/20098064/226637287-abbb037f-72a4-4a9a-ab22-c373a1b6444c.png"> | <img width="293" alt="image" src="https://user-images.githubusercontent.com/20098064/226637459-81aa5e5e-dbb1-4f07-9005-0c6df80b3058.png"> |
|
|
|
|
|
|
### Add Fill & Outline styles, width settings & new typography controls for Product(Add to cart) button block. ([8781](https://github.com/woocommerce/woocommerce-blocks/pull/8781))
|
|
|
|
|
|
- Add `Products block` to a page/post.
|
|
- Select `Add to cart` inner block.
|
|
- In the sidebar, confirm newly added controls work as expected:
|
|
- Styles: Default & Outline ( Feature plugin )
|
|
- Width Settings ( Feature Plugin + WooCommerce Core )
|
|
- Typography controls ( Feature plugin )
|
|
- Confirm `Add to cart` works for cross-sells as well.
|
|
|
|
<img width="277" alt="image" src="https://user-images.githubusercontent.com/16707866/226090467-d0f7457f-fd56-4dba-a5bc-607ae179f9e5.png">
|
|
|
|
|
|
### Add style to the `Mini Cart` buttons. ([8776](https://github.com/woocommerce/woocommerce-blocks/pull/8776))
|
|
|
|
1. Add the `Mini cart` block to the header template of your site.
|
|
2. Go to the `Site Editor` and edit the `Mini cart` template part.
|
|
3. Open the `List view` and select the `Filled Mini Cart view`.
|
|
4. Click on the `View my cart` button and check that you can change the background and text colors of the button.
|
|
5. Click on the `Go to checkout` button and check that you can change the background and text colors of the button.
|
|
7. Save, go to the frontend, and check the buttons have the colors you just picked on the Site editor.
|
|
|
|
### Add the ability to change the background and text colors of the Mini Cart block "Start shopping" button. ([8766](https://github.com/woocommerce/woocommerce-blocks/pull/8766))
|
|
|
|
1. Add the `Mini cart` block to the header template of your site.
|
|
2. Go to the `Site Editor` and edit the `Mini cart` template part.
|
|
3. Open the `List view` and select the `Empty Mini Cart view`.
|
|
4. Click on the `Start shopping` button and check that you can change the background and text colors of the button.
|
|
5. Change both of them and save.
|
|
6. Go to the frontend and check the button has the colors you just picked on the Site editor.
|
|
|
|
### Mini-cart: Add setting to not render the block on the cart & checkout pages. ([8700](https://github.com/woocommerce/woocommerce-blocks/pull/8700))
|
|
|
|
#### Site Editor
|
|
|
|
1. Go to the Site Editor > Template parts and edit the header template to add the `Mini Cart` block. Save.
|
|
2. Edit the block and make sure you see the new setting:
|
|
|
|
<img width="282" alt="Screenshot 2023-03-13 at 16 27 26" src="https://user-images.githubusercontent.com/186112/224748404-6c02b9ef-2112-405b-9ab5-69abe857a03c.png">
|
|
|
|
3. Make sure the default option is `Hide`.
|
|
4. In the store, go to the Cart page and make sure the `Mini Cart` is rendered but invisible. Repeat but for the Checkout page.
|
|
5. Go back to the Site Editor, change the `Mini Cart` setting to `Remove`, and save.
|
|
6. In the store, go to the Cart page and make sure the `Mini Cart` markup is not rendered at all. Repeat but for the Checkout page.
|
|
|
|
|
|
#### Post/page
|
|
|
|
1. Create a new post or page.
|
|
2. Insert the `Mini Cart`.
|
|
3. Make sure the new `Mini Cart in cart and checkout pages` setting does not appear.
|
|
|
|
|
|
### Ensure shipping rates do not show in the Checkout block if the "Hide shipping costs until an address is entered option is selected". ([8682](https://github.com/woocommerce/woocommerce-blocks/pull/8682))
|
|
|
|
|
|
1. Go to `WooCommerce -> Settings -> Shipping -> Local Pickup`, enable Local Pickup and add a location.
|
|
2. Go to the Checkout block in the Page editor, click on the Shipping Options block - in the block sidebar, enable the `Hide shipping costs until an address is entered` option.
|
|
3. In WooCommerce -> Settings -> General change `Default customer location` to `No location by default`.
|
|
4. In an incognito window, add an item to your cart and go to the Checkout block.
|
|
5. Ensure no shipping rates are shown, and ensure the "Shipping" button for method selection says `calculated with an address`
|
|
6. Enter an address (one that you have rates set up for) - as you fill in the address, be sure the rates don't populate until it's completely filled in. (address 1, city, state, country, postcode).
|
|
7. Ensure you can change rates etc.
|
|
8. Disable the `Hide shipping costs until an address is entered` in the Page editor and ensure the rates show as usual as soon as the country/state are entered and the rest of the address is empty. (note you should enter a country that you have rates for!).
|
|
|
|
|
|
### Move option to hide shipping costs until an address is entered to the Checkout block. ([8680](https://github.com/woocommerce/woocommerce-blocks/pull/8680))
|
|
|
|
|
|
1. Go to WooCommerce -> Settings -> Shipping -> Local Pickup, enable Local Pickup and add a location.
|
|
2. Go to the Checkout block in the Page editor. Select the `Shipping Method` block
|
|
3. See the `Hide shipping costs until an address is entered` option in the block sidebar.
|
|
4. Toggle it and ensure it works. Remember the value you toggled it to.
|
|
5. Select the `Shipping options` block, see the same option. Ensure the value is the same as what it was in step 4.
|
|
6. If the option is `true` then you should see the text `Shipping options will be displayed here after entering your full shipping address.` instead of shipping options.
|
|
7. Toggle the option and ensure the inner block changes to either shipping options or the text.
|
|
8. Go back to the `Shipping Method` block and toggle the option there. View the `Shipping options` block while toggling and ensure it changes.
|
|
|
|
|
|
| Before | After |
|
|
| ------ | ----- |
|
|
| <img width="283" alt="image" src="https://user-images.githubusercontent.com/5656702/223886774-2bcbe69f-c01f-48f7-a938-2ccbc5027b70.png"> | <img width="281" alt="image" src="https://user-images.githubusercontent.com/5656702/223886810-e2dcfe67-3a5c-4f02-8775-6ddc6bd9c441.png"> |
|
|
|
|
|
|
### Remove certain Shipping settings from WooCommerce -> Settings -> Shipping -> Shipping Options when using the Cart or Checkout blocks, these have been moved to setting on the blocks. ([8679](https://github.com/woocommerce/woocommerce-blocks/pull/8679))
|
|
|
|
1. Go to `WooCommerce -> Settings -> Advanced` - set the Cart and Checkout pages to pages containing the **shortcode** cart/checkout experience. Save.
|
|
2. Go to `WooCommerce -> Settings -> Shipping -> Shipping Options` - observe the two options, `Hide shipping costs until an address is entered` and `Enable the shipping calculator on the cart page`.
|
|
3. Go to `WooCommerce -> Settings -> Advanced` - set the **Cart** page to one containing the **Cart Block**. Save.
|
|
4. Go to `WooCommerce -> Settings -> Shipping -> Shipping Options` - observe that where the two options were in step 2, only, `Hide shipping costs until an address is entered` remains. Ensure it displays correctly and looks OK.
|
|
5. Go to `WooCommerce -> Settings -> Advanced` - set the **Checkout** page to one containing the **Checkout Block**. Save.
|
|
6. Go to `WooCommerce -> Settings -> Shipping -> Shipping Options` - observe that where the two options were in step 2 nothing appears.
|
|
7. Go to `WooCommerce -> Settings -> Advanced` - set the **Cart** page to one containing the **Shortcode cart**. Save.
|
|
8. Go to `WooCommerce -> Settings -> Shipping -> Shipping Options` - observe that where the two options were in step 2 only `Enable the shipping calculator on the cart page` appears. Ensure it displays correctly.
|
|
|
|
Expected results
|
|
|
|
| | Shortcode Cart | Block Cart |
|
|
|-|----------------|------------|
|
|
| **Shortcode Checkout** | <img width="613" alt="image" src="https://user-images.githubusercontent.com/5656702/223882079-ac03e6ef-f1e9-4f7b-b173-65752866030e.png"> | <img width="582" alt="image" src="https://user-images.githubusercontent.com/5656702/223882155-b8dd6916-5213-4be9-9cae-b04e850a4d3f.png"> |
|
|
| **Block Checkout** | <img width="579" alt="image" src="https://user-images.githubusercontent.com/5656702/223882325-87a77a3c-5409-485d-ad5d-e422273f5d66.png"> | <img width="538" alt="image" src="https://user-images.githubusercontent.com/5656702/223882267-d0c27ae2-01e7-4691-9264-7101051ff48c.png"> |
|
|
|
|
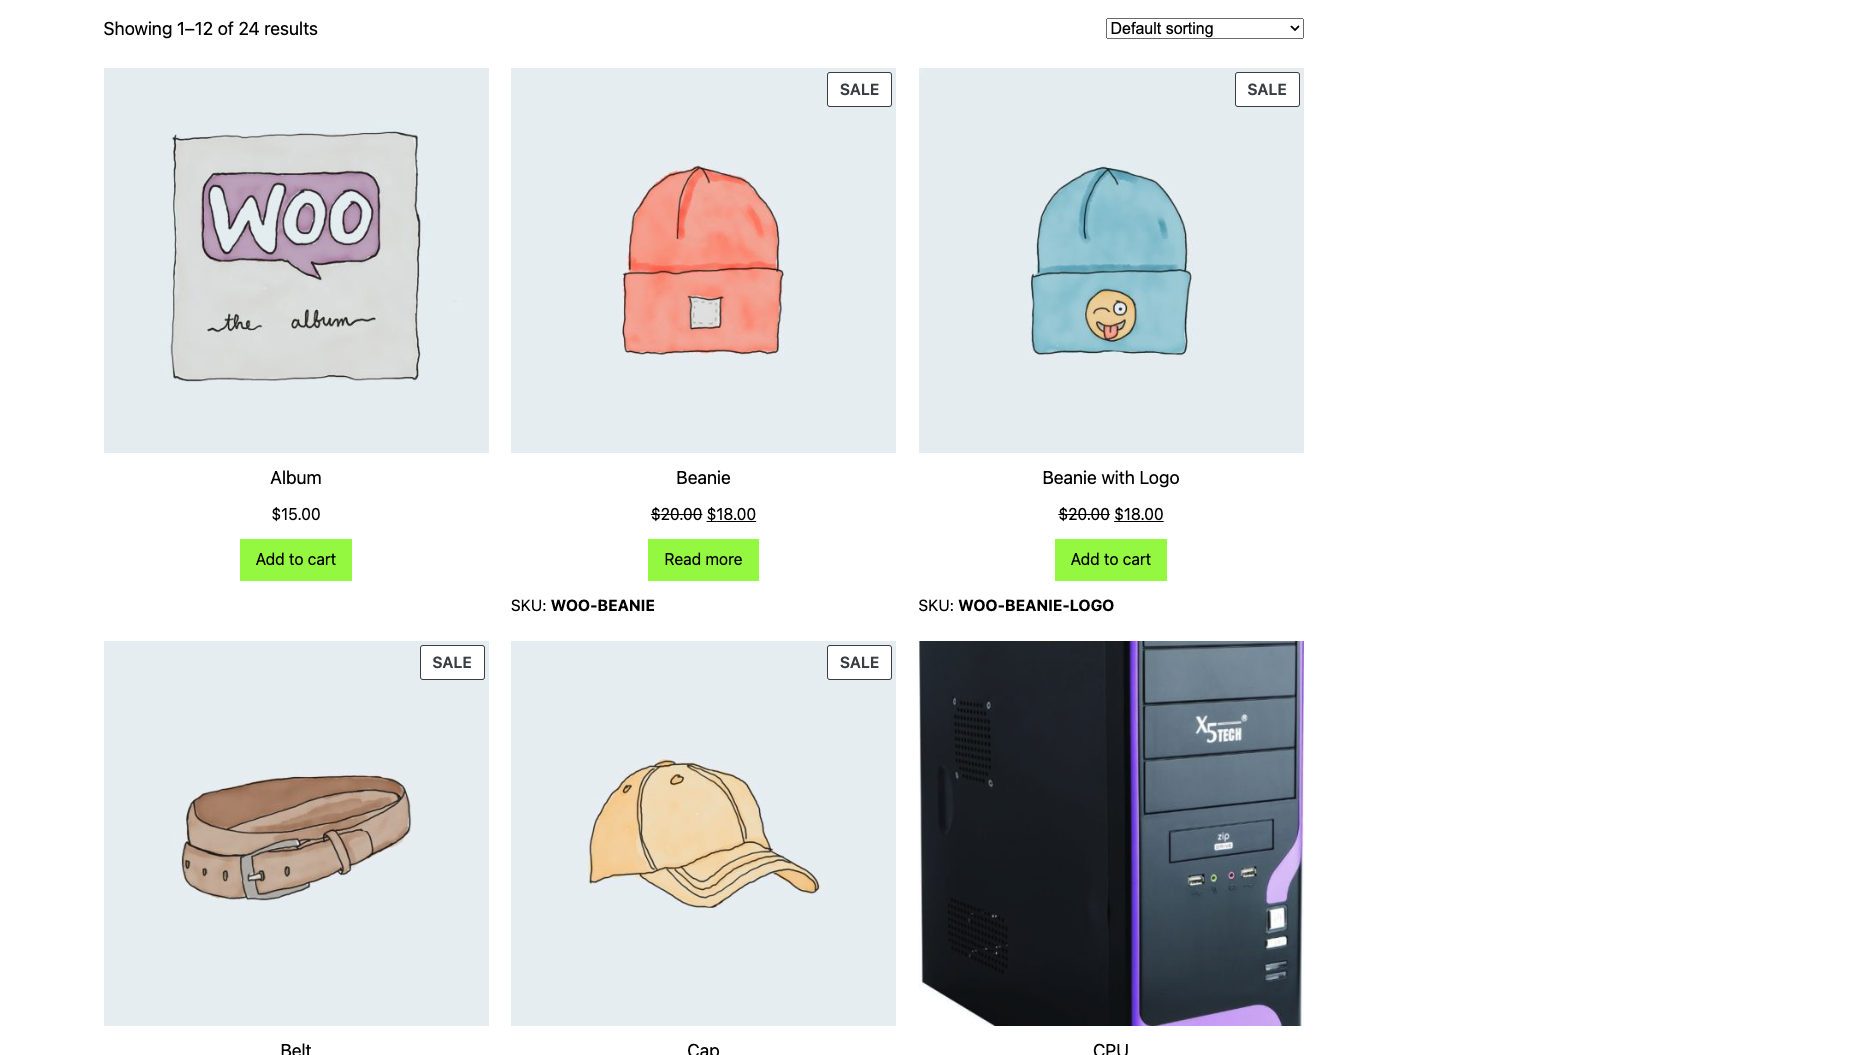
### Add spacing between Mini Cart title and products list when scrolled. ([8676](https://github.com/woocommerce/woocommerce-blocks/pull/8676))
|
|
|
|
|
|
1. With a block theme, add the Mini Cart block to the header of your site.
|
|
2. Add many products to your cart.
|
|
3. Click on the Mini Cart button to open the drawer.
|
|
4. Scroll down the list of products in the Mini Cart drawer and verify there is some space between the title and product list.
|
|
5. Go to Appearance > Editor > Template parts and edit the Mini Cart template part.
|
|
6. Change the background color to something different.
|
|
7. Repeat steps 3 and 4 and verify the space between the Mini Cart title and the products list honors that color.
|
|
|
|
Before | After | After (with custom background color)
|
|
--- | --- | ---
|
|
 |  | 
|
|
|
|
|
|
### Add new ExperimentalOrderLocalPickupPackages Slot/Fill. ([8636](https://github.com/woocommerce/woocommerce-blocks/pull/8636))
|
|
|
|
|
|
1. Go to WooCommerce -> Settings -> Shipping -> Local Pickup and activate Local Pickup. Ensure you have added a couple of locations.
|
|
2. Add an item to your cart and go to the Checkout block.
|
|
3. Select Local Pickup and ensure the options you set up in step 1 are visible.
|
|
|
|
|
|
### Add client side postcode validation. ([8503](https://github.com/woocommerce/woocommerce-blocks/pull/8503))
|
|
|
|
1. Add a product to the Cart and go to the Checkout block page.
|
|
2. Select United Kingdom (UK) as country.
|
|
3. Verify that the postcode `AA9A 9AA` passes the validation.
|
|
4. Verify that the postcode `9999 999` fails the validation.
|
|
5. Verify that it's not possible to have spaces before the postcode, .e.g. ` AA9A 9AA`.
|
|
6. Verify that lowercase letters, e.g. `aa9A 9aa`, are automatically converted to uppercase letters, e.g. `AA9A 9AA`.
|
|
|
|
|
|
### Display pickup location details in order confirmations. ([8727](https://github.com/woocommerce/woocommerce-blocks/pull/8727))
|
|
|
|
1. Place an order using the Checkout block, selecting Local Pickup as your shipping method.
|
|
2. Check the order confirmation page shows pickup details.
|
|
3. Confirm the order confirmation page hides the "shipping address".
|
|
4. Check the order email confirmation shows the same pickup details.
|
|
|
|
|
|
|
|
### Local Pickup: Merge country and state into same field in location modal. ([8408](https://github.com/woocommerce/woocommerce-blocks/pull/8408))
|
|
|
|
|
|
1. `Enable local pickup` in `WooCommerce -> Settings -> Shipping -> Local pickup -> General`.
|
|
2. Under `Pickup locations`, click on `Add pickup location`. The `Pickup location` modal should open
|
|
3. Choose a country with a state. Ensure it's displayed in one field
|
|
4. Fill in the other fields of the modal form, click on `done`, then save changes
|
|
5. Go to your store, add a product to the cart, then go to the Checkout Block page
|
|
6. Under the `Shipping method` section, select `Local Pickup`
|
|
7. Ensure the correct country and state you previously selected are correctly showing under `Pickup options`
|
|
8. Go back to the local pickup settings from step 1. Follow the same steps from 2 to 7, but in step 3, choose a country without a state (e.g., Cameroon) and ensure that the `State` text field is displayed. Fill in the form and continue with the rest of the instructions.
|
|
|
|
| Before | After |
|
|
| ------ | ----- |
|
|
| <img width="772" alt="image" src="https://user-images.githubusercontent.com/14235870/218823036-fe2570cf-fefe-4fc1-be56-4ea628f1bdd5.png"> | <img width="791" alt="image" src="https://user-images.githubusercontent.com/14235870/218822843-84e82d4c-835d-4076-9125-ec74d1ea9817.png"> |
|
|
|
|
|
|
### Enable users to migrate to the blockified Single Product template. ([8324](https://github.com/woocommerce/woocommerce-blocks/pull/8324))
|
|
|
|
1. Enter the `Single Product` template.
|
|
2. Check that the placeholder description says "This block serves as a placeholder for your WooCommerce Single Product Block. We recommend upgrading to the Single Products block for more features to edit your products visually. Don't worry, you can always revert back.".
|
|
3. Click the `Upgrade to Blockified Single Product Template` button.
|
|
4. See new templates work in the Site Editor and on the front end.
|
|
|
|
| Before | After |
|
|
| ------ | ----- |
|
|
| <img width="1043" alt="Screenshot 2023-01-30 at 12 41 58" src="https://user-images.githubusercontent.com/186112/215467611-b77d7564-920f-4c05-87af-32e9ed5e6a9b.png"> |<video src=https://user-images.githubusercontent.com/4463174/227149851-235b6685-0955-48e8-91d5-37f2ad7f9b87.mp4/>|
|
|
|
|
|
|
### Fix border styles not visible in the editor in Featured Product and Featured Category blocks. ([8838](https://github.com/woocommerce/woocommerce-blocks/pull/8838))
|
|
|
|
1. Add a Featured Item (Featured Category or Featured Product) block to a page or post.
|
|
2. Select the border controls and add a border style. Add a color and give it some width.
|
|
3. You should see the border you set dynamically display on the featured item.
|
|
4. Now click on the `Unlink` button on the border controls and try setting different values for color and width for each of the border sides (top,right,bottom,left).
|
|
5. Ensure this is working by visually seeing the changes to the featured item.
|
|
6. Save and make sure this is also displaying correctly on the frontend.
|
|
7. Test both `Featured Category` and `Featured Product` blocks.
|
|
|
|
### Add decoding to product names titles that are in HTML entities. ([8824](https://github.com/woocommerce/woocommerce-blocks/pull/8824))
|
|
|
|
1. Create a product with special characters in its name (ie: Hat & sticker or Shirt - Green).
|
|
2. In the Page editor, add a Featured Product, Hand-Picked Products or Reviews by Product block.
|
|
3. Notice in the selector the names of the products with special characters looks correct and not in the HTML entity form.
|
|
|
|
|
|
### Fix react 18 error in the Site editor when using cart/checkout blocks. ([8820](https://github.com/woocommerce/woocommerce-blocks/pull/8820))
|
|
|
|
- Install and activate WordPress Beta Tester plugin.
|
|
- Go to wp-admin -> Tools -> Beta testing.
|
|
- Select `Bleeding edge` radio option under `Select the update channel you would like this website to use`.
|
|
- Select ` Release Candidates Only` radio option under `Select one of the stream options below`.
|
|
- Save the changes.
|
|
- Go to wp-admin -> Dashboard -> Updates.
|
|
- Update to WP 6.2 latest release candidate.
|
|
- Install [WooCommerce 7.4.1](https://href.li/?https://github.com/woocommerce/woocommerce/releases/tag/7.4.1)
|
|
- Activate any FSE theme.
|
|
- Go to Appearance -> Editor
|
|
- Add Cart block to the template.
|
|
- Open the browser console and select the Cart block on the Site editor.
|
|
|
|
### Filter by Stock and Filter by Rating: Fix the potential endless redirection loop when used on a search results page. ([8784](https://github.com/woocommerce/woocommerce-blocks/pull/8784))
|
|
|
|
1. Enable TT1 theme
|
|
2. Go to Appearance -> Widgets
|
|
3. Add there Filter by Stock, Filter by Rating, Active Filters and Product Search blocks
|
|
4. Save and go to your store's shop
|
|
5. Your blocks should be available in the footer
|
|
6. Input in the search term: `'` and then some other random terms including letters, numbers, white space, special characters
|
|
7. **Expected:** there's no endless redirections
|
|
8. Click on some filters to Filter by Stock and Filter by Rating and confirm there's no redirection loop
|
|
|
|
|
|
### Fix "Save changes" default behavior bug in the Firefox browser. ([8754](https://github.com/woocommerce/woocommerce-blocks/pull/8754))
|
|
|
|
1. Go to `WooCommerce/Shipping/Local pickup`
|
|
2. Click on the `Save changes` button. Ensure you are not redirected to another page, and the notice `Local Pickup settings have been saved.` is displayed
|
|
<img width="1018" alt="image" src="https://user-images.githubusercontent.com/14235870/225263783-6455a4c6-3200-4e93-8e92-74bdf2a83952.png">
|
|
|
|
3. Make some changes (e.g., enable/disable local pickup, add/edit a pickup location, etc.)
|
|
4. Click on the `Save changes` button. Ensure you have the same results in step 2
|
|
5. Refresh the page. Ensure your changes are being saved
|
|
|
|
|
|
|
|
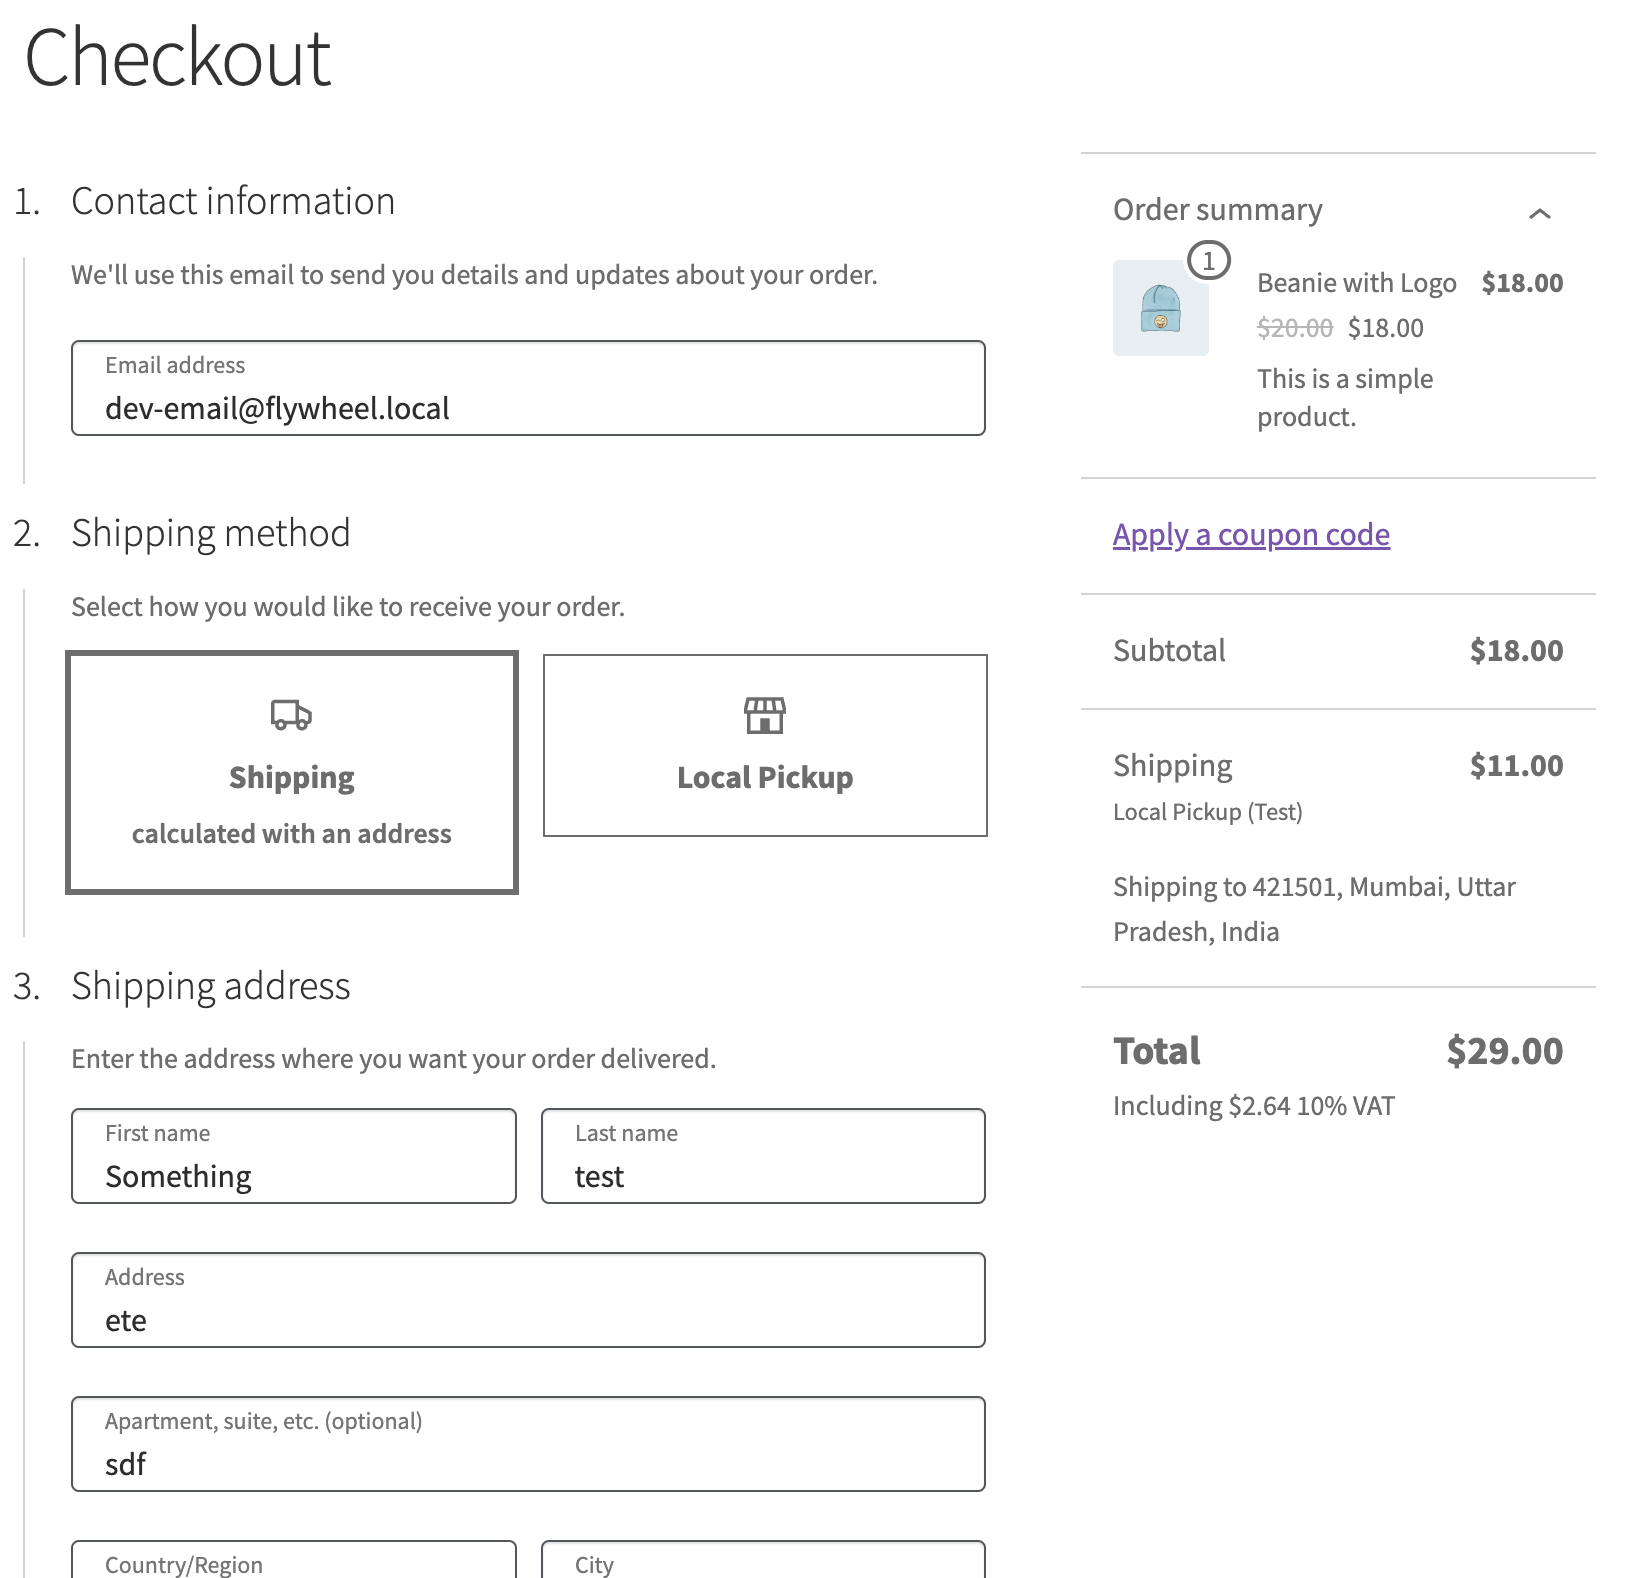
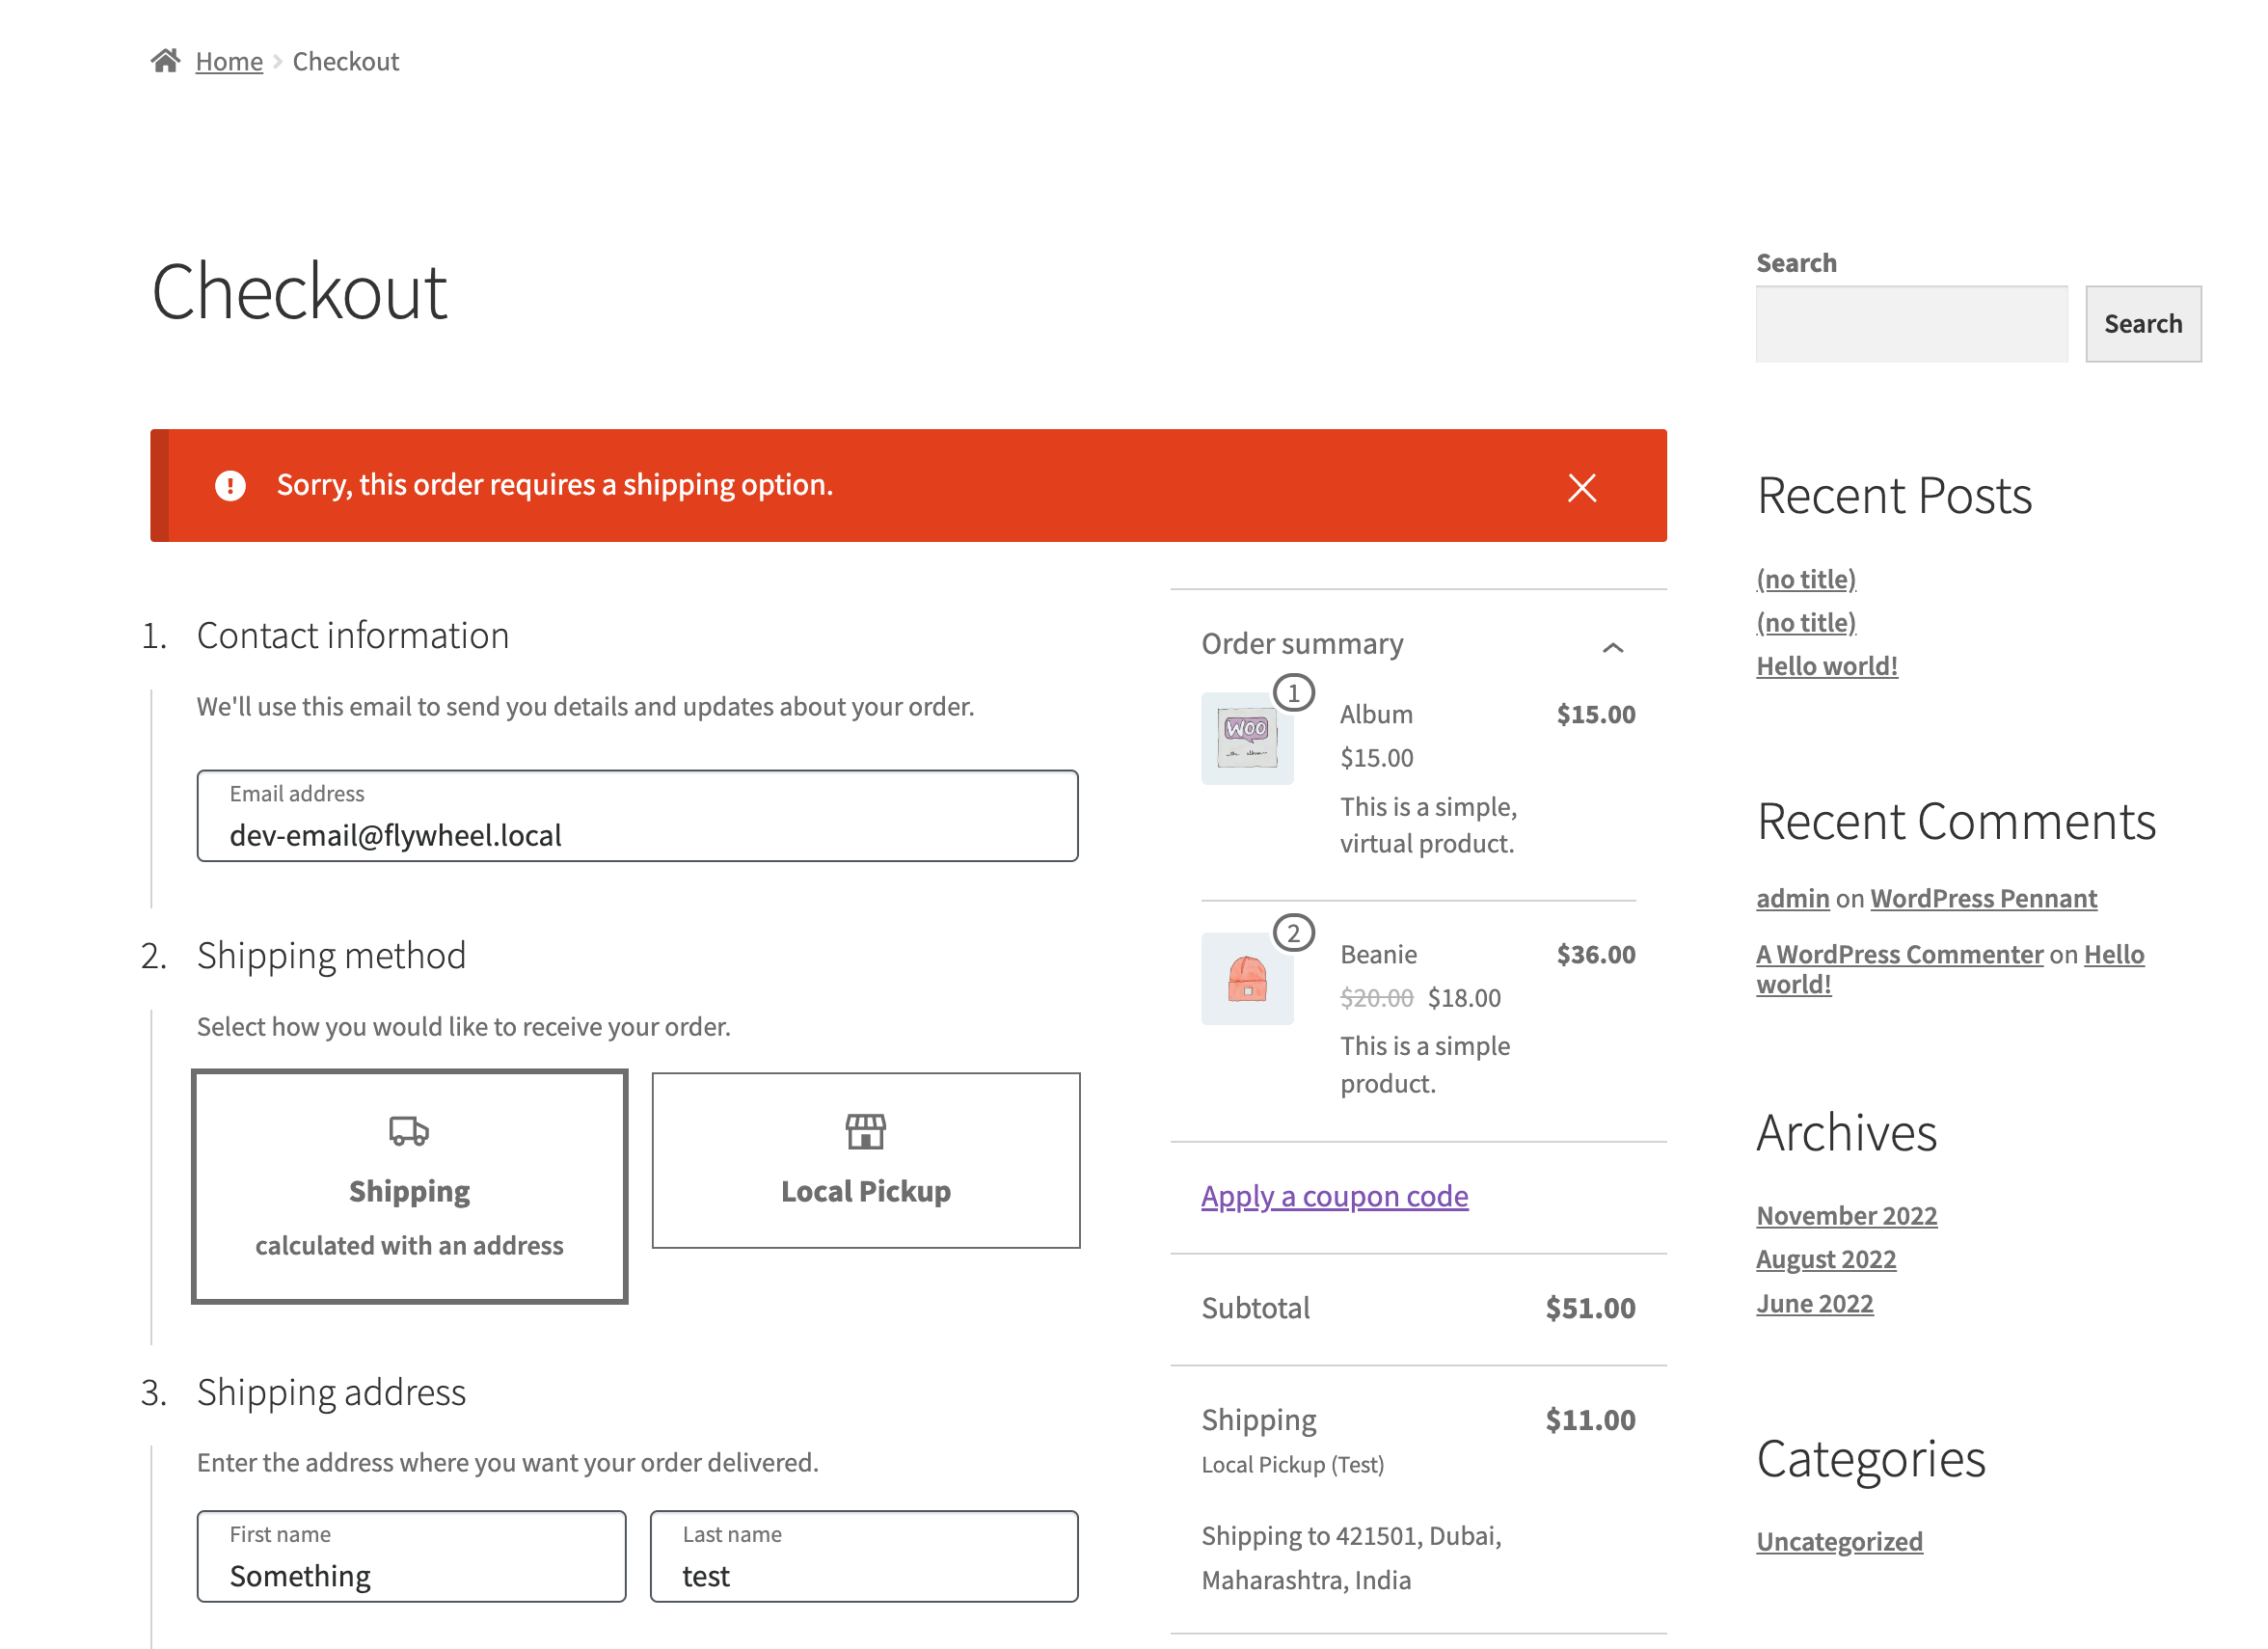
### Add validation error to prevent checkout when there is no shipping method available. ([8384](https://github.com/woocommerce/woocommerce-blocks/pull/8384))
|
|
|
|
1. Enable local pickup with pickup price.
|
|
2. Remove the shipping methods from the WC settings.
|
|
3. Go to the Checkout block and select the shipping option.
|
|
4. Confirm error notice is being displayed at the top.
|
|
5. Confirm you're not able to place the order.
|
|
6. Select local pickup.
|
|
7. Confirm you're able to place an order
|
|
|
|
| Before | After |
|
|
| ------ | ----- |
|
|
|||
|