66 KiB
Testing instructions
Unreleased
Fix WC Home crash when the Analytics is disabled.
- Navigate to WooCommerce -> Settings -> Advanced -> Features. Uncheck Analytics and save the changes.
- Navigate to WooCommerce -> Home and confirm the page loads without an error.
Fix Fix links on the dismiss dropdown are not clickable #7342
Please make sure to test it on Safari as well.
- Navigate to WooCommerce -> Home
- Click [ Dismiss ] button
- Confirm that the links are clickable
Fix undefined method error when setting up WC Tax #7344
- Set up your store with US address to make sure automated tax is supported.
- Install "WooCommerce Shipping & Tax" plugin.
- Go to WooCommerce > Home > Set up tax.
- Click on "Yes please"
- Confirm that no error has occurred and you're redirected to the home screen.
Fix missing translation strings for CES #7270
- Navigate to Settings -> General and change the site language to a non-English (I've used Espanol for testing purposes).
- You might need to update the language file if it's your first time using the selected language. Update the language file from Dashboard -> Updates
- Go to WooCommerce -> Settings
- Click the [ Save Changes ] button to trigger the CES modal.
- Confirm the modal has correct translations (Refer to the screenshots)
Add missing translation strings in the business features section #7268
- Checkout this branch and run
npm start - Navigate to Settings -> General and change the site language to non-English (I've used Espanol for testing purposes)
- You might need to download the new language in Dashboard -> Updates
- Navigate to wp-admin/admin.php?page=wc-admin&path=%2Fsetup-wizard&step=business-features and confirm the translation is working as expected.
Fix inbox note dismiss dropdown not closing on Safari #7278
- Checkout this branch and run npm start
- Navigate to WooCommerce -> Home
- Click "Dismiss" on a note. Confirm the position of the popover is correct.
- Click anywhere outside of the popover content and confirm the popover is closed.
Add TableSummaryPlaceholder to support skeleton loading #7294
- Visit any page using element Table to see this update.
- For example, Products, Orders, Revenue under Analytics; or Transactions, Deposits under Payments.
- While loading, scrolling down to the bottom of the table to see the placeholder of TableSummary.
Sync the category lookup table when a new category gets created #7290
- Navigate to Products -> Add New
- Add a new category on the Add New page and assign the product to it.
- Place an order with the product
- Navigate to Analytics -> Categories
- You should see the category.
Remove facebook extension from onboarding extensions fallback list #7287
- Go to the OBW and look at the Free features tab
- Observe no Facebook extension in the list
"Terms of service" link disappears from "Set up Tax" screen #7269
- Go to OBW setup wizard.
- Uncheck the "WooCommerce shipping" and "WooCommerce Tax" options at Free features step.
- Complete the OBW setup.
- Go to WooCommerce->Home.
- Click on "Set up Tax" option on Task list.
- TOS should not blink.
Use saved values if available when switching tabs #7226
- Start onboarding wizard and continue to step 4.
- Enter selections for business details and choose "Continue"
- Select the tab "Business details" to go back
- Confirm that the previously selected values are shown.
Change the emailed report file name #7178
Confirm the default behaviour remains the same
- Create a new store and install the WP Mail Logging by MailPoet plugin
- Go to Analytics -> Revenue and change the date range to last month
- Click the download button and make sure you see the "Your revenue report will be emailed to you" notification
- Go to Tools -> Scheduled Action and run the newly created
woocommerce_admin_report_exportaction. After that is complete, run thewoocommerce_admin_email_report_download_linkaction. - Go to Tools -> WP Mail Log and check the latest email. The URL linked to the "Download your Revenue report" should work as usual. The URL will be something like
filename=wc-revenue-report-export-16236128226138
Confirm the new filter is working
- Add this code to the
woocommerce-admin.phpfile
add_filter( 'woocommerce_admin_export_id', function ($export_id) {
	return 'different_export_id';
} );
- Repeat the same steps from above. The filename in the link now should be
different_export_id.
Payment gateway suggestions feature
- Navigate to the homescreen via WooCommerce -> Home
- Click on "Set up payments"
How to test
Individual payment gateway plugins dictate the settings and connection flow. For testing purposes, we'll test both the default behavior of the gateway and the enhanced configuration behavior.
- On the payments task, click "Set up" or "Enable" next to a gateway
- Note that the gateway is installed if it requires a plugin
- On the connection step, a button should be presented that links to the gateway's (legacy) settings screen
- Delete the plugin
- Install some of the payment gateways from the links below. They don't need to be activated, but the folder names should match those on WordPress.org to avoid conflicts.
- If setting fields are shown, make sure that validation works, input is saved, and is persisted on page refresh. Make sure the gateway is marked as enabled and not labeled "Requires setup" if all fields are completed.
- If the "Connect" button is shown, follow the connection flow. Make sure that you are returned to the payments task and that the gateway is enabled and marked as configured.
- Remove some settings manually under the payment gateway's legacy settings screen. Make sure the gateway is no longer marked as configured.
- Klarna - https://mc.a8c.com/includes/img-uploader/files/1624475036-klarna-checkout-for-woocommerce.zip
- PayFast - https://mc.a8c.com/includes/img-uploader/files/1624660950-woocommerce-payfast-gateway.zip
- PayPal - https://mc.a8c.com/includes/img-uploader/files/1624475037-woocommerce-paypal-payments.zip
- RazorPay - https://mc.a8c.com/includes/img-uploader/files/1624660848-woo-razorpay.zip
- Stripe - https://mc.a8c.com/includes/img-uploader/files/1624661118-woocommerce-gateway-stripe.zip
- MercaoPago - https://mc.a8c.com/includes/img-uploader/files/1624475616-woocommerce-mercadopago.zip
- Square - https://mc.a8c.com/includes/img-uploader/files/1624475232-woocommerce-square.zip
- eWAY - https://mc.a8c.com/includes/img-uploader/files/1624476063-woocommerce-gateway-eway.zip
PayFast
- Set your country to South Africa in WooCommerce->Settings
- Don't select CBD as an industry during onboarding
Paystack
- Set your country to South Africa in WooCommerce->Settings
- Don't select CBD as an industry during onboarding
- Complete the payment tasks
- Make sure that
ZARis the site currency after configuration of Paystack and that "test mode" is turned off in settings
Stripe
- Set your store country to a Stripe supported country (e.g., US - https://stripe.com/global )
- Don't select CBD as an industry during onboarding
- Make sure you're using a site with https
- Attempt to use the oauth connection flow to enable the gateway, making sure you are returned to the site and connection is successful
- Remove the connection and use a non-https site
- Check that the manual settings configuration flow is shown
PayPal
- Set your store country to any country except India
- Don't select CBD as an industry during onboarding
- Make sure the PayPal connection flow is shown and works as expected
- In Chrome, open the console "Network" tab and right-click on the
get-paramsrequest and select "Block request URL" - Refresh the page and note that the manual settings flow is shown
Klarna
- Set your store country to one of the following:
SE, FI, NO - Don't select CBD as an industry during onboarding
Mollie
- Set your store country to one of the following:
FR, DE, GB, AT, CH, ES, IT, PL, FI, NL, BE - Don't select CBD as an industry during onboarding
Mercado Pago
- Set your store country to one of the following:
AR, BR, CL, CO, MX, PE, UY - Make sure the help text is shown when setting up the gateway with links to registration and the settings screen.
WooCommerce Payments
- Set your store country to one of the following:
US, PR - Don't select CBD as an industry during onboarding
- Make sure the WC Pay card is shown above the other payment gateways
- Attempt to install and configured the gateway
Cash on Delivery
- Make sure "Enable" is shown and clicking this enables the gateway
- Make sure the "Manage" button is shown after enabling the gateway
Direct bank transfer
- Make sure "Set up" is shown next to the gateway
- Enter some bank details
- Make sure the gateway is marked as enabled and configured with the entered settings when visiting the legacy settings screen
RazorPay
- Set your store country to India
- Don't select CBD as an industry during onboarding
PayU
- Set your store country to India
- Don't select CBD as an industry during onboarding
eWAY
- Set your store country to one of the following:
AU, NZ - Don't select CBD as an industry during onboarding
- Make sure the API key and password fields are shown
Square
- Set your store country to the
USand select CBD as an industy during onboarding OR set your store country to one ofUS, CA, JP, GB, AU, IE, don't select CBD as an industry and select that you have a physical store in the business details step. - Make sure the connection flow is shown.
2.4.0
Add padding on table header button #7213
- Create tax rates
- Go to Analytics -> Taxes
- Check it the table style renders as expected
Add target to the button to open it in a new tab #7110
- Navigate to WooCommerce -> Settings -> Payments
- Wait a few seconds until the Recommended ways to get paid section appears.
- Click on the See more options button.
- A new tab/window should open.
Remote Fee Extensions List #7144
- Make sure you have Marketplace suggestions turned off
wp option set woocommerce_show_marketplace_suggestions no - Set your store to a US address
- Be sure to deactivate the following extensions if they are active
- WooCommerce Payments
- WooCommerce Services
- Jetpack
- Mailpoet
- Facebook for WooCommerce
- Google Listings and Ads
- Mailchimp for WooCommerce
- Creative Mail
- Set product types to "Physical" at
/wp-admin/admin.php?page=wc-admin&path=%2Fsetup-wizard&step=product-types - Set the industry to anything other than CBD at
/wp-admin/admin.php?page=wc-admin&path=%2Fsetup-wizard&step=industry
Scenario 1: Default functionality remains
- Go to Business Details step of the OBW
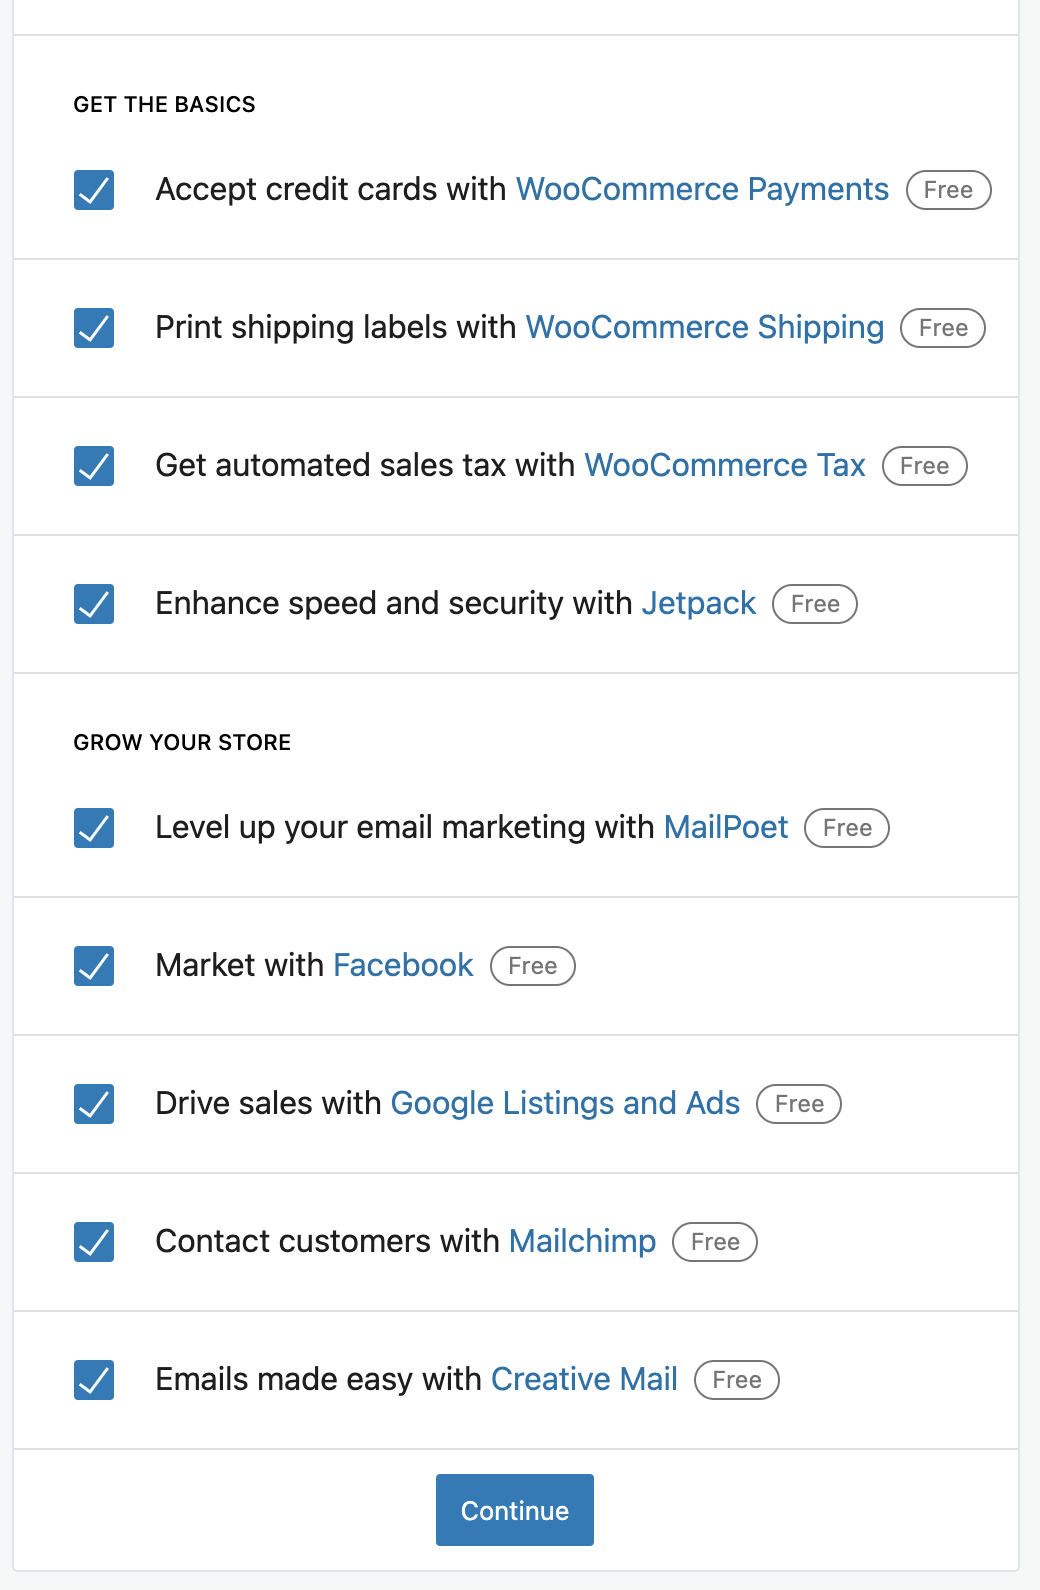
/wp-admin/admin.php?page=wc-admin&path=%2Fsetup-wizard&step=business-features - Click on "Free features" tab
- Click the dropdown "Add recommended business features to my site" to see the list of free extensions.
- See 9 total suggestions
Scenario 2: Default functionality remains
- Turn Marketplace Suggestions on
wp option set woocommerce_show_marketplace_suggestions yes - Repeat steps in Scenario 1 and see the same result
Scenario 3: CBD industry
- Select CBD industry only at
/wp-admin/admin.php?page=wc-admin&path=%2Fsetup-wizard&step=industry - Visit the free features of Business Details and see that WooCommerce Payments is no longer being shown
- Add another industry in addition to CBD and confirm WooCommerce Payments is still not being shown
Scenario 4: Downloads Product Type
- Set the product type to "downloads" only at
/wp-admin/admin.php?page=wc-admin&path=%2Fsetup-wizard&step=product-types - Visit the free features of Business Details and see that WooCommerce Shipping is not shown
- Add another product type, such as "physical" and confirm WooCommerce Shipping is now being shown
Scenario 5: Location
- Set your store location to South Africa
- Confirm WooCommerce Payments, WooCommerce Services Shipping, and WooCommerce Services Tax are not shown.
Scenario 6: Extension already activated
- Install and activate Jetpack
- Confirm Jetpack in not show in Free features list
Include onboarding settings on the analytic pages #7109
- Finish the onboarding wizard as usual.
- Navigate to one of the analytic pages then refresh the page.
- Navigate to WooCommerce -> Home and start OBW again.
- Click the continue button.
- OBW should continue without an error.
Set target to blank for the external links #6999
- Clone this repository.
- Complete the OBW
- Navigate to WooCommerce -> Home
- Hide the Setup task list on the Home screen.
- Note that the Store Management section appears on the Home screen.
- Click on the Visit My Store link.
- Observe that the link opens in a new tab.
Exclude WC Shipping for store that are only offering downloadable products #6917
- Start OBW and enter an address that is in the US.
- Choose "food and drink" from the Industry
- Choose "Downloads" from the Product Types step.
- When you get to the Business Details step, expand "Add recommended business features to my site" by clicking the down arrow.
- Note that "WooCommerce Shipping" is not listed.
Redirect users to WooCommerce Home after setting up a payment method #6891
- Navigate to WooCommerce -> Home and choose "Choose payment methods".
- Click one of the payment methods and go through the setup process.
- You should be redirected to WooCommerce Home with a notice when you are done.
Disable the continue btn when plugins are being installed/activated #6838
- In OBW fill out store details with a USA address
- Click Continue and select Fashion, apparel, and accessories,
- Click Continue, and select Physical products, and continue.
- The business details tab should show a Business details tab, and a Free features tab (disabled at first)
- Select 1-10 for the first dropdown, and No for the second, and click Continue.
- Make sure the "Add recommended business features to my site is ticked
- Click Continue, before the page redirects click Continue again
- Confirm no error has been recorded in your browser console.
Business features uncheck creative mail by default #7139
- Complete the OBW until you get to the business details step.
- Continue setup until the Business Detail step.
- Open
Free Featurestab and toggle dropdown forAdd recommended business features to my site. - Observe that the list have
Creative Mailunchecked by default.
Fix an issue with OBW when wc-pay and Jetpack are both being installed. #6957
- Complete the OBW until you get to the business details step.
- Deselect "Add recommended business features to my site", and select only Jetpack and WooCommerce Payments for installation.
- The plugins should be installed and activated correctly, and you should be able to continue in the flow.
2.3.0
Retain persisted queries when navigating to Homescreen #6614
- Go to Analytics Report.
- Change Time period.
- Navigate to another report.
- Notice that the time period stays the same.
- Navigate to Homescreen.
- Navigate back to previous Analytics Report.
- Ensure that the time period is still what you set on step 2.
Set up shipping costs task, redirect to shipping settings after completion. #6791
- Create a new store, and finish the Onboarding flow
- Go to WooCommerce > Home and select the Set up shipping costs task, it should show the standard stepper
- Type some number in the 'Shipping cost' input
- Click the 'Rest of the world' toggle to toggle it on.
- Type some number in the 'Shipping cost' input box under the 'Rest of the world' label
- Finish the set up, but don't need to install the shipping label plugin
- Once on home screen the Set up shipping costs task should show as finished
- Click on the task again
- It should now redirect to the shipping settings page.
New Google Listings & Ads extension in onboarding #6939
- On a new WooCommerce site/install
- Go through all the onboarding steps till we reach
Included business features - Ensure the plugin shows up correctly with the right naming and select it as the only extension to add
- Continue and confirm the
plugins were successfully activatednotice shows up - Finish onboarding and confirm that the extension was actually activated
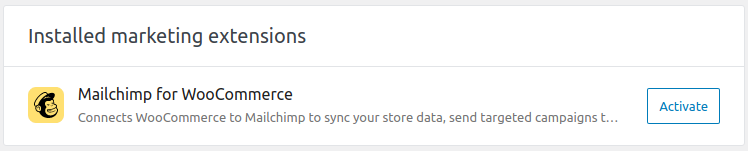
New Google Listings & Ads extension support in Installed Marketing Extensions section
- View the installed marketing extensions section on the page Marketing > Overview
- The extension should appear in the following states:
-
Extension not installed (should not be included in the list, if the list is empty this section won't show at all)
-
Extension installed but not activated (click activate to confirm it works)

-
Extension installed and activated but not setup yet (click "Finish setup" to confirm we get redirected to the get started page)

-
Extension installed, activated and setup (click settings to confirm we get redirected to the settings page)
 Note: The documentation link is not active yet (still in draft)
Add plugin installer to allow installation of plugins via URL #6805
- Visit any admin page with the params
plugin_action(install,activate, orinstall-activate) andplugins(list of comma separated plugins).wp-admin/admin.php?page=wc-admin&plugin_action=install&plugins=jetpack - If visiting this URL from a link, make sure you are sent back to the referer.
- Check that the plugins provided are installed, activated, or both depending on your query.
Add event recording to start of gateway connections #6801
- Enable debug messages inside browser devtools, you can do it by running
localStorage.setItem( 'debug', 'wc-admin:*' );in your browser console. And don't forget to enable all log levels. - Create a new store with event tracking enabled.
- Select
United StatesorUKas the store country. - Visit the Payments task and click to setup
StripeandPayPal. - Verify the event
wcadmin_payments_task_stepper_viewwith the right `payment_method was recorded correctly. - Press
Proceedand verify the eventwcadmin_tasklist_payment_connect_startwith the rightpayment_methodwas recorded. - Verify that the event
wcadmin_tasklist_payment_connect_startalso is recorded for the payment gateways: Square, eWAY (for AU and NZ) and generic gateways like PayFast (for ZA) and PayStack (for ZA, GH, and NG).
Add recommended payment methods in payment settings. #6760
- Create a new store and finish the onboarding flow, making sure your store location is filled out and within US | PR | AU | CA | GB | IE | NZ
- Visit Woocommerce > Settings > Payments you might have to wait a couple seconds, but it should show a card with Recommended ways to get paid listing 3 different payment providers (WC Payments, Stripe, and Paypal).
- Click
Get startedon one of the providers, it will show a loading icon (installing the plugin), once done it should redirect you to the plugin set up page. - Check if the plugin is installed and activated.
- Go back to the payment settings page
- Notice how the plugin you had previously installed and activated does not display anymore.
- Go to WooCommerce > Settings > Advanced > WooCommerce.com and un-select Show Suggestions and save
- Go to the payments setting screen again, the card should not be displayed.
- Enable the Show Suggestions again in WooCommerce > Settings > Advanced > WooCommerce.com
- Go to the payments setting screen again, the card should be displayed.
- Click on the 3 dots of the card, click
Hide this, it should make the card disappear, it should also not show on refresh. This can't be shown again unless thewoocommerce_show_marketplace_suggestionsoption is deleted (through PHPMyAdmin or usingwp option delete woocommerce_show_marketplace_suggestions).
Use the store timezone to make time data requests #6632
- Go to Settings -> General.
- Set your store timezone significantly ahead of or behind the timezone you currently reside in.
- Create a test order and mark complete.
- Navigate to various analytics reports and note the time filter is based on the current store time. E.g., If your store timezone is 12 hours ahead of your current time, you may see
1st - 23rdinstead of1st - 22ndfor "Month to date" depending on your time of day. - Note that the recently added order shows up in analytics reports.
- Change your timezone and repeat, testing with both locations (e.g.,
Amsterdam) and also UTC offsets (e.g.,UTC-6).
Update the checked input radio button margin style #6701
- Go to Home.
- Click on 'Add my products'.
- Select 'Start with a template'.
- Click on the input radio button and see that render as expected.
Fix varation bug with Products reports #6647
- Add two variable products. You want to have at least one variable for each product.
Product A - color:black Product A - color:white
Product B - size:small Product B - size:medium
- Make an order for each product.
- Navigate to Analytics -> Products
- Choose 'Single product' from the 'Show' dropdown and search for the product.
- Confirm that the "Variations" table shows the correct variations. If you searched for the 'Product A', then you should see color:black and color:white.
In case the report shows "no data", please reimport historical data by following the guide on here
Check active plugins before getting the PayPal onboarding status #6625
- Go to the WooCommerce home page
- Open your browser console
- Choose payment methods
- See no error message
Remove PayPal for India #6828
- Setup a new store and set your country to
India. - Go to 'Choose Payment method' Checklist on the home page.
- Verify that PayPal is not presented as a payment method.
Refactor payments to allow management of methods #6786
- Do not select "CBD industry" as a store industry during onboarding.
- Make various payment methods visible by switching to different countries.
- Attempt to set up various payment methods.
- Make sure that after setup, a
Managelink is shown that links to the payment method settings page. - Check that simple methods like, cash delivery or bank transfer initially have an
Enableoption.
Update WC Payments plugin copy #6734
- Install WooCommerce with WooCommerce Payments
- Clone this branch and run npm start (only needed if you are using dev version)
- Navigate to WooCommerce -> Home and observe the copy change.
2.2.0
Fixed event tracking for merchant email notes #6616
- Create a brand new site.
- Install a plugin to log every sent email (you can use WP mail logging).
- Install and activate WC Admin Test Helper.
- Create a new note type
email. - Now go to WooCommerce > Settings > Email (
/wp-admin/admin.php?page=wc-settings&tab=email) and check the checkboxEnable email insightsand save changes. - Now run the
wc_admin_dailycron manually. - Go to Tools > WP Mail Logging Log (
/wp-admin/tools.php?page=wpml_plugin_log) and verify the testing email note was sent. - View the message and press
Test action(a broken image will be visible under the button, but that's expected and only visible in a test environment).
Payments task: include Mercado Pago #6572
- Create a brand new store.
- Set one of the following countries in the first OBW step:
Mexico
Brazil
Argentina
Chile
Colombia
Peru
Uruguay
- Continue with the OBW and finish it up.
- Select
Choose payment methodsin the setup task list (Get ready to start selling). - Press the
Setupbutton in theMercado Pago Paymentsbox. - Try the links presented after the plugin's installation and verify they are working.
- Confirm that the
Mercado Pago payments for WooCommerceplugin was installed. - Press
Continue. - Now the
Mercado Pago Paymentsoption should appear as active.
Update contrast and hover / active colors for analytics dropdown buttons #6504
- Go to analytics.
- Verifty the dropdown buttons (date range or filters) are now higher contrast.
- Verifty the text and chevron in the dropdown button turn blue on hover, and while active.
Set default value to array when op is contains #6622
- Clone and start https://github.com/Automattic/woocommerce.com
- Open
notifications.json.phpfrom woocommerce.com repository and find a rule that uses thecontainsoperator and remove thedefaultkey. Please make a note of the option name. - Open
src/RemoteInboxNotifications/DataSourcepoller.phpfrom your WooCommerce Admin repository and change the datasource to your local woocommerce.com (woocommerce.test) - Make sure your local WooCommerce Admin database does not have the option from step #2
- Install and activate WC Admin Test Helper.
- Now run the
wc_admin_dailycron manually. - Check your debug log in
wp-content/debug.log. You should see PHP error.
Close activity panel tabs by default and track #6566
- Open your browser console and enter
localStorage.setItem( 'debug', 'wc-admin:tracks' );. Make sure the "Verbose" is selected under the levels shown. - With the task list enabled, navigate to the homescreen.
- Check that the
wcadmin_activity_panel_visible_panelsevent is shown withtaskList: truein its data. - Hide the task list.
- Note that
wcadmin_activity_panel_visible_panelsevent is shown with visible activity panels. - After refreshing, make sure that the "Orders" activity panel is closed by default.
Update undefined task name properties for help panel tracks #6565
- Enter
localStorage.setItem( 'debug', 'wc-admin:*' );into your console. Leave your console open. - Navigate to the homescreen.
- Open the "Help" tab in the top right.
- Note the tracks information in the console includes
homescreenfor thetaskNameproperty. - Click on a help item.
- Note
homescreenis used for thetaskNamein the help panel click tracks event. - Navigate to any task in the task list.
- Click on the "Help" tab.
- Note the
taskNamefor the event is the current task. - Click on a help item.
- Note the
taskNamefor the event is the current task.
Add gross sales column to CSV export #6567
- Navigate to Analytics -> Revenue
- Adjust the date filter so that more than 25 rows are visible
- Click "Download"
- Click the download link in the email
- See gross sales column
Add customer name column to CSV export #6556
- Create more than 25 orders
- Go to Analytics -> Orders -> Click "Download"
- Click download link in the email
- See customer column with customer full name
Allow the manager role to query certain options #6577
Testing woocommerce_ces_tracks_queue
- Checkout this branch.
- Open browser inspector and select the Network tab.
- Navigate to WooCommerce -> Settings.
- Confirm that the request to
/wp-json/wc-admin/options?options=woocommerce_ces_tracks_queue&_locale=userreturns 200 status.
Testing woocommerce_navigation_intro_modal_dismissed
- Checkout this branch.
- Navigate to WooCommerce -> Settings -> Advanced -> features (/wp-admin/admin.php?page=wc-settings&tab=advanced§ion=features) and enable Navigation
- Open browser inspector and select the Network tab.
- Navigate to WooCommerce -> Home
- Confirm that the request to
/wp-json/wc-admin/options?options=woocommerce_navigation_intro_modal_dismissed&_locale=userreturns 200 status.
Refactor profile wizard benefits step and add tests #6583
- Deactivate Jetpack and/or WooCommerce Services.
- Visit the profiler benefits page.
/wp-admin/admin.php?page=wc-admin&path=%2Fsetup-wizard&step=benefits - Click "Yes please!" to continue.
- Without connecting to Jetpack, navigate backwards using your browser's back button.
- Make sure the page continues to display (benefits may have changed) and that action buttons are functional.
- Make sure skipping the install works as expected.
- Connect Jetpack.
- Attempt to directly visit the benefits page.
/wp-admin/admin.php?page=wc-admin&path=%2Fsetup-wizard&step=benefits - Note that you are redirected to the homescreen.
Delete customer data on network user deletion #6574
- Set up a multisite network.
- Create a new user.
- Make an order with that user.
- Note the customer data under WooCommerce -> Customers.
- Navigate to Network -> All users
/wp-admin/network/users.php. - Delete that user.
- Wait for the scheduled action to finish or manually run the
wc-admin_delete_user_customersaction under Tools -> Scheduled Actions. - Navigate to WooCommerce -> Customers.
- Make sure that customer data has been deleted.
Fix "Themes" step visibility in IE 11 #6578
- Get an IE 11 test environment. I downloaded a trial version of Parallels Desktop on here and IE 11 virtual machine from developer.microsoft.com
- Make a zip version of this branch by running
npm run test:zip - Make a JN site -> install and activate the zip file.
- Open IE 11 and start OBW
- Confirm that the themes are displayed correctly.
Fix hidden menu title on smaller screens #6562
- Enable the new navigation.
- Shorten your viewport height so that the secondary menu overlaps the main.
- Make sure the menu title can still be seen.
Add filter to profile wizard steps #6564
- Add the following JS to your admin head. You can use a plugin like "Add Admin Javascript" to do this:
wp.hooks.addFilter( 'woocommerce_admin_profile_wizard_steps', 'woocommerce-admin', ( steps ) => {
	return steps.filter( ( step ) => step.key !== 'product-types' );
} );
- Navigate to the profile wizard.
wp-admin/admin.php?page=wc-admin&path=%2Fsetup-wizard. - Make sure the filtered step (product types) is not shown.
Adjust targeting store age: 2 - 5 days for the Add First Product note #6554
- Checkout this branch.
- Create a zip for testing with
npm run zip:test. - Create a
jurassic.ninjainstance. - Upload the plugin and activate it.
- Update the installation date (we need a store between 2 and 5 days old). You can do it with an SQL statement like this:
Update Insight inbox message #6555
- Checkout this branch.
- Update the installation date of your store if it hasn't been at least a day. You can use the following SQL uqery.
UPDATE `wp_options` SET `option_value`=UNIX_TIMESTAMP(DATE_SUB(NOW(), INTERVAL 5 day)) WHERE `option_name` = 'woocommerce_admin_install_timestamp';
- Install and activate WC Admin Test Helper.
- Now run the
wc_admin_dailycron manually. - You should have received an email like the image above.
- Verify the note's status is
sent. You can use an SQL statement like this:
SELECT `status` FROM `wp_wc_admin_notes` WHERE `name` = 'wc-admin-add-first-product-note'
- Now delete the note with an SQL statement like:
DELETE FROM `wp_wc_admin_notes` WHERE `name` = 'wc-admin-add-first-product-note';
- Add a new order and run the cron.
- No note should have been added.
- Remove the order, add a product and run the cron.
- No note should have been added.
- Delete the product and modify the store creation date to 7 days with an SQL statement like:
UPDATE `wp_options` SET `option_value`=UNIX_TIMESTAMP(DATE_SUB(NOW(), INTERVAL 7 day)) WHERE `option_name` = 'woocommerce_admin_install_timestamp';
- No note should have been added.
Improve WC Shipping & Tax logic #6547
Scenario 1 - Exclude the WooCommerce Shipping mention if the user is not in the US
- Start OBW and enter an address that is not in the US
- Choose "food and drink" from the Industry (this forces Business Details to display "Free features" tab)
- When you get to the "Business Details", click "Free features"
- Expand "Add recommended business features to my site" by clicking the down arrow.
- Confirm that "WooCommerce Shipping" is not listed
Scenario 2- Exclude the WooCommerce Shipping mention if the user is in the US but only selected digital products in the Product Types step
- Start OBW and enter an address that is in the US.
- Choose "food and drink" from the Industry (this forces Business Details to display the "Free features" tab)
- Choose "Downloads" from the Product Types step.
- When you get to the Business Details step, expand "Add recommended business features to my site" by clicking the down arrow.
- Confirm that "WooCommerce Shipping" is not listed
Scenario 3 - Include WooCommerce Tax if the user is in one of the following countries: US | FR | GB | DE | CA | PL | AU | GR | BE | PT | DK | SE
-
Start OBW and enter an address that is in one of the following countries
US | FR | GB | DE | CA | PL | AU | GR | BE | PT | DK | SE
-
Continue to the Business Details step.
-
Expand "Add recommended business features to my site" by clicking the down arrow.
-
Confirm that "WooCommerce Tax" is listed.
-
Install and activate WC Admin Test Helper.
-
Run the
wc_admin_dailycron. -
Navigate to WooCommerce -> Home and confirm the Insight note.
Use wc filter to get status tabs for tools category #6525
- Register a new tab via the filter.
add_filter( 'woocommerce_admin_status_tabs', function ( array $tabs ) {
	$tabs['my-tools-page'] = __( 'My Tools Page', 'your-text-domain' );
	return $tabs;
} );
- Enable the new navigation.
- Make sure the menu item for the registered tab is shown under
Tools.
Remove mobile activity panel toggle #6539
- Narrow your viewport to < 782px.
- Navigate to various WooCommerce pages.
- Make sure the various tabs can be seen and function as expected.
- Navigate to a WooCommerce Admin page that is not the homepage.
- Open the "Inbox" panel.
- Click on the "Inbox" panel button again.
- Make sure the panel closes as expected and does not reopen immediately.
Add legacy report items to new navigation #6507
- Enable the new navigation experience.
- Navigate to Analytics->Reports.
- Note that all the reports exist and navigating to those reports works as expected.
- Check that report menu items are marked active when navigating to that page.
Add navigation container tests #6464
- On a new site, finish the store setup wizard, but don't hide the task list.
- Navigate to a WooCommerce Admin Analytics page.
- Note the menu is under the "Analytics" level.
- Click the "Store Setup" link in the top right hand corner.
- Note that the navigation level automatically is updated to the root level where the "Home" item is marked active.
Add preview site button on the appearance task #6457
- Navigate to Home and click "Personalzie your store" task.
- Click on the "Preview Site" button on the header.
- A new tab should open and the URL should be the site URL.
- Navigate to other tasks such as "Store Details" or "Add products" .
- The "Preview Site" should not be shown on the other tasks.
Store profiler - Added MailPoet to new Business Details step #6515
- Create a brand new site and go to the OBW.
- In the first OBW step (
Store Details) setUSin theCountry / Regionselector. - Continue with the profiler.
- In the 4th step (
Business Details) choose any of the options in both selectors. - Under
Free featurestab, verify that the displayed extensions are:
MailPoet
Facebook
Google Ads
Mailchimp
Creative Mail
(In that order)
- Verify that the Creative Mail option copy is
Emails made easy with Creative Mail.
Store profiler - Added MailPoet to Business Details step #6503
- Create a brand new site and go to the OBW.
- In the first OBW step (
Store Details) set a Country / Region other thanUS | BR | FR | ID | GB | DE | VN | CA | PL | MY | AU | NG | GR | BE | PT | DK | SE | JP(e.g.: Uruguay). - Continue with the profiler.
- In the 4th step (
Business Details) choose any of the options in both selectors. - Verify that the displayed extensions are:
MailPoet
Facebook
Google Ads
Mailchimp
Creative Mail
(In that order)
- Verify that the Creative Mail option is toggled off by default
Fix double prefixing of navigation URLs #6460
- Register a navigation menu item with a full URL or admin link.
	\Automattic\WooCommerce\Admin\Features\Navigation\Menu::add_plugin_item(
		array(
			'id'         => 'my-page,
			'title'      => 'My Page,
			'capability' => 'manage_woocommerce',
			'url'        => admin_url( 'my-page '),
		)
	);
- Enable the navigation.
- Check that the menu item is marked active when visiting that page.
- Make sure old menu items are still correctly marked active.
Fix summary number style regression on analytics reports #5913
- Go to Analytics
- See that the active (selected) tab is white, with a highlight above the tab.
- See that inactive tabs are a lighter shade of grey.
Update payment card style on mobile #6413
- Using a small size screen, go to your WooCommerce -> Home -> Choose payment methods.
- See that the text descriptions for payment methods have a margin between them and the edge of the screen.
Navigation: Correct error thrown when enabling #6462
- Create a fresh store
- Navigate to WooCommerce -> Settings -> Advanced Tab -> Features
- Check the box to add the new navigation feature, and hit save
- Ensure that the new navigation appears on the left as expected
Remove Mollie promo note on install #6510
- If you do not currently have the Mollie note on your WooCommerce Admin home screen, you can add a test note with the correct name as follows:
- Install the WooCommerce Admin Test Helper plugin here
- Go to the Admin notes tab
- Add an admin note with the name
wc-admin-effortless-payments-by-mollie - Go to the WCA home screen and verify that your test note is present
- The note is removed on a new version install, so either install an old version of WCA and upgrade to the current one, or trigger the install process manually:
- Install the WCA test helper
- Go to the Tools tab
- Click the
Trigger WCA installbutton
Deprecate Onboarding::has_woocommerce_support #6401
- Clear existing site transients. For example, by using the Transients Manager plugin, and pressing the "Delete all transients" button it provides.
- Add any new theme to WordPress but DO NOT activate it.
- Initialize the Onboarding Wizard.
- See that the Themes step loads fast 😎
- See that the new theme is listed in the Themes step.
Set up tasks can now navigate back to the home screen #6397
- With a fresh install of wc-admin and woocommerce, go to the home screen
- Going to the homescreen redirects to the profile setup wizard, click "Skip setup store details" to return to the home screen
- On the home screen you will see the setup task list. It has the heading "Get ready to start selling"
For each task in that list apart from "Store details":
- Click the item
- You should land on the setup task page
- A title in the top left should reflect the original task name from the task list. e.g. "Add tax rates"
- Clicking the chevron to the left of the title should take you back to the home screen
Add Ireland to Square payment method #6559
- Go to the store setup wizard
/wp-admin/admin.php?page=wc-admin&path=%2Fsetup-wizard - Set up your store with Ireland as its country, and proceed until the
Business Detailsstep - In "Currently selling anywhere?" dropdown, select either:
- Yes, in person at physical stores and/or events
- Yes, on another platform and in person at physical stores and/or events
- Finish the setup wizard, and go to payments task
/wp-admin/admin.php?page=wc-admin&task=payments - Observe Square as a payment method option
Add CES survey for search product, order, customer #6420
- Make sure tracking is enabled in settings.
- Delete the option
woocommerce_ces_shown_for_actionsto make sure CES prompt triggers when updating settings. - Enable the logging of Tracks events to your browser dev console
localStorage.setItem( 'debug', 'wc-admin:tracks' );
Testing search on products:
- Go to Products > All Products.
- Type in anything in search bar, click on "Search products".
- Observe CES prompt "How easy was it to use search?" is displayed.
Testing search on orders:
- Go to Orders > Orders.
- Type in anything in search bar, click on "Search orders".
- Observe CES prompt "How easy was it to use search?" is displayed.
Testing search on customers:
- Go to Customers.
- Type in anything in search bar, and press enter.
- Observe CES prompt "How easy was it to use search?" is displayed
Add CES survey for importing products #6419
- Make sure tracking is enabled in settings.
- Delete the option
woocommerce_ces_shown_for_actionsto make sure CES prompt triggers when updating settings. - Enable the logging of Tracks events to your browser dev console
localStorage.setItem( 'debug', 'wc-admin:tracks' ); - If you don't have a product CSV export, you can obtain a sample CSV here.
- Go to Products > All Products.
- Click on "Import".
- Upload CSV file and finish the import process.
- Observe CES prompt "How easy was it to import products?" is displayed.
Add CES survey for adding product categories and tags #6418
- Make sure tracking is enabled in settings.
- Delete the option
woocommerce_ces_shown_for_actionsto make sure CES prompt triggers when updating settings. - Enable the logging of Tracks events to your browser dev console
localStorage.setItem( 'debug', 'wc-admin:tracks' );
Testing product categories:
- Go to Products > Categories.
- Add a new category.
- Observe CES prompt "How easy was it to add a product category?" is displayed.
Testing product tags:
- Go to Products > Tags.
- Add a new tag.
- Observe CES prompt "How easy was it to add a product tag?" is displayed.
Testing product attributes:
- Go to Products > Attributes.
- Add a new attribute.
- Observe CES prompt "How easy was it to add a product attribute?" is displayed.
Add paystack as payment option for African countries #6579
- Go to the store setup wizard
/wp-admin/admin.php?page=wc-admin&path=%2Fsetup-wizard - Set up your store with South Africa - Eastern Cape as its country, and proceed
- Select Fashion, apparel, and accessories as the industry, and finish the rest of the onboarding flow.
- Once finished it will redirect to the home screen, click on the Choose payment methods task
- Both Paystack and Payfast should be listed above Paypal
- Click Set up on the Paystack payment option
- It should successfully finish the Install step, and ask for a public and secret key.
- Check if the Paystack account link, directs you to the dashboard.paystack.com/#/settings/developer
- Set
public_keyfor public key, andsecret_keyfor secret key and click Proceed - It should redirect you to the payment list and the Set up button should be gone, and replaced by an enabled toggle button.
- You should be able to successfully toggle paystack from on to off and back. Leave it selected for now.
- Go to WooCommerce > Settings > Payments, Paystack should be selected.
- Click Manage, the secret and public key's should match what you entered in step 9.
2.1.3
Fix a bug where the JetPack connection flow would not activate #6521
- With a fresh install of wc-admin and woocommerce, go to the home screen
- Going to the homescreen redirects to the profile setup wizard
- The first step is "Store details" choose United States (any state) for country and fill in the other details with test data.
- Click "continue", you should be taken to the "Industry" step.
- In the "Industry" step check the "Food and Drink" option only. Click "continue"
- In the "Product Type" step choose any value and click "continue"
- You should arrive at the "Business details" step which provides 2 tabs: "Business details" and "Free features". In the "Business Details" tab fill out the dropdowns with any values. Click "continue".
- In the "Free features" step expand the list of extensions to install by clicking the arrow to the right of "Add recommended business features to my site".
- Uncheck all the extensions except for "Enhance speed and security with Jetpack"
- Click "continue", the plugin will be installed and you should arrive at the theme step.
- Click "Continue with my active theme"
- After finishing the wizard, this should redirect you to the "Jetpack" setup connection flow. (You should not be redirected straight to the homescreen).
Update target audience of business feature step #6508
Scenario #1
- With a fresh install of wc-admin and woocommerce, go to the home screen, which starts the onboarding wizard
- Fill out the store details with a canadian address (addr: 4428 Blanshard, country/region: Canada -- British Columbia, city: Victoria, postcode: V8W 2H9)
- Click continue and select Fashion, apparel, and accessories, continue, and select Physical products, and continue.
- The business details tab should show a Business details tab, and a Free features tab (disabled at first)
- There should only be dropdowns visible on the Business details step (no checkboxes)
- Select 1-10 for the first dropdown, and No for the second, and click Continue.
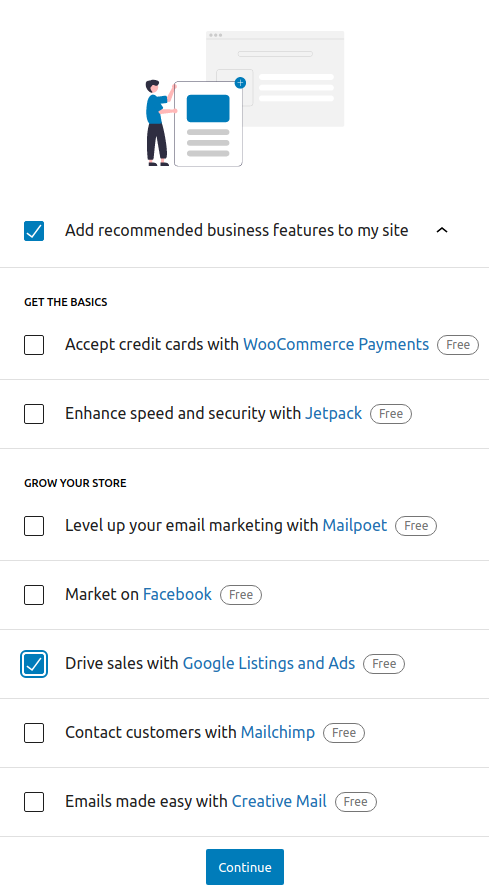
- Click on the expansion icon for the Add recommended business features to my site
- It should list 7 features, including WooCommerce Payments (top one)
- Note down the selected features, for step 10
- Click continue, and select your theme, after it should redirect to the home screen (showing the welcome modal, you can step through this).
- The home screen task list should include a Set up WooCommerce Payments task, and there should also be a Set up additional payment providers inbox card displayed (below the task list).
- Go to Plugins > installed Plugins, check if the selected plugin features selected in step 7 are installed and activated.
Scenario #2
- With a fresh install of wc-admin and woocommerce, go to the home screen, which starts the onboarding wizard
- Fill out the store details with a spanish address (addr: C/ Benito Guinea 52, country/region: Spain -- Barcelona, city: Canet de Mar, postcode: 08360)
- Click continue and select Fashion, apparel, and accessories, continue, and select Physical products, and continue.
- On the business details tab select 1-10 for the first dropdown, and No for the second.
- After filling the dropdowns it should show several checkboxes with plugins (Facebook, mailchimp, creative mail, google ads)
- Note which ones you kept selected (you can unselect one or two)
- Click continue, and select your theme, it should show the WooCommerce Shipping & Tax step after, you can click No thanks.
- You will be redirected to the home screen, showing the welcome modal, you can step through this.
- The task list should show the Choose payment methods task, and the Set up additional payment providers inbox card should not be present.
- Click on the Choose payment methods task, it should not be displaying the Woocommerce Payments option.
- Go to Plugins > installed Plugins, check if the selected plugin features selected in step 4 are installed and activated.
Improve AddFirstProduct email note contents #6617
- Install the plugin in a fresh site.
- Make sure the store has 0 products and 0 orders.
- Update the installation date (we need a store between 2 and 5 days old). You can do it with an SQL statement like this:
UPDATE `wp_options` SET `option_value`=UNIX_TIMESTAMP(DATE_SUB(NOW(), INTERVAL 4 day)) WHERE `option_name` = 'woocommerce_admin_install_timestamp';
-
Install and activate WC Admin Test Helper.
-
Make sure the
woocommerce_merchant_email_notificationsoption is set toyesby using the update option tool. -
Run the
wc_admin_dailycron. -
You should have received an email like the image above.
2.1.2
Add Guards to "Deactivate Plugin" Note Handlers #6532
Test incompatible WooCommerce version
- Install and activate Woocommerce 4.7
- See that the Woocommerce Admin plugin is deactivated.
- Add the Deactivate Plugin note via SQL.
INSERT INTO `wp_wc_admin_notes` (`name`, `type`, `locale`, `title`, `content`, `content_data`, `status`, `source`, `date_created`, `date_reminder`, `is_snoozable`, `layout`, `image`, `is_deleted`, `icon`) VALUES ( 'wc-admin-deactivate-plugin', 'info', 'en_US', 'Deactivate old WooCommerce Admin version', 'Your current version of WooCommerce Admin is outdated and a newer version is included with WooCommerce. We recommend deactivating the plugin and using the stable version included with WooCommerce.', '{}', 'unactioned', 'woocommerce-admin', '2021-03-08 01:26:44', NULL, 0, 'plain', '', 0, 'info');
- See that the note is in the inbox
- Activate the Woocommerce Admin plugin.
- See that Woocommerce Admin immediately de-activates without a fatal error.
- See that the note remains in inbox
Test compatible WooCommerce version
- Deactivate the Woocommerce Admin plugin.
- Install and activate the latest Woocommerce version.
- Add the Deactivate Plugin note via SQL.
INSERT INTO `wp_wc_admin_notes` (`name`, `type`, `locale`, `title`, `content`, `content_data`, `status`, `source`, `date_created`, `date_reminder`, `is_snoozable`, `layout`, `image`, `is_deleted`, `icon`) VALUES ( 'wc-admin-deactivate-plugin', 'info', 'en_US', 'Deactivate old WooCommerce Admin version', 'Your current version of WooCommerce Admin is outdated and a newer version is included with WooCommerce. We recommend deactivating the plugin and using the stable version included with WooCommerce.', '{}', 'unactioned', 'woocommerce-admin', '2021-03-08 01:26:44', NULL, 0, 'plain', '', 0, 'info');
- Activate the Woocommerce Admin plugin.
- See that note is not in the inbox
- Add the Deactivate Plugin note via SQL.
INSERT INTO `wp_wc_admin_notes` (`name`, `type`, `locale`, `title`, `content`, `content_data`, `status`, `source`, `date_created`, `date_reminder`, `is_snoozable`, `layout`, `image`, `is_deleted`, `icon`) VALUES ( 'wc-admin-deactivate-plugin', 'info', 'en_US', 'Deactivate old WooCommerce Admin version', 'Your current version of WooCommerce Admin is outdated and a newer version is included with WooCommerce. We recommend deactivating the plugin and using the stable version included with WooCommerce.', '{}', 'unactioned', 'woocommerce-admin', '2021-03-08 01:26:44', NULL, 0, 'plain', '', 0, 'info');
- De-activate the Woocommerce Admin plugin.
- See that note is not in the inbox
2.1.0
Correct the Klarna slug #6440
- Set up a new store with a UK address so that Klarna available as a payment processor
- Go to the "Choose payment methods" task item
- Set up Klarna. The plugin will install.
- Click Continue. It should take you back to the payment methods page - previously it wasn't doing anything but a console error was displayed.
Navigation: Reset submenu before making Flyout #6396
- Download and activate the MailChimp plugin.
- Turn on Navigation at Settings > Advanced > Features
- Return to the WP dashboard
- Hover over WooCommerce and see the flyout menu appear
- MailChimp should not be included.
Email notes now are turned off by default #6324
- Create a zip for testing with
npm run zip:test. - Create a
jurassic.ninjainstance. - Upload the plugin and activate it.
- Update the installation date (we need a 10-day old store). You can do it with an SQL statement like this (using the WP phpMyAdmin plugin):
UPDATE `wp_options` SET `option_value`=UNIX_TIMESTAMP(DATE_SUB(NOW(), INTERVAL 10 day)) WHERE `option_name` = 'woocommerce_admin_install_timestamp';
-
Confirm that
woocommerce_merchant_email_notificationswas not set before bycore. -
Install and activate WC Admin Test Helper.
-
Delete
woocommerce_merchant_email_notificationsif present using the update option tool. -
Run the
wc_admin_dailycron. -
You should have not received an email note.
-
Verify the note
wc-admin-add-first-product-notewas added in the DB and itsstatusisunactioned. You can use a statement like this:
SELECT `status` FROM `wp_wc_admin_notes` WHERE `name` = 'wc-admin-add-first-product-note';
or with wp-cli:
wp db query 'SELECT status FROM wp_wc_admin_notes WHERE name = "wc-admin-add-first-product-note"' --skip-column-names
- Run the cron again.
- The note's status should continue being
unactioned.
Refactor menu item mapping and sorting #6382
- Enable the new navigation under WooCommerce -> Settings -> Advanced -> Features.
- Navigate to a WooCommerce page.
- Make sure all items and categories continue to work as expected.
- Activate multiple extensions that register WooCommerce extension categories. (e.g., WooCommerce Bookings and WooCommerce Payments).
- Favorite and unfavorite menu items.
- Make sure the menu item order is correct after unfavoriting.
- Create a user with permissions to see some but not all registered WooCommerce pages.
- Check that a user without permission to access a menu item cannot see said menu item.
Fixed associated Order Number for refunds #6428
- In a store with refunded orders.
- Go to
Analytics>Orders - Set the
Date Rangefilter in order to cover the refunded order date. - Verify that now the associated order number and the related products are visible.
Remove CES actions for adding and editing a product and editing an order #6355
- Add a product. The customer effort score survey should not appear.
- Edit a product. The customer effort score survey should not appear.
- Edit an order. The customer effort score survey should not appear.
Center the activity panel #6289
- Narrow your screen to <782px
- Go to WooCommerce home and orders page
- Click on 'w' button, see that the activity panel renders as expected.
Make sure that industry is defined in payment methods #6281
- Start a new store, and skip the initial onboarding flow, there is a button
Skip store detailsat the bottom - Load the
Set up paymentstask, the payment options should load correctly.
Add a new note with a link to the downloadable product doc #6277
- Make sure your store does not have any download products.
- Install and activate WC Admin Test Helper.
- Add a new download product.
- Run the
wc_admin_dailycron manually. - Navigate to WooCommerce -> Home and confirm that the note has been added.
Onboarding - Fixed "Business Details" error #6271
- Check out this branch.
- Go to the "Industry" step in the OBW and select
Food and drink. - Go to the "Business Details" step and press
Free features. - Press
Continue. - It should work.
- Try also selecting and unselecting some checkboxes before pressing
Continue.
Change siteUrl to homeUrl on navigation site title #6240
- Go to WP settings and set the home page to My account
- Go to WC settings and use the new navigation feature
- Click on the header site title My Site and see that the page direct to My account
Refactor panel with withFocusOutside #6233
- Go to WooCommerce home page
- Click on Display and Help button back and forth, check that the popover and the panel close as expected.
- Check that the setup store tab continues to work.
Move capability checks to client #6365
- Create various non-admin users with custom capabilities. Make sure to not include the
view_woocommerce_reportsfor at least one role. https://wordpress.org/plugins/leira-roles/ - Log in as the non-admin users.
- Check that the correct menu items are shown.
- Check that there aren't items shown to the user they should not be able to use or interact with.
- Enable the new navigation under WooCommerce -> Settings -> Advanced -> Features.
- Check that the users are able to see the new navigation menu.
- Click on various tabs in the activity panel.
- Make sure the tabs work as expected.
- Make sure that users without the
manage_woocommercepermission are not able to see the "Store Setup" tab. - With a user that can
manage_woocommerce, navigate to the homepage via URL and make sure the homescreen is shown./wp-admin/admin.php?page=wc-admin - With a user that cannot
view_woocommerce_reportsmake sure navigating to an analytics report does not work./wp-admin/admin.php?page=wc-admin&path=/analytics/overview
Add CES track settings tab on updating settings #6368
- Make sure tracking is enabled in settings:
/wp-admin/admin.php?page=wc-settings&tab=advanced§ion=woocommerce_com
- Delete the option
woocommerce_ces_shown_for_actionsto make sure CES prompt triggers when updating settings. - Enable the logging of Tracks events to your browser dev console:
localStorage.setItem( 'debug', 'wc-admin:tracks' );
- Go to WooCommerce > Settings, and select a top-level tab such as Products, Shipping, etc.
- Click on
Save changes. - Observe in developer console,
wcadmin_ces_snackbar_viewis logged when CES prompt is displayed. - In the event props, it should have a new
settings_areakey followed by the value of the settings tab you have selected.
Add navigation intro modal #6367
- Visit the homescreen and dismiss the original welcome modal if you haven't already.
- Enable the new navigation under WooCommerce -> Settings -> Advanced -> Features. (This will also require opting into tracking).
- Visit the WooCommerce Admin homescreen.
- Note the new modal.
- Check that pagination works as expected and modal styling is as expected.
- Dismiss the modal.
- Refresh the page to verify the modal does not reappear.
- On a new site, enable the navigation before visiting the homescreen.
- Navigate to the homescreen.
- Note the welcome modal is shown and the navigation intro modal is not shown.
- Refresh the page and note the nav intro modal was dismissed and never shown.
2.0.0
Add the Mollie payment provider setup task #6257
- You'll need a site that has the setup task list visible. Complete the OBW and make sure you're in a Mollie supported country (Such as United Kingdom).
- Go to the setup payments task
- Mollie should be listed as an option
- Click "Set up" button on the Mollie task
- It should install and activate the mollie payments plugin
- The connect step should provide links to create an account or go straight to Mollie settings. (test both links work)
- Click "continue"
- You should arrive back at the payment provider list
Fix: allow for more terms to be shown for product attributes in the Analytics orders report. #5868
- Create a product attribute
- Give the attribute more than 10 terms
- Go to Analytics -> Orders
- Add an attribute filter to the list, choose your attribute.
- Go to the second input field and click on it, a result set of all your terms should appear
Add: new inbox message - Getting started in Ecommerce - watch this webinar. #6086
- First you'll need to make sure you meet the criteria for the note:
- obw is done
- revenue is between 0-2500
- do not check "setting up for client" in obw
- store should have no products
- Install and activate WC Admin Test Helper
- Run the
wc_admin_dailycron manually - Confirm the new note is displayed and that the content matches that specified below:
- Title: Getting Started in eCommerce - webinar
- Copy: We want to make eCommerce and this process of getting started as easy as possible for you. Watch this webinar to get tips on how to have our store up and running in a breeze.
- CTA leads to: https://youtu.be/V_2XtCOyZ7o
- CTA label: Watch the webinar
Update: store deprecation welcome modal support doc link #6094
- Starting with a fresh store (or by deleting the woocommerce_task_list_welcome_modal_dismissed option), visit /wp-admin/admin.php?page=wc-admin. You should see the standard welcome modal.
- Add &from-calypso to the URL. You should see the Calypso welcome modal.
- Notice "Learn more" links to https://wordpress.com/support/new-woocommerce-experience-on-wordpress-dot-com/
Enhancement: Allowing users to create products by selecting a template. #5892
- Load new store and finish the Wizard
- Go to the
Add my productstask - Click the
Start with a templateoption, and select either a physical, digital, variable product - Once you click
Go, it should redirect you to an edit page of the new post, with the data from the sample-data.csv (mentioned in the original ticket). Only the title is missing, as it is saved as auto-draft. - You should be able to save the new product as draft or publish it.
- You should be able to exit without making any changes, and not having the product show up as draft in your product list.
- Create new product from template
- Wait until redirected
- Without saving go to the Products > all products page, the new product should not be displayed.
Update: Homescreen layout, moving Inbox panel for better interaction. #6122
- Create a new woo store, and finish the onboarding wizard.
- Go to the home screen, and make sure the panels follow this order:
- Two column:
- Left column: store setup and/or management tasks + inbox panel
- Right column: stats overview + store management shortcuts (only shows when setup tasks is hidden)
- Single column:
- store setup tasks, inbox panel, stats overview, store management links (only visible when setup tasks is hidden).
- Hide the setup tasks list, and see if the store management links show up in the right place.
Enhancement: Use the new Paypal payments plugin for onboarding. #6261
- Create new woo store, and finish the onboarding wizard
- Go to the home screen, and click the Set up payments task. Paypal Payments option should be listed as an option, with a Set up button.
- Click Set up on the Paypal plugin.
- It should automatically start the Install step, and install and enable the Paypal Payments plugin.
- For Paypal Payments version greater then
1.1.0.- For the second step it should show a
Connectbutton - Click on Connect and a window should popup for Paypal, follow this until finished. The last button is - Go back to Woocommerce Developers
- Once done, the page should reload, and briefly show the setup screen again, it should then finish and go back to the payment list.
- Once on the payment list, the
Set upbutton should be gone, and instead show a toggle, that is set to enabled.- The enable/disable button should be correctly reflected in the Woocommerce payment settings screen as well.
- For the second step it should show a
- For Paypal Payments version
1.1.0and below- For the second step it will show the manual fields (merchant email, merchant id, client id, client secret).
- Check if the help links work below, they should help with finding the above credentials.
- If you have a business account set up, you can find the credentials in these two places
- Get live app credentials
- Merchant id
- Fill in the credentials and click Proceed, this should succeed and redirect you to the Payment options list
- The Set up button should be replaced by a toggle, that is set to enabled.
- The enable/disable button should be correctly reflected in the Woocommerce payment settings screen as well.
Once everything is configured and enabled do a client test
- Make sure you have added a product and store homescreen (Finish the Personalize my store task)
- Navigate to one of the products and add it to the cart
- Click go to checkout
- Paypal should be one of the options to pay
- Filling in your billing/shipping info then click pay with Paypal
- The paypal pay window should pop up correctly without errors.