14
Release Testing Instructions WooCommerce 6.3
Tam Mullen edited this page 2022-03-03 13:41:22 +00:00
WooCommerce 6.3 includes:
WooCommerce Admin Updates:
Make $customer_id public again #8371
- Download and install WooCommerce Square plugin
- Go to Plugins > WooCommerce Square > Configure
- Enable sandbox mode and setup sandbox account with Square
- Go to WooCommerce > Settings > Payments and enable Square payments
- Create a test product
- Attempt to purchase the product via customer facing UI using WooCommerce Square payments. You can use the test credit cards here
- Make sure purchase is successful
WooCommerce Payments task in new task list experiment #8321
- On a new WooCommerce site finish the onboarding flow and make sure to select WooCommerce Payments under the free features in the Business Details step.
- Enable the
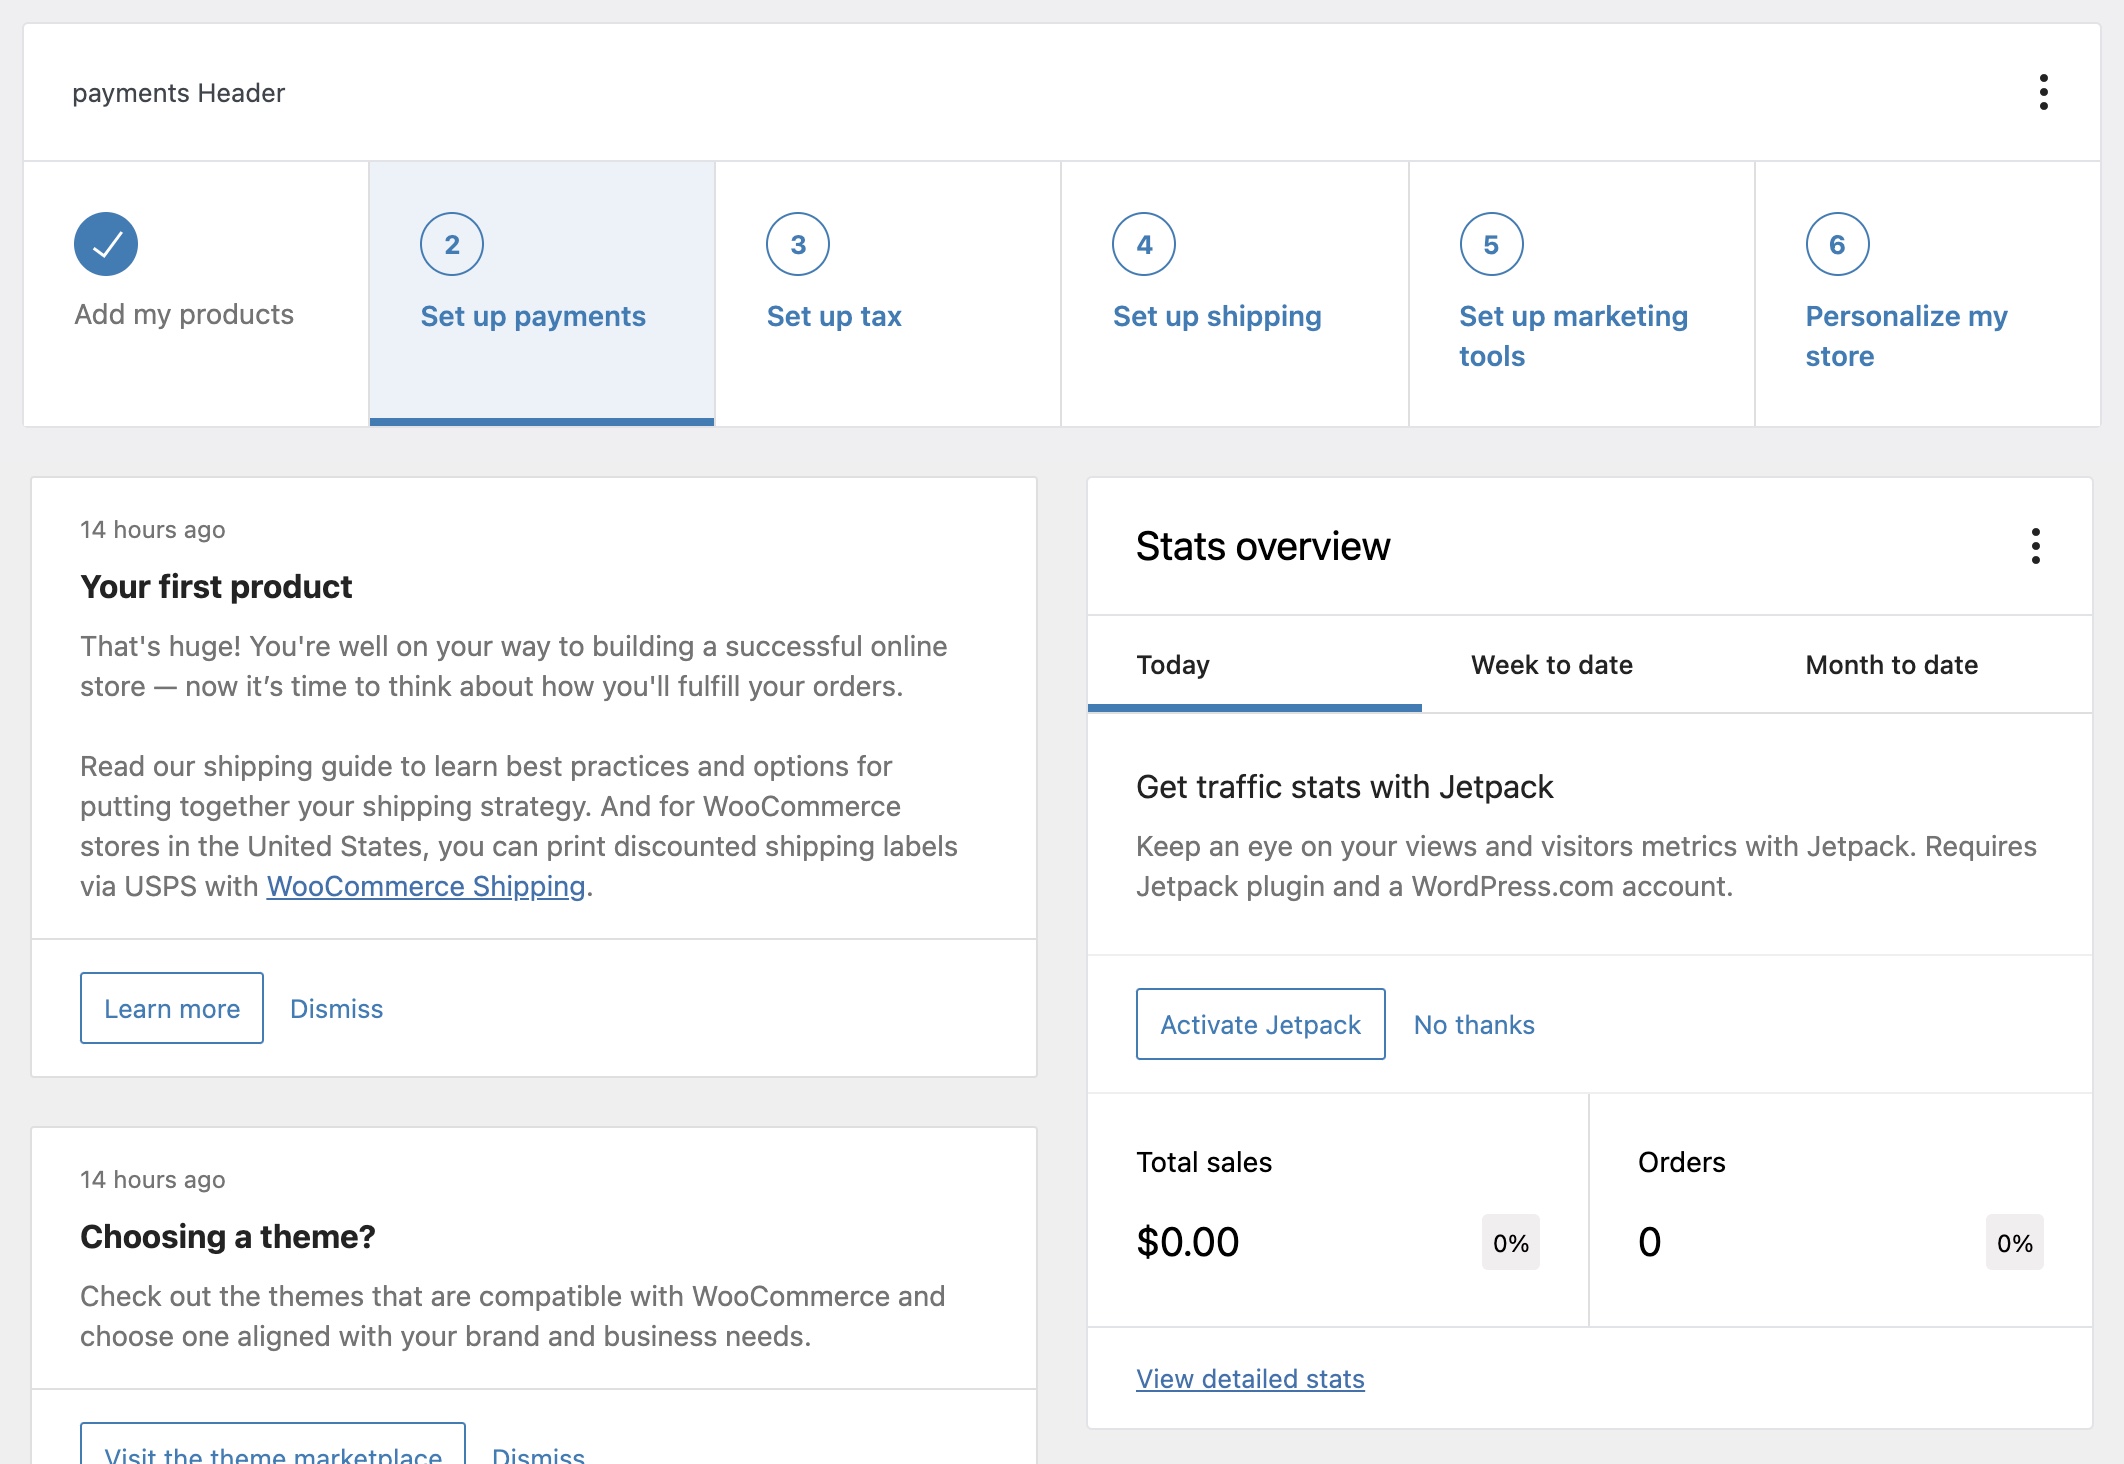
woocommerce_tasklist_progression_headercard_2col_2022_03treatment by opening your browser console and runninglocalStorage.setItem('explat-experiment--woocommerce_tasklist_progression_headercard_2022_03', '{"experimentName":"woocommerce_tasklist_progression_headercard_2022_03","variationName":"treatment","retrievedTimestamp":' + Date.now() + ',"ttl":7200}');. - Go to WooCommerce > Home or refresh this page, a new task list should be displayed (example pic)
- Store Details task should not be present and the Get paid with WooCommerce Payments task should be displayed in the new task list with a Set up additional payment providers in the Things to do next task list.
- Make sure you have WooCommerce Payments dev mode enabled (you can install the WooCommerce Payments dev tools plugin for this)
- Click on the Get paid with WooCommerce Payments and set up/connect WooCommerce Payments
- Once finished and redirected back to WooCommerce > Home the Get paid with WooCommerce Payments should not be present anymore in the new task list. Instead an uncompleted Set up payments should be listed.
- The Things to do next task list should not include the Set up additional payment providers task anymore.
Fix category report query returns invalid net sales
- Create a new store and finish the Onboarding flow
- Go to Products > Add New and create a product called Hoodie with Pocket with the price $35
- Create a new category called Hoodie with Clothing as the parent category in the Product categories on the right.
- Select Clothing and Hoodie with Pocket as well and click Update
- Create an order with a single item of Hoodie with Pocket (keep note of the total price)
- Run the action scheduler (make sure all are run), you can do this manually by going to WooCommerce > Status > Scheduled Actions. If your queue is large, just make sure that the
wc-admin_import_ordersactions are run. - Go to Analytics > Overview and scroll down to the Leaderboards
- Observe that the Clothing category has only 1 items sold and net sales is $35
- Click on Clothing it will redirect to the Categories page and show the correct numbers
- Now click on Analytics > Categories again and scroll down to the table
- Observe that the Clothing category has only 1 items sold and net sales is $35
Hide store address fields in regions that specify hidden #8172
- Go to the store setup wizard
- Change to a country like Guatemala that hides the post code
- Verify that the post code is hidden and "Continue" still works as expected
- Switch to a different country with all fields shown and make sure things still work as expected
Add localized validation to store address #8123
Store details
- Navigate to the Store Details step of the profiler
- Change the country/region to US.
- Check that all fields are still required
- Change your country to Australia
- Make sure post code and city labels are updated (you can check this list here for other country requirements by shortcode)
- Change the country to Hong Kong
- Check that zip/postal is no longer required
Tasks
- Delete any shipping zones you might have
- Clear your address in WooCommerce > Settings aside from the country/region.
- Visit the Shipping task in the task list
- It should prompt you to put in the store address.
- This should follow the same store address validation as the Store Details step.
Enhance report chart i18n support #8129
- Go to Analytics > Overview
- Observe chart texts show normally in English/site language.
- Select different "stats" by click on the 3 dots on the right hand and enabling other stats, now repeat step 2 until all options are confirmed.
- Go to Settings > General
- Change the "Site Language" to another languages like "Português do Brasil"
- Repeat 1 ~ 3 steps
Add MailPoet to Installed marketing extensions #8091
- Go to Marketing > Overview
- MailPoet is not shown in Installed marketing extensions
- Go to Plugins and install but don't activate MailPoet 3
- Go to Marketing > Overview
- See MailPoet in Installed marketing extensions
- Click Activate
- Click Finish Setup
- Finish MailPoet setup (fill with dummy data)
- Go to Marketing > Overview
- See MailPoet links to Docs, Support, and Settings
Add additional store profiler track for the business details tab. #8265
- Open your console and make sure you have tracks outputted (
localStorage.setItem( 'debug', 'wc-admin:*' );) - Go to the Onboarding wizard and step through until the business details
/wp-admin/admin.php?page=wc-admin&path=%2Fsetup-wizard&step=business-details - A
storeprofiler_step_viewshould be triggered withbusiness-detailsas the step. - Fill out the dropdowns and click continue
- A
storeprofiler_step_completeshould of fired with astepprop ofbusiness-details. A newstoreprofiler_step_viewshould of also fired withbusiness-featuresas a step. Now select some free features and click continue. - A
storeprofiler_step_completeshould of fired with astepprop ofbusiness-features. - Check the general styling of the business features tab to make sure things look good still.
WooCommerce Blocks Updates:
FSE: Add support for the global style for the Price Filter block. (5559)
- Upgrade to
WordPress 5.9. - Install and enable the
Twenty Twenty-Twotheme. - Add the
Price Filter blockto a post. - On the right sidebar, personalize the styles of the block.
- Go on the page and check if there are changes.
- Reset to default using the
Resetbutton from the different sections. - Go to Dashboard and select Appearance > Editor (beta). On top of the screen, select Home > Browser all templates > Single Post. When the page is loaded, add the block to the page.
- On the Editor page click on the
Stylesicon on the right-top corner. - Verify that the
Price Filter blockis shown under theBlockssection. Personalize the block. - Save your changes.
- Go on the page created earlier and check if all styles are applied correctly.
- Edit your previous post/page again.
- Change again the styles.
- Save your changes.
- Check if these styles have priority over the styles from the Site Editor.
FSE: Update the block theme folders to latest Gutenberg convention (i.e. templates and parts). (5464)
- Activate the Gutenberg plugin (or use WordPress 5.9). Select a block theme e.g. TT1 Blocks.
- Open Appearance > Editor > Templates.
- Make sure all the templates and parts appear correctly. WooCommerce templates that should be available:
Archive Product,Single Product,Product CategoryandProduct Tag. WooCommerce template-parts that should be availableMini Cart.
FSE: Add support for the wide and full alignment for the legacy template block. (5433)
- Activate the Gutenberg plugin (or use WordPress 5.9). Select a block theme e.g. TT1 Blocks.
- From the dashboard, click on Theme > Site Editor.
- Check Site Editor > Templates.
- Edit a legacy template (for example
Product Category Page). - Check if you can change the alignment.
- Change it.
- Check if the changes are also reflected on the frontend side.
You should test these steps at least one between Product Category Page, Product Archive Page and Product Tag Page.
You should test Single Product Page.
Added controls to product grid blocks for filtering by stock levels. (4943)
- Create a new post.
- Add a new product grid block (namely,
Products by Attribute,Products by Tag,Top Rated Products,Products by Attribute,On Sale ProductsorNewest Products). - In the right hand edit column, open the 'Stock level' panel.
- Change the drop down menu setting and observe the product list changing to match the new filter.
- Repeat with any variations and combinations of settings.
All Products block displays thumbnails. (5551)
- With a previous version of Woo Blocks and create a new post and add
All Productblock and save it. Enable the version of this release (6.8.0). - Add a product with a portrait image (example you can use), and one with a landscape image (example you can use).
- Edit the existing page with the
All Products block. Edit the block, select the image. In the sidebar, under "Block" tab, the "Image Sizing" setting should be "Full Size". This confirms existing blocks are not affected. - Visit the page with this block on the front end. Sort by "latest" so that the two new products you added are visible. Notice the aspect ratios of these are different and cause the other items out of alignment.
- Add the
All Productsblock to a new page and save it. - Edit the
All productsblock, click on pencil to edit and select the image. In the sidebar, under "Block" tab, the "Image Sizing" setting should have "Cropped" selected. - Visit this page on the front end and sort by "latest" so that the two new products you added are visible.
- All product images should be the same aspect ratio and align within the grid.
- Go to Appearance > Customize > WooCommerce > Product Images and set a custom aspect ratio (for example, 16:9).
- Visit the all products page again. All product images should be rendered with this new aspect ratio.
Filter Products By Price block: Don't allow to insert negative values on inputs. (5123)
- Create a post and add
All Productsblock and addFilter Products by Priceblock. - Save the post.
- Go to the page having all the above block added.
Check that:
- the user can't insert in both inputs a negative number.
- the user can't insert on input left a number that is greater than input on the right.
- if the user inserts on the input on the right a number that is lower than input on the left, the component sets to 0 the minimum price.
FSE: Revert "Allow LegacyTemplate block to be reinserted, only on WooCommerce block templates.". (5643)
- Load Appearance > Site Editor and select one of the WooCommerce templates. Confirm it loads the correct Legacy Template block in the Editor for the given block template.
- Remove this block, you should not be able to reinsert it and do not save (this is expected as part of this revert)
- Refresh the page and confirm the correct Legacy Template block still gets rendered in the Site Editor
- Customise this template, and save it. Now reload this template and ensure it loads the customised template in the 5. Site Editor and on the frontend.
- Try clearing the customisations on Site Editor > Templates screen, ensure these are reset in the Site Editor and on the frontend.
FSE: Add support for the global style for the Featured Category block. (5542)
- On WordPress 5.9, install and enable the Gutenberg plugin.
- Install and enable the Twenty Twenty-Two theme.
- Add the Featured Category Block to a post.
- On the right sidebar, personalize the styles of the block.
- Go on the page and check if there are changes.
- Reset to default using the Reset button from the different sections.
- Go to Dashboard and select Appearance > Editor (beta). On top of the screen, select Home > Browser all templates > Single Post. When the page is loaded, add the block to the page.
- On the Editor page click on the Styles icon on the right-top corner.
- Verify that the Featured Category block is shown under the Blocks section. Personalize again the block.
- Save your changes.
- Go on the page created earlier and check if all styles are applied correctly.
- Edit your previous post/page again.
- Change again the styles.
- Save your changes.
- Check if these styles have priority over the styles from the Site Editor.
FSE: Enable Mini Cart template-parts only for experimental builds. (5606)
- Using Wordpress 5.9, select a block theme e.g. TT1 Blocks.
- Open Appearance > Editor > Templates Parts.
- Check that Mini Cart template is NOT visible.
WooCommerce Core Updates:
Create and fill the product attributes lookup table during a clean install of WooCommerce 31911
- Perform a clean new install of WooCommerce 6.3 on a new WordPress instance.
- Verify that the tools page shows a "Regenerate the product attributes lookup table" entry.
- Verify that Settings - Products has an "Advanced" section that allows controlling the feature.
- Verify that the "Use the product attributes lookup table for catalog filtering" option in the above settings section is checked.
Create and activate product attributes lookup table in data migration 31256
- Start with a site running WooCommerce 6.2.0 or older.
- Upgrade the site to 6.3.0
- Go to your WooCommerce admin area, you'll see a "Database update required" banner, click the "Update database" button. Wait until the database update finishes.
- Go to WooCommerce - Settings - Products - Advanced. Confirm the "Use the product attributes lookup table for filtering" option is ticked

- Setup some additional products, use this csv file https://raw.githubusercontent.com/woocommerce/woocommerce/dbac025535e29f5f67bdd96ba256ca4531662b4e/DATA_FOR_POC/FilterByAttributeUsingLookup_Products.csv
- Trash a variable product
- Create/delete/modify products and variations as follows and verify that everything continues working.
- A new product is created
- A new variation is added to a product
- A product or variation that had been trashed previously is untrashed
- The product visibility changes to "search" or "hidden"
- The attributes for a product change, this includes:
- New attributes are added or deleted for a product
- Terms are added or removed from the attribute definition for a product
- The attribute changes between "used for variations" and not
- The attributes for a variation change
Use inline onload event instead of jQuery load #31623
- Install Test jQuery Updates plugin
- Ensure you have a product with multiple product images
- View the product on the front-end to ensure the images appear as expected Using your browser's developer tools, block the request for jQuery migrate and refresh
- In Test jQuery Updates plugin disable jQuery Migrate (see #31636 for an example)
- See that the images are no longer displayed