WooCommerce 6.6 includes:
WooCommerce Blocks Updates #32940
Workflow: WooCommerce Product Blocks
Blocks 7.5.0
Add PHP templates support to the Active Product Filters block. (6295)
- With a block theme (such as Twenty Twenty Two), go to Edit Site > Product Catalog.
- Add
Active Product Filters,Filter Products by Stock,Filter Products by Attribute,Filter Products by Priceblocks to the template. - Go to the shop page on the front end.
- Select some filters, see the page reload and the selected filters appear in the Active Products Filters block.
- Remove an arbitrary filter, see the page reload and the removed filter doesn't appear in the Active Product Filters block. See the filtered product results updates accordingly.
Enhanced the Featured Category block (6276):
- Use a block theme (such as Twenty Twenty Two)
- Add the ”Featured Category” block to a page and select a product.
- Make sure that the resizable handle is a shown fully (it should be a full circle), and that is shown only when the block is selected.
- Select the block and apply a Duotone filter.
- Make sure the overlay color control is under the
Overlaysection and change the overlay color to a gradient. - Add a padding to the block and make sure the padding is added on the inside of the wrapper (i.e. no white space is created outside of the block).
- Move around your image focal point and make sure you can actually move around the entire image and not only constrained on one dimension.
- Apply “Image fit > Cover” and notice how the image will scale along with the container. As opposed to point 5 above, now the focal point picker is limited to one dimension.
- Increase the
padding-topof the block and notice that the content can't get pushed out of the container, but instead the container resizes. - When that's the case, try resizing the block through the handle to a lower height: the handle should move but the container should not resize. When the mouse is lifted, the handle should return to its original position.
- For the steps 4–9 above, save the page and check that the styles are applied correctly on the front-end (as the block is rendered statically via PHP).
Allow adding the Filter Products by Stock block to Product Catalog templates to filter products. (6261)
- With a block theme (such as Twenty Twenty Two), go to Appearance > Editor > Template > Product Catalog.
- Add the Filter Products by Stock block above the product grid.
- Be sure that you have some out stock products. Check "out of stock" on the frontend.
- Notice the page reloads and the list of products updates accordingly.
- Add a test page to your site with the
All Productsblock, and theFilter Product by Stockblock and ensure no regressions have been introduced here.
Enhanced the Featured Product block (6181):
- Use a block theme (such as Twenty Twenty Two)
- Add the ”Featured Product” block to a page and select a product.
- Make sure that the resizable handle is a shown fully (it should be a full circle), and that is shown only when the block is selected.
- Select the block and apply a Duotone filter.
- Make sure the overlay color control is under the
Overlaysection and change the overlay color to a gradient. - Add a padding to the block and make sure the padding is added on the inside of the wrapper (i.e. no white space is created outside of the block).
- Move around your image focal point and make sure you can actually move around the entire image and not only constrained on one dimension.
- Apply “Image fit > Cover” and notice how the image will scale along with the container. As opposed to point 5 above, now the focal point picker is limited to one dimension.
- Increase the
padding-topof the block and notice that the content can't get pushed out of the container, but instead the container resizes. - When that's the case, try resizing the block through the handle to a lower height: the handle should move but the container should not resize. When the mouse is lifted, the handle should return to its original position.
- For the steps 4–9 above, save the page and check that the styles are applied correctly on the front-end (as the block is rendered statically via PHP).
Store API: Allow Store API to filter products by custom taxonomies. (6152)
- Add an All Products Block to a page, add the Filter Products by Attribute Block, and Filter by Price Block too.
- Go to the page and use the filters, ensure they update the All Products Block correctly.
Filter Products by Attribute: Fix the page reload which happens when clicking the filter button on Woo templates using the Classic Template block. (6287)
- On a block theme, go to Edit Site > Product Catalog template.
- Add Active Filters and Filter Products by Attribute block to the template.
- Choose an attribute to filter, and make sure the filter button is toggled.
- Go to the shop page.
- Select an attribute, a reload should not happen until you click the filter button.
- Once the filter has been applied. Uncheck it, a reload should not happen until you click the filter button.
- Try this again with the filter button untoggled, although these reloads should now happen as soon as you check the attribute you're filtering by
- Check there are no regressions on All Products block.
Add RTL support for the Mini Cart icon. (6264)
- Add Mini Cart to the site (Header for block themes, Sidebar for classic theme).
- Set the language to an RTL language (ie: Arabic).
- See the Mini Cart looks good on the front end.
Fix page load problem due to incorrect URL to certain assets. (6260)
- Go to an atomic website.
- Install WC Subscriptions. Try to open wp-admin > WooCommerce > Home (/wp-admin/admin.php?page=wc-admin).
- Page should load normally.
Make Filters Products by Price work with Active Filters block for the PHP rendered Classic Template. (6245)
- Add the
Filter Products by Priceblock &Active Filtersblock to the Shop Page - Open the Shop page
- Use the
Filter Products by Priceblock, the page should reload with the filter params now being in the URL too. - Check the
Active Filtersblock shows the active price filter.
Fix attribute filter dropdown list z-index level. (6294)
- Create new page with Filter Products by Attribute and All Products block right under
- Configure Filter block to use Dropdown display style and show Colour attribute (if using sample products)
- Have products on sale in first row
- Visit page and focus on field to see dropdown
- All Products block Placeholder elements should be under the dropdown
- Sale badge shouldn't bleed through the dropdown
Fix Featured Product block frontend mismatch. (6263)
- Switch to a block-enabled theme (such as Twenty-twentytwo).
- Add the Featured Product block to a page.
- Confirm that it has a default, semi-transparent, black overlay and that a default height of 500 px or whatever the theme supports through the
featured_block::default_heightsetting. - Publish the page.
- Preview the page and confirm that the block looks like the one in the editor (specifically for height and overlay).
- Play around with the styles of the block on the editor (change the overlay color, the padding, the opacity, the image fit etc.).
- Confirm they get correctly applied on the frontend.
Fix Customizer fatal error on PHP 8. (6317)
- Use a PHP 8 site with Storefront theme
- Go to Appearance > Customize.
- See no fatal error, the Customizer is loading and working as expected.
Fix page refresh when using filters with the All Products block on non-product archive templates for WooCommerce. (6324)
- Activate Storefront
- Add the All Products block to a newly created page, along with a filter block such as Filter by Attribute
- Visit this page on the frontend and select some attributes to filter by.
- Observe the filters being applied without a page refresh.
Blocks 7.6.0
Featured Category: Add background color option. (6368)
Prerequisites:
- Install & use a block theme e.g. Twenty Twenty-Two.
- Create a new post/page.
- In the editor, add two
Featured Categoryblocks. - For each block select the same category, it should have a product picture.
- Select each block and use the Replace button in the block toolbar to add a product image smaller than the Featured Category block (for an example see screenshots above).
- Now select the first
Featured Categoryblock. In the editor sidebar'sColorsection of the block select aBackgroundcolor. The background color should be visible in the parts not covered by the product image. - Save your post/page.
- In the admin dashboard navigate to
Appearance>Editor(/wp-admin/site-editor.php). - Open the Styles sidebar by clicking the round Styles icon in the top right of the editor.
- In the Styles sidebar navigate to
Blocks>Featured Category>Colors>Background. - Change the background color and save your changes.
- Navigate back to the post/page you previously created.
- The first block should still show the background color you selected in step 5. The second block should show the Global Styles color you selected in step 10.
- Click
Preview>Preview in new taband confirm the colors appear as expected on the Frontend of your site as well.
Featured Product: Add background color option. (6367)
Prerequisites:
- Install & use a block theme e.g. Twenty Twenty-Two.
- Create a new post/page.
- In the editor, add two
Featured Productblocks. - For each block select the same product, it should have a product picture.
- Select each block and use the Crop tool in the block toolbar to crop the product image smaller than the Featured product block e.g. by setting the aspect ratio to 2:3.
- Now select the first
Featured Productblock. In the editor sidebar'sColorsection of the block select aBackgroundcolor. The background color should be visible in the parts not covered by the product image. - Save your post/page.
- In the admin dashboard navigate to
Appearance>Editor(/wp-admin/site-editor.php). - Open the Styles sidebar by clicking the round Styles icon in the top right of the editor.
- In the Styles sidebar navigate to
Blocks>Featured Product>Colors>Background. - Change the background color and save your changes.
- Navigate back to the post/page you previously created.
- The first block should still show the background color you selected in step 5. The second block should show the Global Styles color you selected in step 10.
- Click
Preview>Preview in new taband confirm the colors appear as expected on the Frontend of your site as well.
Added media controls allowing the user to edit images within the editor on a Featured Category block. (6360)
- Add the Featured Category block
- Choose either a category with an associated image or select an image for the block through the toolbar
- Click on the “Crop” icon on the toolbar
- Ensure the toolbar controls are now changed and show:
Zoom, Aspect ratio, Rotate | Apply, Cancelcontrols - Ensure only the image is now visible instead of the whole block inside the image editor
- Try executing edits and applying them
- Ensure the image turns semi-transparent and a loading spinner shows in the image
- Ensure the block now shows your edited image
- Click on the “Crop” icon again
- Click away from the block
- Ensure the block exits “Edit mode”
Added media controls allowing the user to edit images within the editor on a Featured Product block. (6348)
- Add the Featured Product block
- Choose a product with an image or select an image for the block through the toolbar
- Click on the “Crop” icon on the toolbar
- Ensure the toolbar controls are now changed and show:
Zoom, Aspect ratio, Rotate | Apply, Cancelcontrols - Ensure only the image is now visible instead of the whole block inside the image editor
- Try executing edits and applying them
- Ensure the image turns semi-transparent and a loading spinner shows in the image
- Ensure the block now shows your edited image
- Click on the “Crop” icon again
- Click away from the block
- Ensure the block exits “Edit mode”
Add the alt text control to the Featured Category block media settings. (6341)
- Create a new page and add a
Featured Category. - On the block settings go to
Media Settingsand check theAlt texttextarea appears empty. - Add an
alttext, save the block and check it renders on the frontend with the specifiedalttext. - Edit the block again, remove the
alttext and save it. - Check the
altrendered on the frontend corresponds to the category name.
Hide the Product Tag Cloud from the Widgets screen in classic themes. (6327)
- With a classic theme (ie: Storefront), go to Appearance > Widgets.
- Open the block inserter and make sure the Product Tag Cloud (isn't showing up)
Add the alt text control to the Featured Product block media settings. (6308)
- Create a new page and add a
Featured Product. - On the block settings go to
Media Settingsand check theAlt texttextarea appears empty. - Add an
alttext, save the block and check it renders on the frontend with the specifiedalttext. - Edit the block again, remove the
alttext and save it. - Check the
altrendered on the frontend corresponds to the product name.
GridContentControl: Add product image control. (6302)
- Activate a block theme, like Twenty Twenty Two
- Create a new page, and add all the aforementioned, affected blocks (Handpicked Products etc.)
- Hand-picked Products
- Products by Tag
- Products by Attribute
- Products by Category
- Best Selling Products
- Newest Products
- On Sale Products
- Top Rated Products
- Check if the Product image toggle is present under Content
- Verify that the toggle shows/hides product Images both in the editor and the frontend
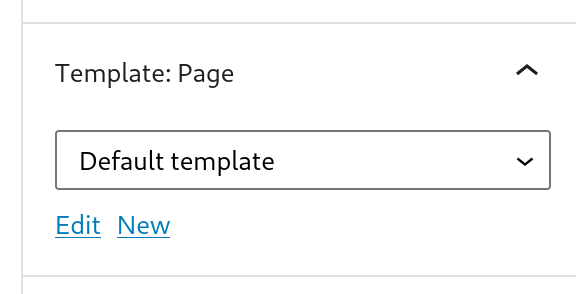
Remove the Template panel from the Setting Sidebar for Shop page. (6366)
- Active Twenty Twenty-Two.
- Make sure WooCommerce is setup (WC pages are installed).
- Edit the Shop Page, don't see the Template panel.
- Edit other pages, see the Template panel as normal.
Parse categories coming from the back-end as a json array. (6358)
- Create two products assigned to two different categories and add one review to each of them.
- Create a new page and add a
Reviews by Categoryblock. - Select only one category on the block (corresponding to one of the previous products/reviews) and save it.
- Check that it renders the expected reviews only on the edit mode.
- Publish the page, go to the frontend and check it renders the same expected reviews.
- Edit the block and select multiple categories.
- Check that it renders the expected reviews only on the edit mode.
- Update the page, go to the frontend and check it renders the same expected reviews.
- Edit again the block and deselect all the categories.
- Check that it renders all the reviews only on the edit mode.
- Update the page, go to the frontend and check it renders also all the reviews.
Fix: Mini Cart block is not available from the Edit template screen. (6351)
- With Twenty Twenty-Two, add the Mini Cart block to the header template part.
- Edit a page using Block Editor.
- From the Page sidebar, edit the template.
- Notice the Mini Cart block works as expected.
Fix Filter Products by Attribute block not working on PHP templates when Filter button was enabled. (6332)
- With a block theme, go to Appearance > Site Editor.
- Go to Templates and edit the Product Catalog template.
- Above the WooCommerce Classic Template block, add the Filter Products by Attribute block (making sure you only have one Filter Products by Attribute block) and set its Filter button attribute to true.
- In the frontend, filter by attribute.
- Verify the page reloads and the filter is applied.
WooCommerce Core Updates
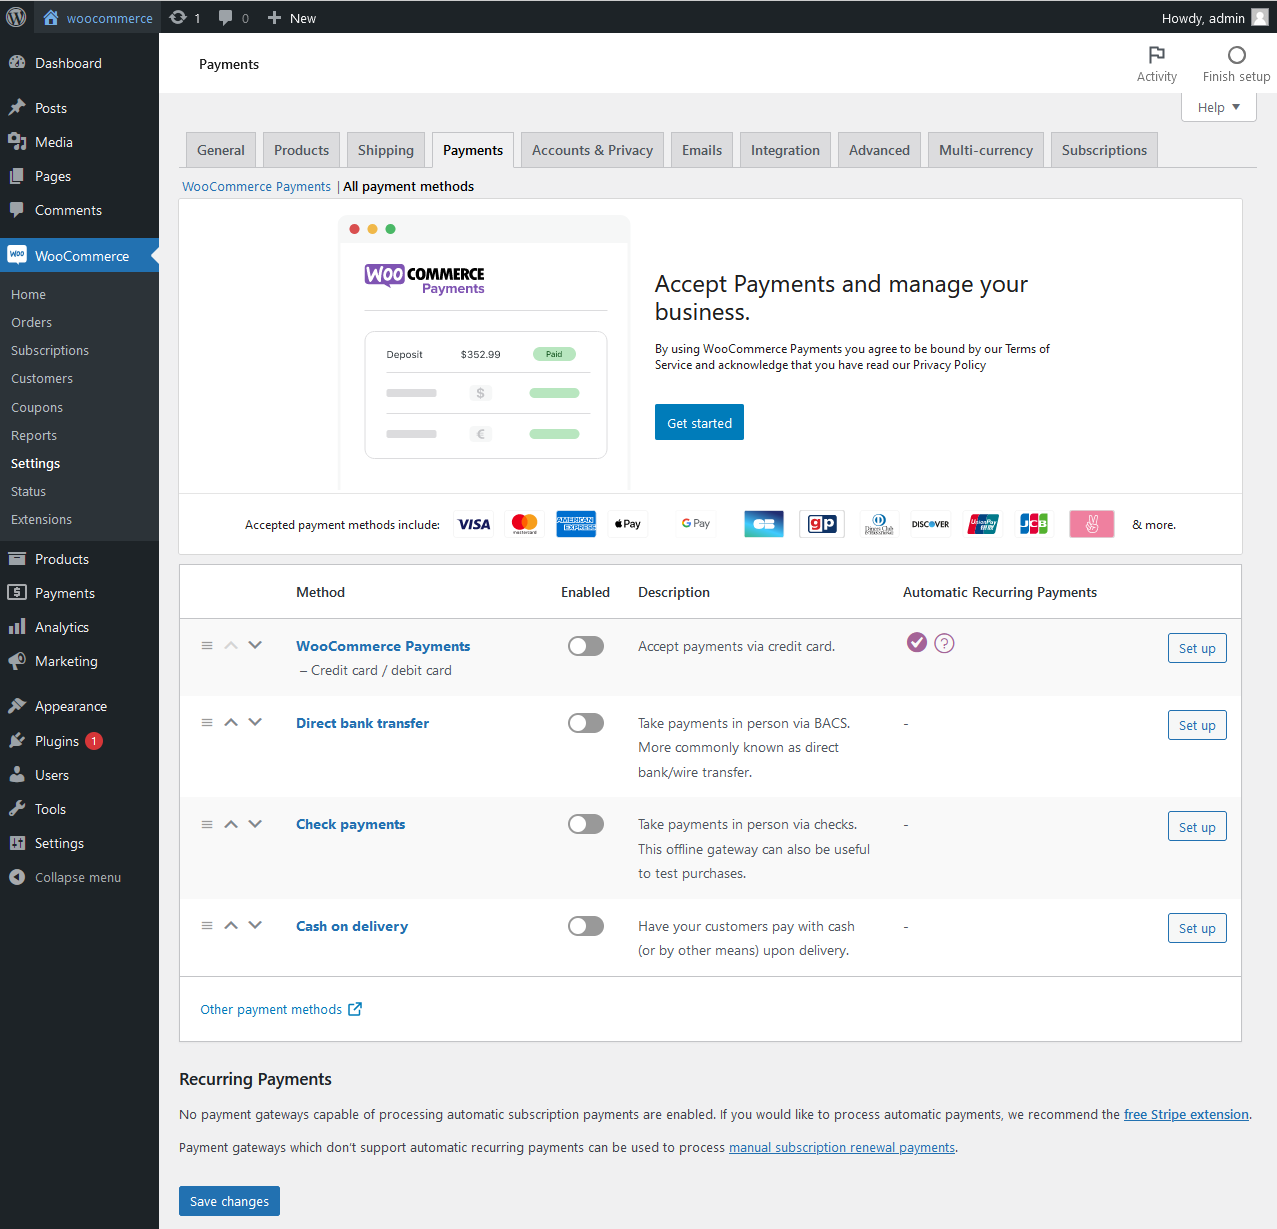
Payments Banner in Settings experiment (#32662, #32697, #33066))
Workflow: WooCommerce Core
- Start with a fresh install of WooCommerce
- Install and activate the latest WooCommerce Test Helper plugin
Scenario 1 WCPay eligible and WCPay not installed -> Should not see the banner
- Navigate to WooCommerce > Settings and Set the store country to an eligible WooCommerce Payments country, such as United States. (List of eligible countries here https://woocommerce.com/document/payments/countries/#section-1).
- Navigate to WooCommerce > Settings and click Payments tab to trigger the experiment check and populate it into our helper plugin.
- Navigate to Tools > WCA Test Helper > Experiments and toggle 'woocommerce_payments_settings_banner_2022_*' to control
- Go back to WooCommerce > Settings > Payments tab.
- WCPay eligible and WCPay not installed -> Should not see the banner

Scenario 2 WCPay ineligible and/or WCPay not installed -> Should not see the banner
- Navigate to WooCommerce > Settings and Set the store country to an ineligible WooCommerce Payments country, such as Norway. (List of eligible countries here https://woocommerce.com/document/payments/countries/#section-1).
- Navigate to WooCommerce > Settings and click Payments tab to trigger the experiment check and populate it into our helper plugin.
- Navigate to Tools > WCA Test Helper > Experiments and toggle 'woocommerce_payments_settings_banner_2022_*' to control
- Go back to WooCommerce > Settings > Payments tab.
- WCPay ineligible and/or WCPay not installed -> Should not see the banner
Scenario 3 WCPay eligible and WCPay installed but setup incomplete and assigned to 'control' -> Should not see the banner
- Navigate to WooCommerce > Settings and Set the store country to an eligible WooCommerce Payments country, such as United States. (List of eligible countries here https://woocommerce.com/document/payments/countries/#section-1).
- Navigate to WooCommerce > Settings and click Payments tab to trigger the experiment check and populate it into our helper plugin.
- Navigate to Tools > WCA Test Helper > Experiments and toggle 'woocommerce_payments_settings_banner_2022_*' to control
- Install and activate the WooCommerce Payments plugin directly using the WordPress plugin screen.
- Go back to WooCommerce > Settings > Payments tab.
- WCPay eligible and WCPay installed but setup incomplete and assigned to 'control' -> Should not see the banner
Scenario 4 WCPay eligible and WCPay installed but setup incomplete and assigned to 'treatment' -> Should see the banner
- Navigate to WooCommerce > Settings and Set the store country to an eligible WooCommerce Payments country, such as United States. (List of eligible countries here https://woocommerce.com/document/payments/countries/#section-1).
- Navigate to WooCommerce > Settings and click Payments tab to trigger the experiment check and populate it into our helper plugin.
- Navigate to Tools > WCA Test Helper > Experiments and toggle 'woocommerce_payments_settings_banner_2022_*' to treatment
- Install and activate the WooCommerce Payments plugin directly using the WordPress plugin screen.
- Go back to WooCommerce > Settings > Payments tab.
- WCPay eligible and WCPay installed but setup incomplete and assigned to 'treatment' -> Should see the banner
Scenario 5 WCPay eligible and WCPay installed but setup incomplete and assigned to 'treatment' -> Should see the banner -> Skip payment welcome screen
- Navigate to WooCommerce > Settings and Set the store country to an eligible WooCommerce Payments country, such as United States. (List of eligible countries here https://woocommerce.com/document/payments/countries/#section-1).
- Navigate to WooCommerce > Settings and click Payments tab to trigger the experiment check and populate it into our helper plugin.
- Navigate to Tools > WCA Test Helper > Experiments and toggle 'woocommerce_payments_settings_banner_2022_*' to treatment
- Install and activate the WooCommerce Payments plugin directly using the WordPress plugin screen.
- Go back to WooCommerce > Settings > Payments tab.
- WCPay eligible and WCPay installed but setup incomplete and assigned to 'treatment' -> Should see the banner
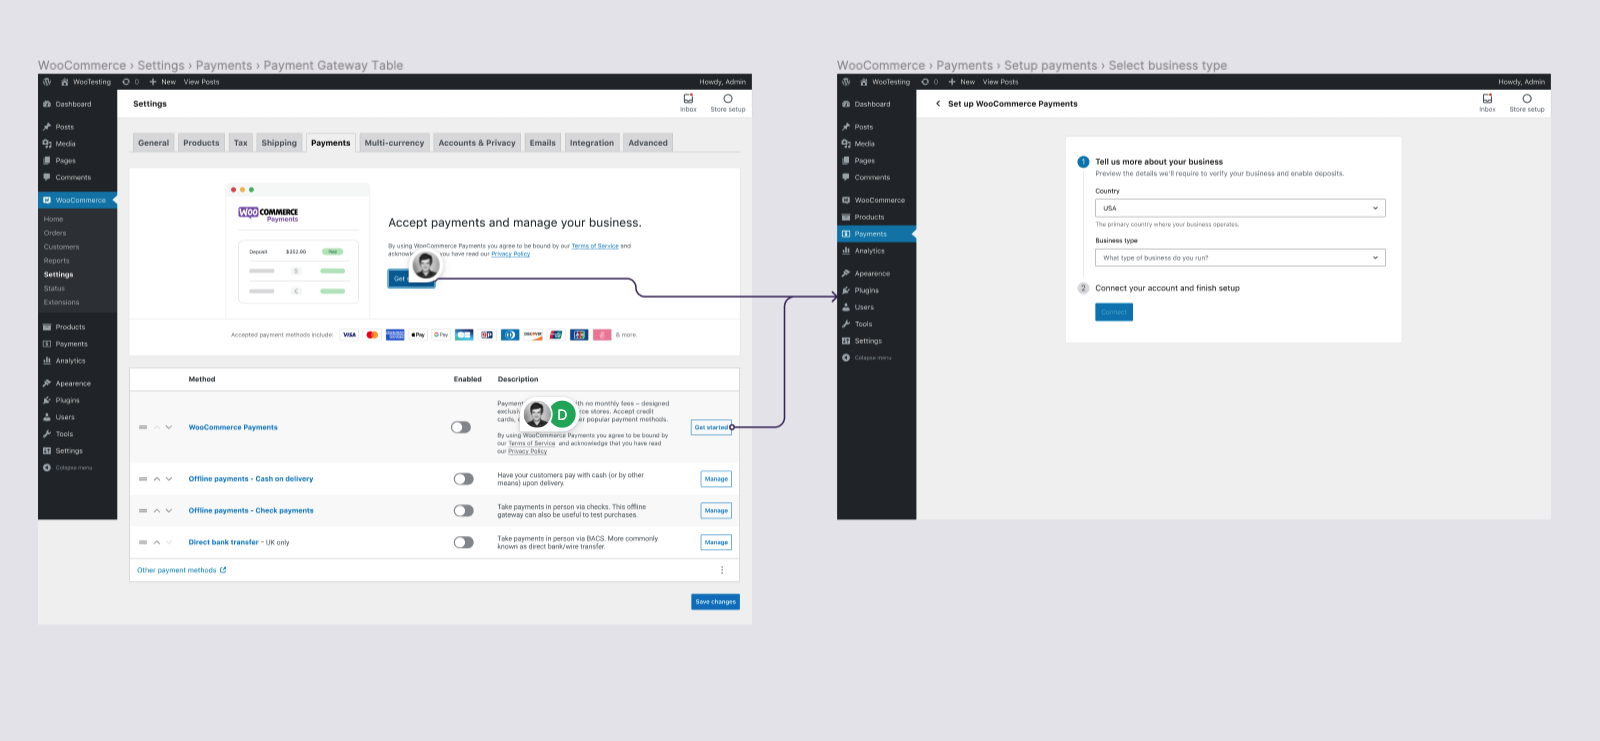
- Click WCPay "Get Started" button in the banner
- Confirm the button redirects you to the WC Pay connect page.
- Go back and Click WCPay "Get Started" button in the payments table
- Confirm the button also redirects you to the WC Pay connect page.
Scenario 6 WCPay eligible and WCPay installed and setup completed and assigned to 'treatment' -> Should not see the banner
- Navigate to WooCommerce > Settings and Set the store country to an eligible WooCommerce Payments country, such as United States. (List of eligible countries here https://woocommerce.com/document/payments/countries/#section-1).
- Navigate to WooCommerce > Settings and click Payments tab to trigger the experiment check and populate it into our helper plugin.
- Navigate to Tools > WCA Test Helper > Experiments and toggle 'woocommerce_payments_settings_banner_2022_*' to treatment
- Install and activate the WooCommerce Payments plugin directly using the WordPress plugin screen. Complete the setup for WooCommerce Payments (Developer mode information here)
- Go back to WooCommerce > Settings > Payments tab.
- WCPay eligible and WCPay installed and setup completed and assigned to 'treatment' -> Should not see the banner
Change wcpay task display logic #32923
Workflow: WooCommerce Core Setup List
Display the wcpay task when WooCommerce Payments is installed during the OBW
- Use a fresh site
- Choose a supported country like US in the
Store Detailsstep - Install WooCommerce Payments in the Business Details / Free Features step.
- Go to
Woocommerce > Home - Observe that
Get paid with WooCommerce Paymentstask is displayed
Display the wcpay task when WooCommerce Payments is installed via Plugins > Add New
- Use a fresh site
- Choose a supported country like US in the
Store Detailsstep - Uncheck WooCommerce Payments in the Business Details / Free Features step.
- Install
WooCommerce PaymentsviaPlugins > Add New - Go to
Woocommerce > Home - Observe that
Get paid with WooCommerce Paymentstask is displayed
Do not display the wcpay task when task list has been completed
- Use a fresh site
- Choose a supported country like US in the
Store Detailsstep - Uncheck WooCommerce Payments in the Business Details / Free Features step.
- Go to
Woocommerce > Home - Complete all tasks
- Install
WooCommerce PaymentsviaPlugins > Add New - Go to
Woocommerce > Home - Observe that
Get paid with WooCommerce Paymentstask is NOT displayed
Product Task experiment (#32941, #32973, #32801, #32779)
Workflow: WooCommerce Core Setup List
Prerequisite
- Start with a fresh install of WooCommerce
- Install and activate the latest WooCommerce Test Helper plugin
- Skip OBW
- Navigate to Tools > WCA Test Helper > Experiments and add
woocommerce_products_task_layout_stackedto treatment - Make sure your site has woocommerce_allow_tracking option set to yes
Test no notice on the empty Products page
- Make sure debug is enabled or use query monitor
- Go to the Products page
- Observe No error/warning notices
Testing control
- Navigate to WooCommerce > Home
- Go to "Add products" task
- Observe the old products task is displayed
Testing card layout
- Go to
Tools > WCA Test Helper > Experiments - Enable treatment for
woocommerce_products_task_layout_card - Navigate to WooCommerce > Home
- Go to "Add products" task
- Observe new products task with card layout

- Add a new product from the available templates Physical product, Digital product, Variable product, Grouped product, External product.
Testing stacked layout
- Go to
Tools > WCA Test Helper > Experiments - Enable treatment for
woocommerce_products_task_layout_stackedand disablewoocommerce_products_task_layout_card - Navigate to WooCommerce > Home
- Go to "Add products" task
- Observe new products task with stacked layout

- Add a new product from the available templates Physical product, Digital product, Variable product, Grouped product, External product.
Add experimental import products task (#32835, #33047)
- Start with a fresh install of WooCommerce
- Install and activate the latest WooCommerce Test Helper plugin
- Navigate to Tools > WCA Test Helper > Experiments and toggle
woocommerce_products_task_layout_stackedto treatment - Make sure your site has woocommerce_allow_tracking option set to yes
- Start OBW.
- Choose Yes, on another platform in the Business Details step.
- Navigate to WoocCommerce -> Home and click Add my products
- You should see the new Import your products

- Check the options work ok
Add experimental sample products task (#32960, #32977, #32815)
Prerequisite
- Start with a fresh install of WooCommerce
- Install and activate the latest WooCommerce Test Helper plugin
- Skip OBW
- Navigate to Tools > WCA Test Helper > Experiments and toggle
woocommerce_products_task_layout_stackedto treatment - Make sure your site has woocommerce_allow_tracking option set to yes
Testing old sample import if not treatment
- Install
WooCommerce Admin Test Helper - Go to
Tools > WCA Test Helper > Experiments - Disable both
woocommerce_products_task_layout_stackedandwoocommerce_products_task_layout_cardexperiment - Make sure there are no products in store (if there are in trash, empty them)
- Go to appearance task
/wp-admin/admin.php?page=wc-admin&task=appearance - Click on "Import products" button
- Go to Products page
- Observe 18 products are imported
Testing sample import under treatment
- Go to
Tools > WCA Test Helper > Experiments - Enable treatment for either
woocommerce_products_task_layout_stackedorwoocommerce_products_task_layout_card - Trash all products & empty trash
- Go to Products task
- Click on "Load sample products"
- Observe that a confirmation dialog is displayed
- Click Import sample products button
- Observe 9 products are imported
Testing fashion sample import under treatment
- Go to
Tools > WCA Test Helper > Experiments - Enable treatment for either
woocommerce_products_task_layout_stackedorwoocommerce_products_task_layout_card - Trash all products & empty trash
- Go to Products task
- Click on "Load sample products"
- Observe that a confirmation dialog is displayed
- Click Import sample products button
- Observe 9 fashion products are imported
Add WooCommerce > Subscriptions admin menu item and empty state offer screen #32957
Workflow: WooCommerce Core
- Start with a fresh install of WooCommerce
- Install and activate the latest WooCommerce Test Helper plugin
- Plugin eligibility: Ensure the following plugins are not installed at all:
- WooCommerce Subscriptions
- WooCommerce Payments
- Sumo Subscriptions
- Yith Subscriptions
- Subscripto
- Subscriptions For WooCommerce
- Store tracking eligibility: Your store allows tracking.
- This checkbox should be checked: WooCommerce → Settings → Advanced → WooCommerce.com → Enable tracking.
- Store location eligibility: For the menu item to be displayed your store needs to based in the US.
- Go to WooCommerce > Settings and make sure your store is set to a US based address.
- Store age criteria: To view the subscription menu item your store will need to have been active for more than 6 months - we're testing this experiment on established stores. If your store doesn't meet this criteria, you can use the following code snippet with the code snippet plugin:
update_option( 'woocommerce_admin_install_timestamp', strtotime( '-6 month' ) );- or change the
woocommerce_admin_install_timestampoption to1620866357(timestamp from ~1 year ago) via the/wp-admin/options.phppage.
- Paid order criteria: Only stores with at least 1 order in the last 30 days are eligible. If your store doesn't have an order in the last 30 days. Either:
- Set any existing pending or failed order to processing or completed
- If you don't have any order at all, you can just manually create one in WooCommerce > Orders > Add new and set it to processing or completed status
- If you meet all the criteria above you should see a WooCommerce > Subscriptions (new) menu item.
- View the WooCommerce > Subscriptions (new) page.
- The 'new' badge should disappear on subsequent page loads.

The error scenario
If an error occurs during plugin installation and activation an error message will be displayed directing the user to install the WooCommerce Payments plugin manually.
To test this flow:
- Add the following code snippet to your site.
- Go to WooCommerce -> Subscriptions
- Click "Get started"
- An error should occur installing the plugin. See example below.
define( 'DISALLOW_FILE_MODS', true );

❗Note: The link takes the user to the WooCommerce Payments wp.org page.
The success scenario
- Go to WooCommerce > Subscriptions
- Click "Get started"
- WooCommerce Payments will be installed and activated in the background
- Once complete, you will be directed to the “Add new product” page or to the WCPay onboarding flow depending on which experiment treatment you were assigned to. Please see the "Testing the treatments" section below for more instructions.
The dismiss scenario
- Go to WooCommerce > Subscriptions
- Click "No thanks"
- You should be redirected to the WooCommerce > Home screen and the subscriptions menu item should no longer be displayed.
Note: If you need to bring the menu item back, delete or change the woocommerce-wcpay-subscriptions_dismissed wp option.
Testing the treatments
Download, install and activate the WooCommerce Admin Test Helper plugin.
Navigate to Tools → WCA Test Helper → Experiments. This page should contain a row for the "woocommerce_wcpay_subscriptions_page_202207_v1" experiment.
Here you can toggle between the control (treatment A) and the treatment (treatment B).
Treatment A
- Toggle to the control experience from Tools → WCA Test Helper → Experiments.
- Navigate to WooCommerce → Subscriptions.
- Observe the following step headers in the "You’re only steps away from selling subscriptions" section.
- Create a subscription
- Create and connect your account
- Provide a few business details
- Click the "Get started" button.
- The WooCommerce Payments plugin will be installed & activated and you will be redirected to the “Add new product” page.
Treatment B
- Toggle to the treatment experience from Tools → WCA Test Helper → Experiments.
- Navigate to WooCommerce → Subscriptions.
- Observe the following step headers in the "You’re only steps away from selling subscriptions" section.
- Create and connect your account
- Provide a few business details
- Create subscriptions
- Click the "Get started" button.
- The WooCommerce Payments plugin will be installed & activated and you will be redirected to the WCPay onboarding flow.
Update add product task to only show "subscriptions" product type for stores in the US #33068
Workflow: WooCommerce Core Setup List
- Start with a fresh install of WooCommerce
- Install and activate the latest WooCommerce Test Helper plugin
- Navigate to Tools > WCA Test Helper > Experiments and toggle
woocommerce_products_task_layout_stackedto treatment - Make sure your site has
woocommerce_allow_trackingoption set toyes - Go to OBW
- Set
Countryto the US - Select "Subscriptions" in the
Product Typesstep. - Navigate to
WooCommerce > Home - Go to "Add products" task
- Observe that the subscriptions product type is shown
- Go to
woocommmerce > Settings - Change
Country / Stateto another country. - Go back to "Add products" task
- Observe that the subscriptions product type is hidden.
Add TikTok marketing task #32850
Workflow: WooCommerce Core Setup List
- Start with a fresh install of WooCommerce
- Skip OBW
- Navigate to WooCommerce > Settings > Advanced > woocommerce.com.
- Disable (untick) Enable tracking and Show Suggestions.
- Navigate to WooCommerce > Home and begin the Set up marketing tools task.
- Confirm the TikTok plugin is listed under GROW YOUR STORE

- Go back to OBW and change the store country to that is not one of in the list. for example Brunei.
- Go back to the marketing task and confirm the plugin is no longer visible.
- Go back to OBW and change the store country back.
- Go back to the marketing task and click GET STARTED for the TikTok plugin. Make sure the plugin gets installed without any errors.
Adding badge to legacy admin menu to indicate remaining onboarding tasks #32611
Workflow: WooCommerce Core Setup List
- Start with a fresh install of WooCommerce
- Notice that no badge is displayed before completing any tasks (Unless one is auto-completed, which is true for at least one of the experiments)
- Complete the setup wizard, and notice that the badge is now displayed indicated remaining tasks

- Complete a couple other tasks, notice that the badge is updated properly. (don't complete all of them)
- Hide the task list, and notice that the badge disappears
- Display the task list again through Help -> Setup Wizard -> Task List -> Enable
- Notice badge reappears
- Complete the setup task list.
- Notice the badge now disappears again.
Update react-dates to 21.8.0 #32954
_Workflow: WooCommerce Admin
- Navigate to Analytics -> Overview
- Click Date range: and make sure the date range works as expected.
Remove memoize-one from woo admin & update it to ^6.0.0 for woo components #32936
Workflow: WooCommerce Admin
- Go to Analytics > Overview
- Confirm that all charts should be rendered without errors.
Allow removal of all zone regions from a shipping zone #32828
Workflow: WooCommerce Core
- Go to WC > Settings > Shipping.
- Give it a name and choose a region.
- Save changes.
- Remove all the zone regions and click "Save Changes" again.
- Confirm that changes are saved correctly.
Mark marketing task as complete when an extension is installed #32630
Workflow: WooCommerce Core Setup List
- In a brand new store, go through the OBW, and in step 4 (Business Details), go to
Free featuresand install theMailPoetextension. - Finish the OBW.
- Go to the
Homescreen and verify that the marketing task is marked as completed. - Delete the
MailPoetextension. - Verify that the marketing task is not marked as completed now.
Remove WCAdmin deactivation note #33028
Workflow: WooCommerce Admin
- In a fresh site, install & activate WooCommerce 6.4.1
- Install & activate WooCommerce Admin 3.2.1
- Go to Home > WooCommerce
- Observe the note "Deactivate old WooCommerce Admin version" exists

- Upgrade to WooCommerce 6.6
- Observe the note is removed after upgrade and WooCommerce Admin has been deactivated
Fix get_options function deprecation notice in WC 6.5 RC #32891
Workflow: WooCommerce Core
- Go to WooCommerce > Settings
- Confirm no deprecation notice in the PHP error log -
The Automattic\WooCommerce\Admin\API\Options::get_options function is deprecated since version 3.1
Use the price decimal separator to format product weight and dimensions #32746
Workflow: WooCommerce Core
- Set your thousand separator as a dot (.) and decimal separator as a comma (,):

- Edit a product or create a new, and try to add a dot as decimal in the weight and any of dimensions fields (you shouldn't be able to):

- Save your changes and check if they're still using the comma as separator:

- Set your thousand separator as a comma (,) and decimal separator as a dot (.) and check if the weight and dimensions values follows your new settings:

- Now, the warning will appear if you try to use a comma instead:

Fix progress header title #32786
Workflow: WooCommerce Core Setup List
- Start with a fresh install
- Install and activate the latest WooCommerce Test Helper plugin
- Navigate to Tools > WCA Test Helper > Experiments and toggle
woocommerce_tasklist_setup_experiment_2_2022_*to treatment. - Navigate to WooCommerce > Home, start the onboarding wizard, and press skip.
- The progress header should show up with a
Welcome to <site name>above the task list. - Now start and finish the OBW.
- The progress header should stay the same.
- Finish another task.
- Now the progress header should say
Let's get you started :rocket:. - Finish all the tasks.
- The message
You've completed store setupwill be visible. - Refresh the page or select
Show setup task listin the kebab menu. - Now the progress header should show:
Welcome to <site name>.
Add Preview store button to Home screen #32739
Workflow: WooCommerce Admin
- Go to the Home screen and verify the
Preview storebutton is visible in the Activity panel.
- Press the button.
- The store's URL should be opened in a new tab.
Cleanup and fix translation path changes #33226
Workflow: WooCommerce Admin
- Install Woocommerce and set the site language to a language with good translation coverage such as French (France) or German Go to: Dashboard > Settings > General and change the Site language. Go to: Dashboard > Updates and click on the button to update translations
- Check that translations are working, both in the onboarding wizard and analytics screens


Add check for post_types key #33180
_Workflow: WooCommerce Blocks
- Install and active
Quadrattheme. https://en-gb.wordpress.org/themes/quadrat/ - Go on the page for adding a product (
/wp-admin/post-new.php?post_type=product) - Be sure that it is not raised the warning:
Warning: in_array() expects parameter 2 to be array, null given in /plugins/woocommerce/includes/admin/class-wc-admin-meta-boxes.php on line 279